Jennika Knit Slouch Hat
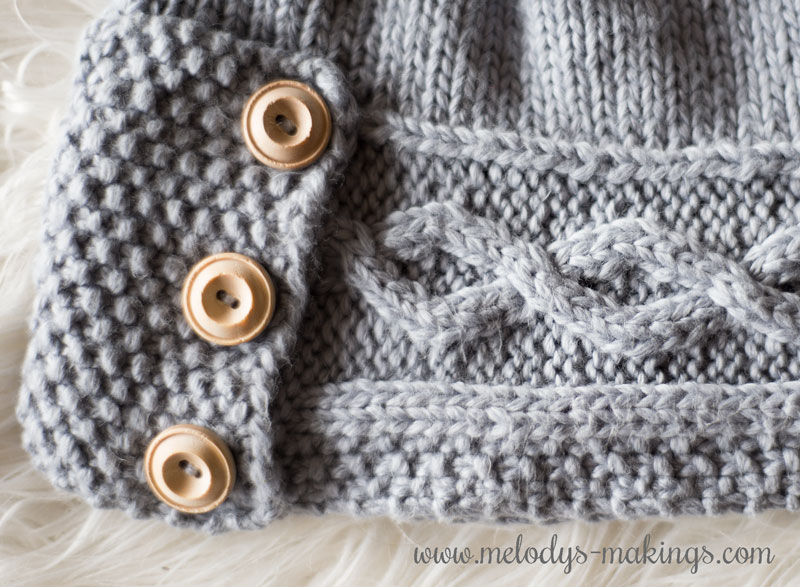
This slouchy hat knitting pattern features stunning cables worked as a horizontal band to start the hat off. With a seed stitch overlap that buttons together, it has some really eye catching features to it. Once you’ve completed the cabled band using Straight Needles, you’ll pick up stitches along the top of it to complete the slouchy top of the hat.

I made this knit slouch hat about 7 years ago now, and it is still one of my absolute favorite hats to wear. Every time I do, I get compliments, and it is really fun to watch the surprise in my friends when I reply, “Thank you! I made it.”
Plus, I also have a free pattern for matching mittens to this design… so if you’d like a full matching set, this project is perfect for you. Get the Jennika Mittens Knitting Pattern on my blog here.
If you crochet, you can check out the Crochet Jennika Slouch Hat Pattern on my blog here.
Please Pay With A Share!
1. Head over to Ravelry, add this knit slouchy hat pattern to your favorites and queue the pattern listing. This is a great way to help designers connect with new customers, and we always super appreciate you taking that extra moment!
You’ll find the Ravelry listing here.
2. Share this blog post with your crafty friends. Please use the handy social sharing buttons at the bottom of this post so your crafty friends can take advantage of this free pattern too.
Not a Fan of Ads?
No worries! Help support this blog and get an ad-free PDF copy of this pattern for just $5.50!
You’ll find this slouchy knit hat pattern available on Etsy here.
You’ll find this knit slouchy hat pattern available on Ravelry here.
Average Head Circumference:
Materials:
● Yarn: Approximately 75-200 yards of Worsted (4) yarn
**Yarn requirements are estimates only**
(I used Jupiter Moon Farm’s Cumulus for mine.)
● Knitting Needles: Size 5.5mm (US 9) Double Pointed Needles (or use the Magic Loop Method) and Cable Needle (or whatever size is needed to achieve gauge) and Straight Needles Double Pointed Needles (or use the Magic Loop Method) one size smaller than the size you achieve gauge with
● Yarn or Tapestry Needle
● 3 .75-1” (2.5cm) buttons
Abbreviations:
● K: Knit
● P: Purl
●M1 (Make 1): On a knit row: Insert left needle, front to back, under the strand between st on left needle and st on right needle making a new loop on left needle. Knit this loop through the back.
● C4B: Cable 4 Back: Slip next 2 sts onto cable needle, and hold in back of work, K2, then K2 from the cable needle.
● C4F: Cable 4 Front: Slip next 2 sts onto cable needle, and hold in front of work, K2, then K2 from the cable needle.
● T3F: Twist 3 Front: Slip next 2 sts onto cable needle, and hold in front of work, P1, then K2 from the cable needle. (Also called T3L)
● T3B: Twist 3 Back: Slip next stitch onto cable needle, and hold in back of work, K2, then K1 from the cable needle. (Also called T3R)
●**: Repeat the section in between the two stars as specified
Gauge:
9 sts and 13 rows = 2 inches (5 centimeters) in Stockinette Stitch
***It is important to check your gauge!***
Jennika Slouch Hat Knitting Pattern
Toddler Pattern:
Brim Pattern
Cast on 20 sts onto Straight Needles
Row 1: *P1, K1* Repeat across
Row 2: *K1, P1* Repeat across
Repeat Rows 1&2 until your project measures approx. 2 inches (5cm) in length from the cast on edge.
Row 3: (Right Side) K2, P1, T3F, P4, T3B, P1, K2, *P1, K1* Repeat once (20 total sts)
Row 4: *K1, P1* Repeat once, P2, K2, P2, K4, P2, K2, P2
Row 5: K2, P2, T3F, P2, T3B, P2, K2, *P1, K1* Repeat once
Row 6: *K1, P1* Repeat once, P2, K3, P2, K2, P2, K3, P2
Row 7: K2, P3, T3F, T3B, P3, K2, *P1, K1* Repeat once
Row 8: *K1, P1* Repeat once, P2, K4, P4, K4, P2
Row 9: K2, P4, C4B, P4, K2, *P1, K1* Repeat once
Row 10: *K1, P1* Repeat once, P2, K4, P4, K4, P2
Row 11: K2, P3, T3B, T3F, P3, K2, *P1, K1* Repeat once
Row 12: *K1, P1* Repeat once, P2, K3, P2, K2, P2, K3, P2
Row 13: K2, P2, T3B, P2, T3F, P2, K2, *P1, K1* Repeat once
Row 14: *K1, P1* Repeat once, P2, K2, P2, K4, P2, K2, P2
Row 15: K2, P1, T3B, P4, T3F, P1, K2, *P1, K1* Repeat once
Row 16: *K1, P1* Repeat once, P2, K1, P2, K6, P2, K1, P2
Row 17: K2, P1, T3F, P4, T3B, P1, K2, *P1, K1* Repeat once
Row 18: *K1, P1* Repeat once, P2, K2, P2, K4, P2, K2, P2
Row 19: K2, P2, T3F, P2, T3B, P2, K2, *P1, K1* Repeat once
Row 20: *K1, P1* Repeat once, P2, K3, P2, K2, P2, K3, P2
Row 21: K2, P3, T3F, T3B, P3, K2, *P1, K1* Repeat once
Row 22: *K1, P1* Repeat once, P2, K4, P4, K4, P2
Row 23: K2, P4, C4B, P4, K2, *P1, K1* Repeat once
Row 24: *K1, P1* Repeat once, P2, K4, P4, K4, P2
Repeat Rows 11-24 until your project measures approx. 18 inches (45.75cm) in length from the cast on edge. End after a repeat of Row 24. It’s better for your project to measure less than 18 inches (instead of more) if your measurements don’t line up perfectly.
Row 25: *P1, K1* Repeat across
Row 26: *K1, P1* Repeat across
Repeat Rows 25&26 until your project measures approx. 20 inches (50.75cm) in length from the cast on edge.
Bind off as if to knit (this edge will be hidden). Secure and weave in all ends.
Body of Hat
Working across the long side of the rectangle you just made, evenly pick up and knit 81 sts onto this edge. Leave 2 inches (5cm) with no sts at the Row 1/long side corner with the right side of the brim (side showing cables) facing you. Start your sts after this section (the seed stitch section) so you can fold this over the other side later.
Join in the round and place stitch marker. (Right side with cables should be facing)
Round 1: Knit
Repeat Round 1 until your project measures approx. 7 inches (17.75cm) in length from the bottom edge (the side you haven’t picked up sts on) of the brim.
Decreases:
Round 1: *K2tog, K7* Repeat around (72 total sts)
Round 2: *K2tog, K6* Repeat around (63 total sts)
Round 3: *K2tog, K5* Repeat around (54 total sts)
Round 4: *K2tog, K4* Repeat around (45 total sts)
Round 5: *K2tog, K3* Repeat around (36 total sts)
Round 6: *K2tog, K2* Repeat around (27 total sts)
Round 7: *K2tog, K1* Repeat around (18 total sts)
Round 8: *K2tog* Repeat around (9 total sts)
Do not bind off. Cut approx. 7 inch tail. Using yarn needle, remove all sts from DPNs or magic loop, as if to purl. Pull tail through sts to cinch the top of hat. Using yarn needle, pull tail through to the inside of the hat. Tie a knot and weave in ends.
Fold the extra 2 inches of brim over on top of the 2 inches of seed stitch section on the opposite side. Add one 1 inch (2.5cm) button to hold this flap in place.
Child Pattern:
Brim Pattern
Cast on 20 sts onto Straight Needles
Row 1: *P1, K1* Repeat across
Row 2: *K1, P1* Repeat across
Repeat Rows 1&2 until your project measures approx. 2 inches (5cm) in length from the cast on edge.
Row 3: (Right Side) K2, P1, T3F, P4, T3B, P1, K2, *P1, K1* Repeat once (20 total sts)
Row 4: *K1, P1* Repeat once, P2, K2, P2, K4, P2, K2, P2
Row 5: K2, P2, T3F, P2, T3B, P2, K2, *P1, K1* Repeat once
Row 6: *K1, P1* Repeat once, P2, K3, P2, K2, P2, K3, P2
Row 7: K2, P3, T3F, T3B, P3, K2, *P1, K1* Repeat once
Row 8: *K1, P1* Repeat once, P2, K4, P4, K4, P2
Row 9: K2, P4, C4B, P4, K2, *P1, K1* Repeat once
Row 10: *K1, P1* Repeat once, P2, K4, P4, K4, P2
Row 11: K2, P3, T3B, T3F, P3, K2, *P1, K1* Repeat once
Row 12: *K1, P1* Repeat once, P2, K3, P2, K2, P2, K3, P2
Row 13: K2, P2, T3B, P2, T3F, P2, K2, *P1, K1* Repeat once
Row 14: *K1, P1* Repeat once, P2, K2, P2, K4, P2, K2, P2
Row 15: K2, P1, T3B, P4, T3F, P1, K2, *P1, K1* Repeat once
Row 16: *K1, P1* Repeat once, P2, K1, P2, K6, P2, K1, P2
Row 17: K2, P1, T3F, P4, T3B, P1, K2, *P1, K1* Repeat once
Row 18: *K1, P1* Repeat once, P2, K2, P2, K4, P2, K2, P2
Row 19: K2, P2, T3F, P2, T3B, P2, K2, *P1, K1* Repeat once
Row 20: *K1, P1* Repeat once, P2, K3, P2, K2, P2, K3, P2
Row 21: K2, P3, T3F, T3B, P3, K2, *P1, K1* Repeat once
Row 22: *K1, P1* Repeat once, P2, K4, P4, K4, P2
Row 23: K2, P4, C4B, P4, K2, *P1, K1* Repeat once
Row 24: *K1, P1* Repeat once, P2, K4, P4, K4, P2
Repeat Rows 11-24 until your project measures approx. 19 inches (48.25cm) in length from the cast on edge. End after a repeat of Row 24. It’s better for your project to measure less than 19 inches (instead of more) if your measurements don’t line up perfectly.
Row 25: *P1, K1* Repeat across
Row 26: *K1, P1* Repeat across
Repeat Rows 25&26 until your project measures approx. 21 inches (53.25cm) in length from the cast on edge.
Bind off as if to knit (this edge will be hidden). Secure and weave in all ends.
Body of Hat
Working across the long side of the rectangle you just made, evenly pick up and knit 85 sts onto this edge. Leave 2 inches (5cm) with no sts at the Row 1/long side corner with the right side of the brim (side showing cables) facing you. Start your sts after this section (the seed stitch section) so you can fold this over the other side later.
Join in the round and place stitch marker. (Right side with cables should be facing)
Round 1: Knit
Repeat Round 1 until your project measures approx. 7.5 inches (19cm) in length from the bottom edge (the side you haven’t picked up sts on) of the brim.
Decreases:
Round 1: *K2tog, K7* Repeat to last 4 sts, K4 (76 total sts)
Round 2: *K2tog, K6* Repeat to last 4 sts, K4 (67 total sts)
Round 3: *K2tog, K5* Repeat to last 4 sts, K4 (58 total sts)
Round 4: *K2tog, K4* Repeat to last 4 sts, K4 (49 total sts)
Round 5: *K2tog, K3* Repeat to last 4 sts, K4 (40 total sts)
Round 6: *K2tog, K2* Repeat to last 4 sts, K4 (31 total sts)
Round 7: *K2tog, K1* Repeat to last 4 sts, K4 (22 total sts)
Round 8: *K2tog* Repeat around (11 total sts)
Do not bind off. Cut approx. 7 inch tail. Using yarn needle, remove all sts from DPNs or magic loop, as if to purl. Pull tail through sts to cinch the top of hat. Using yarn needle, pull tail through to the inside of the hat. Tie a knot and weave in ends.
Fold the extra 2 inches of brim over on top of the 2 inches of seed stitch section on the opposite side. Add one 1 inch (2.5cm) button to hold this flap in place.
Teen/Small Adult Pattern
Brim Pattern
Cast on 20 sts onto Straight Needles
Row 1: *P1, K1* Repeat across
Row 2: *K1, P1* Repeat across
Repeat Rows 1&2 until your project measures approx. 2 inches (5cm) in length from the cast on edge.
Row 3: (Right Side) K2, P1, T3F, P4, T3B, P1, K2, *P1, K1* Repeat once (20 total sts)
Row 4: *K1, P1* Repeat once, P2, K2, P2, K4, P2, K2, P2
Row 5: K2, P2, T3F, P2, T3B, P2, K2, *P1, K1* Repeat once
Row 6: *K1, P1* Repeat once, P2, K3, P2, K2, P2, K3, P2
Row 7: K2, P3, T3F, T3B, P3, K2, *P1, K1* Repeat once
Row 8: *K1, P1* Repeat once, P2, K4, P4, K4, P2
Row 9: K2, P4, C4B, P4, K2, *P1, K1* Repeat once
Row 10: *K1, P1* Repeat once, P2, K4, P4, K4, P2
Row 11: K2, P3, T3B, T3F, P3, K2, *P1, K1* Repeat once
Row 12: *K1, P1* Repeat once, P2, K3, P2, K2, P2, K3, P2
Row 13: K2, P2, T3B, P2, T3F, P2, K2, *P1, K1* Repeat once
Row 14: *K1, P1* Repeat once, P2, K2, P2, K4, P2, K2, P2
Row 15: K2, P1, T3B, P4, T3F, P1, K2, *P1, K1* Repeat once
Row 16: *K1, P1* Repeat once, P2, K1, P2, K6, P2, K1, P2
Row 17: K2, P1, T3F, P4, T3B, P1, K2, *P1, K1* Repeat once
Row 18: *K1, P1* Repeat once, P2, K2, P2, K4, P2, K2, P2
Row 19: K2, P2, T3F, P2, T3B, P2, K2, *P1, K1* Repeat once
Row 20: *K1, P1* Repeat once, P2, K3, P2, K2, P2, K3, P2
Row 21: K2, P3, T3F, T3B, P3, K2, *P1, K1* Repeat once
Row 22: *K1, P1* Repeat once, P2, K4, P4, K4, P2
Row 23: K2, P4, C4B, P4, K2, *P1, K1* Repeat once
Row 24: *K1, P1* Repeat once, P2, K4, P4, K4, P2
Repeat Rows 11-24 until your project measures approx. 20 inches (50.75cm) in length from the cast on edge. End after a repeat of Row 24. It’s better for your project to measure less than 20 inches (instead of more) if your measurements don’t line up perfectly.
Row 25: *P1, K1* Repeat across
Row 26: *K1, P1* Repeat across
Repeat Rows 25&26 until your project measures approx. 22 inches (55.75cm) in length from the cast on edge.
Bind off as if to knit (this edge will be hidden). Secure and weave in all ends.
Body of Hat
Working across the long side of the rectangle you just made, evenly pick up and knit 90 sts onto this edge. Leave 2 inches (5cm) with no sts at the Row 1/long side corner with the right side of the brim (side showing cables) facing you. Start your sts after this section (the seed stitch section) so you can fold this over the other side later.
Join in the round and place stitch marker. (Right side with cables should be facing)
Round 1: Knit
Repeat Round 1 until your project measures approx. 8 inches (20.25cm) in length from the bottom edge (the side you haven’t picked up sts on) of the brim.
Decreases:
Round 1: *K2tog, K8* Repeat around (81 total sts)
Round 2: *K2tog, K7* Repeat around (72 total sts)
Round 3: *K2tog, K6* Repeat around (63 total sts)
Round 4: *K2tog, K5* Repeat around (54 total sts)
Round 5: *K2tog, K4* Repeat around (45 total sts)
Round 6: *K2tog, K3* Repeat around (36 total sts)
Round 7: *K2tog, K2* Repeat around (27 total sts)
Round 8: *K2tog, K1* Repeat around (18 total sts)
Round 9: *K2tog* Repeat around (9 total sts)
Do not bind off. Cut approx. 7 inch tail. Using yarn needle, remove all sts from DPNs or magic loop, as if to purl. Pull tail through sts to cinch the top of hat. Using yarn needle, pull tail through to the inside of the hat. Tie a knot and weave in ends.
Fold the extra 2 inches of brim over on top of the 2 inches of seed stitch section on the opposite side. Add one 1 inch (2.5cm) button to hold this flap in place.
Adult Pattern
Brim Pattern
Cast on 20 sts onto Straight Needles
Row 1: *P1, K1* Repeat across
Row 2: *K1, P1* Repeat across
Repeat Rows 1&2 until your project measures approx. 2 inches (5cm) in length from the cast on edge.
Row 3: (Right Side) K2, P1, T3F, P4, T3B, P1, K2, *P1, K1* Repeat once (20 total sts)
Row 4: *K1, P1* Repeat once, P2, K2, P2, K4, P2, K2, P2
Row 5: K2, P2, T3F, P2, T3B, P2, K2, *P1, K1* Repeat once
Row 6: *K1, P1* Repeat once, P2, K3, P2, K2, P2, K3, P2
Row 7: K2, P3, T3F, T3B, P3, K2, *P1, K1* Repeat once
Row 8: *K1, P1* Repeat once, P2, K4, P4, K4, P2
Row 9: K2, P4, C4B, P4, K2, *P1, K1* Repeat once
Row 10: *K1, P1* Repeat once, P2, K4, P4, K4, P2
Row 11: K2, P3, T3B, T3F, P3, K2, *P1, K1* Repeat once
Row 12: *K1, P1* Repeat once, P2, K3, P2, K2, P2, K3, P2
Row 13: K2, P2, T3B, P2, T3F, P2, K2, *P1, K1* Repeat once
Row 14: *K1, P1* Repeat once, P2, K2, P2, K4, P2, K2, P2
Row 15: K2, P1, T3B, P4, T3F, P1, K2, *P1, K1* Repeat once
Row 16: *K1, P1* Repeat once, P2, K1, P2, K6, P2, K1, P2
Row 17: K2, P1, T3F, P4, T3B, P1, K2, *P1, K1* Repeat once
Row 18: *K1, P1* Repeat once, P2, K2, P2, K4, P2, K2, P2
Row 19: K2, P2, T3F, P2, T3B, P2, K2, *P1, K1* Repeat once
Row 20: *K1, P1* Repeat once, P2, K3, P2, K2, P2, K3, P2
Row 21: K2, P3, T3F, T3B, P3, K2, *P1, K1* Repeat once
Row 22: *K1, P1* Repeat once, P2, K4, P4, K4, P2
Row 23: K2, P4, C4B, P4, K2, *P1, K1* Repeat once
Row 24: *K1, P1* Repeat once, P2, K4, P4, K4, P2
Repeat Rows 11-24 until your project measures approx. 21 inches (53.25cm) in length from the cast on edge. End after a repeat of Row 24. It’s better for your project to measure less than 21 inches (instead of more) if your measurements don’t line up perfectly.
Row 25: *P1, K1* Repeat across
Row 26: *K1, P1* Repeat across
Repeat Rows 25&26 until your project measures approx. 23 inches (58.5cm) in length from the cast on edge.
Bind off as if to knit (this edge will be hidden). Secure and weave in all ends.
Body of Hat
Working across the long side of the rectangle you just made, evenly pick up and knit 94 sts onto this edge. Leave 2 inches (5cm) with no sts at the Row 1/long side corner with the right side of the brim (side showing cables) facing you. Start your sts after this section (the seed stitch section) so you can fold this over the other side later.
Join in the round and place stitch marker. (Right side with cables should be facing)
Round 1: Knit
Repeat Round 1 until your project measures approx. 8.5 inches (21.5cm) in length from the bottom edge (the side you haven’t picked up sts on) of the brim.
Decreases:
Round 1: *K2tog, K8* Repeat to last 4 sts, K4 (85 total sts)
Round 2: *K2tog, K7* Repeat to last 4 sts, K4 (76 total sts)
Round 3: *K2tog, K6* Repeat to last 4 sts, K4 (67 total sts)
Round 4: *K2tog, K5* Repeat to last 4 sts, K4 (58 total sts)
Round 5: *K2tog, K4* Repeat to last 4 sts, K4 (49 total sts)
Round 6: *K2tog, K3* Repeat to last 4 sts, K4 (40 total sts)
Round 7: *K2tog, K2* Repeat to last 4 sts, K4 (31 total sts)
Round 8: *K2tog, K1* Repeat to last 4 sts, K4 (22 total sts)
Round 9: *K2tog* Repeat around (11 total sts)
Do not bind off. Cut approx. 7 inch tail. Using yarn needle, remove all sts from DPNs or magic loop, as if to purl. Pull tail through sts to cinch the top of hat. Using yarn needle, pull tail through to the inside of the hat. Tie a knot and weave in ends.
Fold the extra 2 inches of brim over on top of the 2 inches of seed stitch section on the opposite side. Add one 1 inch (2.5cm) button to hold this flap in place.
This design, a written work and images are a copyright of ©MelodysMakings and may not be copied or reproduced in any way. You have permission to sell finished products made from this pattern, but please leave a link to my website, www.melodys-makings.com, in your product listing specifying that I am the designer of this pattern. Thank you for supporting me as a work at home mother!