Jennika Crochet Slouch Hat
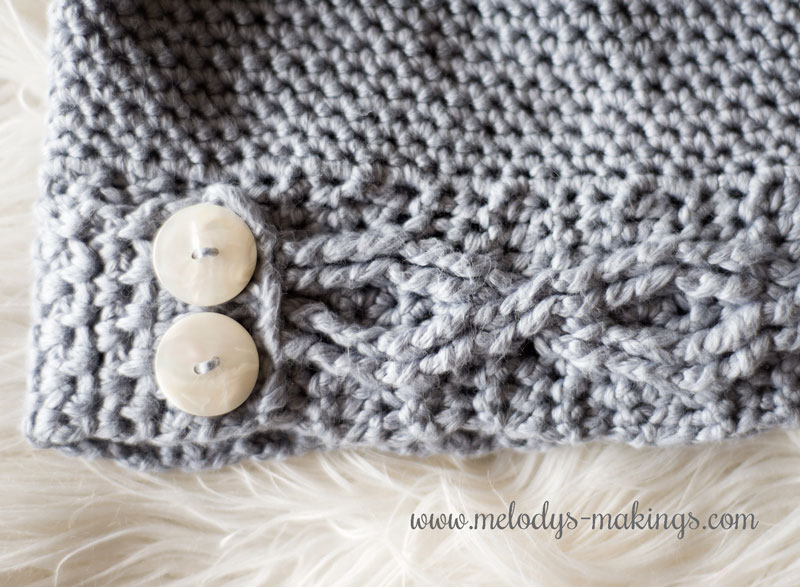
This slouchy hat crochet pattern features stunning cables worked as a horizontal band to start the hat off. With a moss stitch overlap that buttons together, it has some really eye catching features to it. Once you’ve completed the cabled band, you’ll pick up stitches along the top of it to complete the slouchy top of the hat.

Plus, I also have a free pattern for matching mittens to this design… so if you’d like a full matching set, this project is perfect for you. Get the Jennika Mittens Crochet Pattern on my blog here.
If you knit, you can check out the Jennika Slouch Hat Knitting Pattern on my blog here.
Please Pay With A Share!
1. Head over to Ravelry, add this crochet slouch hat pattern to your favorites and queue the pattern listing. This is a great way to help designers connect with new customers, and we always super appreciate you taking that extra moment!
You’ll find the Ravelry listing here.
2. Share this blog post with your crafty friends. Please use the handy social sharing buttons at the bottom of this post so your crafty friends can take advantage of this free pattern too.
Not a Fan of Ads?
No worries! Help support this blog and get an ad-free PDF copy of this pattern for just $5.50!
You’ll find this slouchy crochet hat pattern available on Etsy here.
You’ll find this crochet slouchy hat pattern available on Ravelry here.
Average Head Circumference:
Materials:
● Yarn: Approximately 150-225 yards of Worsted (4) yarn
**Yarn requirements are estimates only**
(I used Jupiter Moon Farm’s Cumulus for mine.)
● Crochet Hook: Size 5.5mm (I/9) OR whatever size is needed to achieve gauge
● Yarn or Tapestry Needle
● Two 1” (2.5cm) buttons
Abbreviations:
● CH: Chain
● SC: Single Crochet
● HDC: Half Double Crochet
● FPDC: Front Post Double Crochet
● FPTRC: Front Post Triple Crochet
● C4F Cable Sequence: Cable 4 Front: Skip the next 2 sts, FPDC around each of the next 2 sts, moving your hook in front of your work, return to the first of the 2 sts you just skipped, and FPDC each of those 2 sts.
● C4B Cable Sequence: Cable 4 Back: Skip the next 2 sts, FPDC around each of the next 2 sts, moving your hook behind your work, return to the first of the 2 sts you just skipped, and FPDC each of those 2 sts.
●**: Repeat the section in between the two stars as specified
**This pattern is written in US terminology**
Gauge:
7 sts and 8 rows = 2 inches (5 centimeters) in Single Crochet
***It is important to check your gauge!***
Jennika Slouch Hat Crochet Pattern
Toddler Pattern:
Brim
Chain 12
Row 1: SC into the 4th chain from hook, *CH1, skip the next chain, SC in the next chain* Repeat across row, CH2, turn work (5 total sts/5 total CH1 spaces including turning chain space)
Row 2: SC into next CH1 space, *CH1, skip the next stitch, SC into next CH1 space* Repeat across, ending with a SC in the last CH3 space from Row 1, CH2, turn work (5 total sts/5 total CH1 spaces)
Row 3: SC into next CH1 space, *CH1, skip the next stitch, SC into next CH1 space* Repeat across, ending with a SC in the turning chain space from previous row, CH2, turn work (5 total sts/5 total CH1 spaces)
Repeat Row 3 until your project measures approx. 2 inches (5cm) in length from the starting chain edge. On last repeat CH1, turn work.
Row 4: SC each stitch and CH1 space across, CH1, turn work (10 total sts)
Row 5: SC each stitch across, CH1, turn work (10 total sts)
Row 6: (Right Side) SC each of the next 2 sts, FPTRC around the Row 4 stitch directly below the 2nd SC stitch you just worked, skip the next stitch, FPTRC around the next SC stitch from Row 4, skip the next stitch, SC each of the next 2 sts, FPTRC around the 5th SC stitch after the last FPTRC stitch from Row 4, skip the next stitch, FPTRC around the 6th SC stitch after the last FPTRC stitch from Row 4, skip the next stitch, SC into each of the next 2 sts, CH1, turn work (10 total sts)
Row 7: SC each of the next 2 sts, BPDC each of the next 2 sts, SC each of the next 2 sts, BPDC each of the next 2 sts, SC each of the next 2 sts, CH1, turn work
Row 8: HDC each stitch across, CH1, turn work
Row 9: SC each stitch across, CH1, turn work
Row 10: SC each of the next 3 sts, FPTRC around the top of the first post stitch from Row 6, skip the next stitch, FPTRC around the top of the second post stitch from Row 6, skip the next stitch, FPTRC around the top of the third post stitch from Row 6, skip the next stitch, FPTRC around the top of the fourth post stitch from Row 6, skip the next stitch, SC each of the next 3 sts, CH1, turn work
Row 11: SC each of the next 3 sts, BPDC each of the next 4 sts, SC each of the next 3 sts, CH1, turn work
Row 12: HDC each of the next 3 sts, C4F Cable Sequence, HDC each of the next 3 sts, CH1, turn work
Row 13: SC each of the next 3 sts, BPDC each of the next 4 sts, SC each of the next 3 sts, CH1, turn work
Row 14: SC each of the next 2 sts, FPTRC around the top of the first post stitch you reach from Row 12, skip the next stitch, FPTRC around the top of the second post stitch you reach from Row 12, skip the next stitch, SC into each of the next 2 sts, FPTRC around the top of the third post stitch you reach from Row 12, skip the next stitch, FPTRC around the top of the fourth post stitch you reach from Row 12, skip the next stitch, SC each of the next 2 sts, CH1, turn work
Row 15: SC each of the next 2 sts, BPDC each of the next 2 sts, SC each of the next 2 sts, BPDC each of the next 2 sts, SC each of the next 2 sts, CH1, turn work
Row 16: HDC each stitch across, CH1, turn work
Row 17: SC each stitch across, CH1, turn work
Row 18: SC each of the next 3 sts, FPTRC around the top of the first post stitch from Row 14, skip the next stitch, FPTRC around the top of the second post stitch from Row 14, skip the next stitch, FPTRC around the top of the third post stitch from Row 14, skip the next stitch, FPTRC around the top of the fourth post stitch from Row 14, skip the next stitch, SC each of the next 3 sts, CH1, turn work
Row 19: SC each of the next 3 sts, BPDC each of the next 4 sts, SC each of the next 3 sts, CH1, turn work
Row 20: HDC each of the next 3 sts, C4F Cable Sequence, HDC each of the next 3 sts, CH1, turn work
Row 21: SC each of the next 3 sts, BPDC each of the next 4 sts, SC each of the next 3 sts
Repeat Rows 14-21 (referencing Row 20 post sts in Row 14 repeats) until your project measures approx. 18 inches (45.75cm) in length from the starting chain edge. End after a repeat of Row 21. It’s better for your project to measure less than 18 inches (instead of more) if your measurements don’t line up perfectly.
Row 22: SC each stitch across, CH2, turn work
Row 23: Skip first stitch, SC into the second stitch, *CH1, skip the next stitch, SC in the next stitch* Repeat across row, CH2, turn work (5 total sts/5 total CH1 spaces including turning chain space)
Row 24: SC into next CH1 space, *CH1, skip the next stitch, SC into next CH1 space* Repeat across, ending with a SC in the last CH3 space from Row 1, CH2, turn work (5 total sts/5 total CH1 spaces)
Row 25: SC into next CH1 space, *CH1, skip the next stitch, SC into next CH1 space* Repeat across, ending with a SC in the turning chain space from previous row, CH2, turn work (5 total sts/5 total CH1 spaces)
Repeat Row 25 until your project measures approx. 20 inches (50.75cm) in length from the starting chain edge. Do not CH1 or turn work on last repeat.
Fasten Off. Secure and weave in all ends.
Body of Hat
Working across the long side of the rectangle you just made, evenly SC 63 sts onto this edge. Leave 2 inches (5cm) with no sts at the Row 1/long side corner with the right side of the brim (side showing cables) facing you. Start your sts after this section (the moss stitch section) so you can fold this over the other side later.
Join in the round by slipping first and last sts together.
Place stitch marker.
You’ll now be working in continuous rounds.
Round 1: SC each stitch around
Repeat Round 1 until your project measures approx. 7 inches (17.75cm) in length from the bottom edge (the side you haven’t picked up sts on) of the brim.
Decreases:
Round 1: *SC2tog, SC each of the next 7 sts* Repeat around (56 total sts)
Round 2: *SC2tog, SC each of the next 6 sts* Repeat around (49 total sts)
Round 3: *SC2tog, SC each of the next 5 sts* Repeat around (42 total sts)
Round 4: *SC2tog, SC each of the next 4 sts* Repeat around (35 total sts)
Round 5: *SC2tog, SC each of the next 3 sts* Repeat around (28 total sts)
Round 6: *SC2tog, SC each of the next 2 sts* Repeat around (21 total sts)
Round 7: *SC2tog, SC next stitch* Repeat around (14 total sts)
Round 8: *SC2tog* Repeat around (7 total sts)
Continue to SC2tog until the hole at the top of your hat is closed. When you’re down to only 3 or 4 sts, use your yarn or tapestry needle to cinch the hole shut to help avoid a pointy tip. Secure and weave in all ends.
Fold the extra 2 inches of brim over on top of the 2 inches of Moss stitch section on the opposite side. Add one 1 inch (2.5cm) button to hold this flap in place.
Child Pattern:
Brim
Chain 12
Row 1: SC into the 4th chain from hook, *CH1, skip the next chain, SC in the next chain* Repeat across row, CH2, turn work (5 total sts/5 total CH1 spaces including turning chain space)
Row 2: SC into next CH1 space, *CH1, skip the next stitch, SC into next CH1 space* Repeat across, ending with a SC in the last CH3 space from Row 1, CH2, turn work (5 total sts/5 total CH1 spaces)
Row 3: SC into next CH1 space, *CH1, skip the next stitch, SC into next CH1 space* Repeat across, ending with a SC in the turning chain space from previous row, CH2, turn work (5 total sts/5 total CH1 spaces)
Repeat Row 3 until your project measures approx. 2 inches (5cm) in length from the starting chain edge. On last repeat CH1, turn work.
Row 4: SC each stitch and CH1 space across, CH1, turn work (10 total sts)
Row 5: SC each stitch across, CH1, turn work (10 total sts)
Row 6: (Right Side) SC each of the next 2 sts, FPTRC around the Row 4 stitch directly below the 2nd SC stitch you just worked, skip the next stitch, FPTRC around the next SC stitch from Row 4, skip the next stitch, SC each of the next 2 sts, FPTRC around the 5th SC stitch after the last FPTRC stitch from Row 4, skip the next stitch, FPTRC around the 6th SC stitch after the last FPTRC stitch from Row 4, skip the next stitch, SC into each of the next 2 sts, CH1, turn work (10 total sts)
Row 7: SC each of the next 2 sts, BPDC each of the next 2 sts, SC each of the next 2 sts, BPDC each of the next 2 sts, SC each of the next 2 sts, CH1, turn work
Row 8: HDC each stitch across, CH1, turn work
Row 9: SC each stitch across, CH1, turn work
Row 10: SC each of the next 3 sts, FPTRC around the top of the first post stitch from Row 6, skip the next stitch, FPTRC around the top of the second post stitch from Row 6, skip the next stitch, FPTRC around the top of the third post stitch from Row 6, skip the next stitch, FPTRC around the top of the fourth post stitch from Row 6, skip the next stitch, SC each of the next 3 sts, CH1, turn work
Row 11: SC each of the next 3 sts, BPDC each of the next 4 sts, SC each of the next 3 sts, CH1, turn work
Row 12: HDC each of the next 3 sts, C4F Cable Sequence, HDC each of the next 3 sts, CH1, turn work
Row 13: SC each of the next 3 sts, BPDC each of the next 4 sts, SC each of the next 3 sts, CH1, turn work
Row 14: SC each of the next 2 sts, FPTRC around the top of the first post stitch you reach from Row 12, skip the next stitch, FPTRC around the top of the second post stitch you reach from Row 12, skip the next stitch, SC into each of the next 2 sts, FPTRC around the top of the third post stitch you reach from Row 12, skip the next stitch, FPTRC around the top of the fourth post stitch you reach from Row 12, skip the next stitch, SC each of the next 2 sts, CH1, turn work
Row 15: SC each of the next 2 sts, BPDC each of the next 2 sts, SC each of the next 2 sts, BPDC each of the next 2 sts, SC each of the next 2 sts, CH1, turn work
Row 16: HDC each stitch across, CH1, turn work
Row 17: SC each stitch across, CH1, turn work
Row 18: SC each of the next 3 sts, FPTRC around the top of the first post stitch from Row 14, skip the next stitch, FPTRC around the top of the second post stitch from Row 14, skip the next stitch, FPTRC around the top of the third post stitch from Row 14, skip the next stitch, FPTRC around the top of the fourth post stitch from Row 14, skip the next stitch, SC each of the next 3 sts, CH1, turn work
Row 19: SC each of the next 3 sts, BPDC each of the next 4 sts, SC each of the next 3 sts, CH1, turn work
Row 20: HDC each of the next 3 sts, C4F Cable Sequence, HDC each of the next 3 sts, CH1, turn work
Row 21: SC each of the next 3 sts, BPDC each of the next 4 sts, SC each of the next 3 sts
Repeat Rows 14-21 (referencing Row 20 post sts in Row 14 repeats) until your project measures approx. 19 inches (48.25cm) in length from the starting chain edge. End after a repeat of Row 21. It’s better for your project to measure less than 19 inches (instead of more) if your measurements don’t line up perfectly.
Row 22: SC each stitch across, CH2, turn work
Row 23: Skip first stitch, SC into the second stitch, *CH1, skip the next stitch, SC in the next stitch* Repeat across row, CH2, turn work (5 total sts/5 total CH1 spaces including turning chain space)
Row 24: SC into next CH1 space, *CH1, skip the next stitch, SC into next CH1 space* Repeat across, ending with a SC in the last CH3 space from Row 1, CH2, turn work (5 total sts/5 total CH1 spaces)
Row 25: SC into next CH1 space, *CH1, skip the next stitch, SC into next CH1 space* Repeat across, ending with a SC in the turning chain space from previous row, CH2, turn work (5 total sts/5 total CH1 spaces)
Repeat Row 25 until your project measures approx. 21 inches (53.25cm) in length from the starting chain edge. Do not CH1 or turn work on last repeat.
Fasten Off. Secure and weave in all ends.
Body of Hat
Working across the long side of the rectangle you just made, evenly SC 67 sts onto this edge. Leave 2 inches (5cm) with no sts at the Row 1/long side corner with the right side of the brim (side showing cables) facing you. Start your sts after this section (the moss stitch section) so you can fold this over the other side later.
Join in the round by slipping first and last sts together.
Place stitch marker.
You’ll now be working in continuous rounds.
Round 1: SC each stitch around
Repeat Round 1 until your project measures approx. 7.5 inches (19cm) in length from the bottom edge (the side you haven’t picked up sts on) of the brim.
Decreases:
Round 1: *SC2tog, SC each of the next 7 sts* Repeat to last 4 sts, SC each of last 4 sts (60 total sts)
Round 2: *SC2tog, SC each of the next 6 sts* Repeat to last 4 sts, SC each of last 4 sts (53 total sts)
Round 3: *SC2tog, SC each of the next 5 sts* Repeat to last 4 sts, SC each of last 4 sts (46 total sts)
Round 4: *SC2tog, SC each of the next 4 sts* Repeat to last 4 sts, SC each of last 4 sts (39 total sts)
Round 5: *SC2tog, SC each of the next 3 sts* Repeat to last 4 sts, SC each of last 4 sts (32 total sts)
Round 6: *SC2tog, SC each of the next 2 sts* Repeat to last 4 sts, SC each of last 4 sts (25 total sts)
Round 7: *SC2tog, SC next stitch* Repeat to last 4 sts, SC each of last 4 sts (18 total sts)
Round 8: *SC2tog* Repeat to last 4 sts, SC each of last 4 sts (11 total sts)
Continue to SC2tog until the hole at the top of your hat is closed. When you’re down to only 3 or 4 sts, use your yarn or tapestry needle to cinch the hole shut to help avoid a pointy tip. Secure and weave in all ends.
Fold the extra 2 inches of brim over on top of the 2 inches of Moss stitch section on the opposite side. Add one 1 inch (2.5cm) button to hold this flap in place.
Teen/Small Adult Pattern
Brim
Chain 12
Row 1: SC into the 4th chain from hook, *CH1, skip the next chain, SC in the next chain* Repeat across row, CH2, turn work (5 total sts/5 total CH1 spaces including turning chain space)
Row 2: SC into next CH1 space, *CH1, skip the next stitch, SC into next CH1 space* Repeat across, ending with a SC in the last CH3 space from Row 1, CH2, turn work (5 total sts/5 total CH1 spaces)
Row 3: SC into next CH1 space, *CH1, skip the next stitch, SC into next CH1 space* Repeat across, ending with a SC in the turning chain space from previous row, CH2, turn work (5 total sts/5 total CH1 spaces)
Repeat Row 3 until your project measures approx. 2 inches (5cm) in length from the starting chain edge. On last repeat CH1, turn work.
Row 4: SC each stitch and CH1 space across, CH1, turn work (10 total sts)
Row 5: SC each stitch across, CH1, turn work (10 total sts)
Row 6: (Right Side) SC each of the next 2 sts, FPTRC around the Row 4 stitch directly below the 2nd SC stitch you just worked, skip the next stitch, FPTRC around the next SC stitch from Row 4, skip the next stitch, SC each of the next 2 sts, FPTRC around the 5th SC stitch after the last FPTRC stitch from Row 4, skip the next stitch, FPTRC around the 6th SC stitch after the last FPTRC stitch from Row 4, skip the next stitch, SC into each of the next 2 sts, CH1, turn work (10 total sts)
Row 7: SC each of the next 2 sts, BPDC each of the next 2 sts, SC each of the next 2 sts, BPDC each of the next 2 sts, SC each of the next 2 sts, CH1, turn work
Row 8: HDC each stitch across, CH1, turn work
Row 9: SC each stitch across, CH1, turn work
Row 10: SC each of the next 3 sts, FPTRC around the top of the first post stitch from Row 6, skip the next stitch, FPTRC around the top of the second post stitch from Row 6, skip the next stitch, FPTRC around the top of the third post stitch from Row 6, skip the next stitch, FPTRC around the top of the fourth post stitch from Row 6, skip the next stitch, SC each of the next 3 sts, CH1, turn work
Row 11: SC each of the next 3 sts, BPDC each of the next 4 sts, SC each of the next 3 sts, CH1, turn work
Row 12: HDC each of the next 3 sts, C4F Cable Sequence, HDC each of the next 3 sts, CH1, turn work
Row 13: SC each of the next 3 sts, BPDC each of the next 4 sts, SC each of the next 3 sts, CH1, turn work
Row 14: SC each of the next 2 sts, FPTRC around the top of the first post stitch you reach from Row 12, skip the next stitch, FPTRC around the top of the second post stitch you reach from Row 12, skip the next stitch, SC into each of the next 2 sts, FPTRC around the top of the third post stitch you reach from Row 12, skip the next stitch, FPTRC around the top of the fourth post stitch you reach from Row 12, skip the next stitch, SC each of the next 2 sts, CH1, turn work
Row 15: SC each of the next 2 sts, BPDC each of the next 2 sts, SC each of the next 2 sts, BPDC each of the next 2 sts, SC each of the next 2 sts, CH1, turn work
Row 16: HDC each stitch across, CH1, turn work
Row 17: SC each stitch across, CH1, turn work
Row 18: SC each of the next 3 sts, FPTRC around the top of the first post stitch from Row 14, skip the next stitch, FPTRC around the top of the second post stitch from Row 14, skip the next stitch, FPTRC around the top of the third post stitch from Row 14, skip the next stitch, FPTRC around the top of the fourth post stitch from Row 14, skip the next stitch, SC each of the next 3 sts, CH1, turn work
Row 19: SC each of the next 3 sts, BPDC each of the next 4 sts, SC each of the next 3 sts, CH1, turn work
Row 20: HDC each of the next 3 sts, C4F Cable Sequence, HDC each of the next 3 sts, CH1, turn work
Row 21: SC each of the next 3 sts, BPDC each of the next 4 sts, SC each of the next 3 sts
Repeat Rows 14-21 (referencing Row 20 post sts in Row 14 repeats) until your project measures approx. 20 inches (50.75cm) in length from the starting chain edge. End after a repeat of Row 21. It’s better for your project to measure less than 20 inches (instead of more) if your measurements don’t line up perfectly.
Row 22: SC each stitch across, CH2, turn work
Row 23: Skip first stitch, SC into the second stitch, *CH1, skip the next stitch, SC in the next stitch* Repeat across row, CH2, turn work (5 total sts/5 total CH1 spaces including turning chain space)
Row 24: SC into next CH1 space, *CH1, skip the next stitch, SC into next CH1 space* Repeat across, ending with a SC in the last CH3 space from Row 1, CH2, turn work (5 total sts/5 total CH1 spaces)
Row 25: SC into next CH1 space, *CH1, skip the next stitch, SC into next CH1 space* Repeat across, ending with a SC in the turning chain space from previous row, CH2, turn work (5 total sts/5 total CH1 spaces)
Repeat Row 25 until your project measures approx. 22 inches (55.75cm) in length from the starting chain edge. Do not CH1 or turn work on last repeat.
Fasten Off. Secure and weave in all ends.
Body of Hat
Working across the long side of the rectangle you just made, evenly SC 70 sts onto this edge. Leave 2 inches (5cm) with no sts at the Row 1/long side corner with the right side of the brim (side showing cables) facing you. Start your sts after this section (the moss stitch section) so you can fold this over the other side later.
Join in the round by slipping first and last sts together.
Place stitch marker.
You’ll now be working in continuous rounds.
Round 1: SC each stitch around
Repeat Round 1 until your project measures approx. 8 inches (20.25cm) in length from the bottom edge (the side you haven’t picked up sts on) of the brim.
Decreases:
Round 1: *SC2tog, SC each of the next 8 sts* Repeat around (63 total sts)
Round 2: *SC2tog, SC each of the next 7 sts* Repeat around (56 total sts)
Round 3: *SC2tog, SC each of the next 6 sts* Repeat around (49 total sts)
Round 4: *SC2tog, SC each of the next 5 sts* Repeat around (42 total sts)
Round 5: *SC2tog, SC each of the next 4 sts* Repeat around (35 total sts)
Round 6: *SC2tog, SC each of the next 3 sts* Repeat around (28 total sts)
Round 7: *SC2tog, SC each of the next 2 sts* Repeat around (21 total sts)
Round 8: *SC2tog, SC next stitch* Repeat around (14 total sts)
Round 9: *SC2tog* Repeat around (7 total sts)
Continue to SC2tog until the hole at the top of your hat is closed. When you’re down to only 3 or 4 sts, use your yarn or tapestry needle to cinch the hole shut to help avoid a pointy tip. Secure and weave in all ends.
Fold the extra 2 inches of brim over on top of the 2 inches of Moss stitch section on the opposite side. Add one 1 inch (2.5cm) button to hold this flap in place.
Adult Pattern
Brim
Chain 12
Row 1: SC into the 4th chain from hook, *CH1, skip the next chain, SC in the next chain* Repeat across row, CH2, turn work (5 total sts/5 total CH1 spaces including turning chain space)
Row 2: SC into next CH1 space, *CH1, skip the next stitch, SC into next CH1 space* Repeat across, ending with a SC in the last CH3 space from Row 1, CH2, turn work (5 total sts/5 total CH1 spaces)
Row 3: SC into next CH1 space, *CH1, skip the next stitch, SC into next CH1 space* Repeat across, ending with a SC in the turning chain space from previous row, CH2, turn work (5 total sts/5 total CH1 spaces)
Repeat Row 3 until your project measures approx. 2 inches (5cm) in length from the starting chain edge. On last repeat CH1, turn work.
Row 4: SC each stitch and CH1 space across, CH1, turn work (10 total sts)
Row 5: SC each stitch across, CH1, turn work (10 total sts)
Row 6: (Right Side) SC each of the next 2 sts, FPTRC around the Row 4 stitch directly below the 2nd SC stitch you just worked, skip the next stitch, FPTRC around the next SC stitch from Row 4, skip the next stitch, SC each of the next 2 sts, FPTRC around the 5th SC stitch after the last FPTRC stitch from Row 4, skip the next stitch, FPTRC around the 6th SC stitch after the last FPTRC stitch from Row 4, skip the next stitch, SC into each of the next 2 sts, CH1, turn work (10 total sts)
Row 7: SC each of the next 2 sts, BPDC each of the next 2 sts, SC each of the next 2 sts, BPDC each of the next 2 sts, SC each of the next 2 sts, CH1, turn work
Row 8: HDC each stitch across, CH1, turn work
Row 9: SC each stitch across, CH1, turn work
Row 10: SC each of the next 3 sts, FPTRC around the top of the first post stitch from Row 6, skip the next stitch, FPTRC around the top of the second post stitch from Row 6, skip the next stitch, FPTRC around the top of the third post stitch from Row 6, skip the next stitch, FPTRC around the top of the fourth post stitch from Row 6, skip the next stitch, SC each of the next 3 sts, CH1, turn work
Row 11: SC each of the next 3 sts, BPDC each of the next 4 sts, SC each of the next 3 sts, CH1, turn work
Row 12: HDC each of the next 3 sts, C4F Cable Sequence, HDC each of the next 3 sts, CH1, turn work
Row 13: SC each of the next 3 sts, BPDC each of the next 4 sts, SC each of the next 3 sts, CH1, turn work
Row 14: SC each of the next 2 sts, FPTRC around the top of the first post stitch you reach from Row 12, skip the next stitch, FPTRC around the top of the second post stitch you reach from Row 12, skip the next stitch, SC into each of the next 2 sts, FPTRC around the top of the third post stitch you reach from Row 12, skip the next stitch, FPTRC around the top of the fourth post stitch you reach from Row 12, skip the next stitch, SC each of the next 2 sts, CH1, turn work
Row 15: SC each of the next 2 sts, BPDC each of the next 2 sts, SC each of the next 2 sts, BPDC each of the next 2 sts, SC each of the next 2 sts, CH1, turn work
Row 16: HDC each stitch across, CH1, turn work
Row 17: SC each stitch across, CH1, turn work
Row 18: SC each of the next 3 sts, FPTRC around the top of the first post stitch from Row 14, skip the next stitch, FPTRC around the top of the second post stitch from Row 14, skip the next stitch, FPTRC around the top of the third post stitch from Row 14, skip the next stitch, FPTRC around the top of the fourth post stitch from Row 14, skip the next stitch, SC each of the next 3 sts, CH1, turn work
Row 19: SC each of the next 3 sts, BPDC each of the next 4 sts, SC each of the next 3 sts, CH1, turn work
Row 20: HDC each of the next 3 sts, C4F Cable Sequence, HDC each of the next 3 sts, CH1, turn work
Row 21: SC each of the next 3 sts, BPDC each of the next 4 sts, SC each of the next 3 sts
Repeat Rows 14-21 (referencing Row 20 post sts in Row 14 repeats) until your project measures approx. 21 inches (53.25cm) in length from the starting chain edge. End after a repeat of Row 21. It’s better for your project to measure less than 21 inches (instead of more) if your measurements don’t line up perfectly.
Row 22: SC each stitch across, CH2, turn work
Row 23: Skip first stitch, SC into the second stitch, *CH1, skip the next stitch, SC in the next stitch* Repeat across row, CH2, turn work (5 total sts/5 total CH1 spaces including turning chain space)
Row 24: SC into next CH1 space, *CH1, skip the next stitch, SC into next CH1 space* Repeat across, ending with a SC in the last CH3 space from Row 1, CH2, turn work (5 total sts/5 total CH1 spaces)
Row 25: SC into next CH1 space, *CH1, skip the next stitch, SC into next CH1 space* Repeat across, ending with a SC in the turning chain space from previous row, CH2, turn work (5 total sts/5 total CH1 spaces)
Repeat Row 25 until your project measures approx. 23 inches (58.5cm) in length from the starting chain edge. Do not CH1 or turn work on last repeat.
Fasten Off. Secure and weave in all ends.
Body of Hat
Working across the long side of the rectangle you just made, evenly SC 74 sts onto this edge. Leave 2 inches (5cm) with no sts at the Row 1/long side corner with the right side of the brim (side showing cables) facing you. Start your sts after this section (the moss stitch section) so you can fold this over the other side later.
Join in the round by slipping first and last sts together.
Place stitch marker.
You’ll now be working in continuous rounds.
Round 1: SC each stitch around
Repeat Round 1 until your project measures approx. 8.5 inches (21.5cm) in length from the bottom edge (the side you haven’t picked up sts on) of the brim.
Decreases:
Round 1: *SC2tog, SC each of the next 8 sts* Repeat to last 4 sts, SC each of last 4 sts (67 total sts)
Round 2: *SC2tog, SC each of the next 7 sts* Repeat to last 4 sts, SC each of last 4 sts (60 total sts)
Round 3: *SC2tog, SC each of the next 6 sts* Repeat to last 4 sts, SC each of last 4 sts (53 total sts)
Round 4: *SC2tog, SC each of the next 5 sts* Repeat to last 4 sts, SC each of last 4 sts (46 total sts)
Round 5: *SC2tog, SC each of the next 4 sts* Repeat to last 4 sts, SC each of last 4 sts (39 total sts)
Round 6: *SC2tog, SC each of the next 3 sts* Repeat to last 4 sts, SC each of last 4 sts (32 total sts)
Round 7: *SC2tog, SC each of the next 2 sts* Repeat to last 4 sts, SC each of last 4 sts (25 total sts)
Round 8: *SC2tog, SC next stitch* Repeat to last 4 sts, SC each of last 4 sts (18 total sts)
Round 9: *SC2tog* Repeat around (9 total sts)
Continue to SC2tog until the hole at the top of your hat is closed. When you’re down to only 3 or 4 sts, use your yarn or tapestry needle to cinch the hole shut to help avoid a pointy tip. Secure and weave in all ends.
Fold the extra 2 inches of brim over on top of the 2 inches of Moss stitch section on the opposite side. Add one 1 inch (2.5cm) button to hold this flap in place.
This design, a written work and images are a copyright of ©MelodysMakings and may not be copied or reproduced in any way. You have permission to sell finished products made from this pattern, but please leave a link to my website, www.melodys-makings.com, in your product listing specifying that I am the designer of this pattern. Thank you for supporting me as a work at home mother!