Cadence Cabled Cloche Knit Pattern
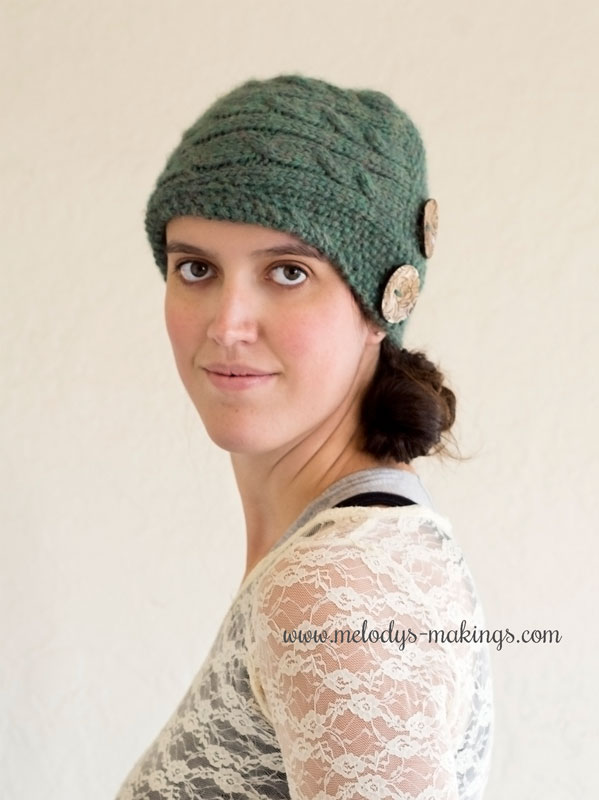
Free Knit Hat Pattern
Shortly after my third child, Theo, was born, I stopped brushing my hair. It was a matter of too much on my plate, and way too much hair to brush, haha. I won’t go into the details about how that worked out in the long run (let’s just say my mother-in-law had to get busy with the scissors) but I was in serious need of a helpful hair-hiding hat during that time.
That’s how my Cadence Cabled Cloche was born. It’s an elegant hat featuring gorgeous design elements that might help trick people into thinking you actually take care of yourself! Haha.
This free knit hat pattern features bulky (5) weight yarn and size 5.5mm (US9) knitting needles. Pattern features all sizes Toddler, Child, and Adult.
Please Pay With A Share!
1. Head over to Ravelry, add this pattern to your favorites and queue the pattern listing. This is a great way to help designers connect with new customers, and we always super appreciate you taking that extra moment!
You’ll find the knit Ravelry listing here.
2. Share this blog post with your crafty friends. Please use the handy social sharing buttons at the bottom of this post so your crafty friends can take advantage of this free pattern too.
3. Scroll down to view the pattern OR if you’d like an ad-free PDF copy of this pattern (or to add the pattern to your Rav. library), simply input your email address into this form and I’ll email one over:
Cadence Cabled Cloche Knit Pattern
Average Head Circumference Size Chart
18-20″ (45.75-50.75cm)
19-20.5” (48.25-52cm)
21.5-22.5″ (54.5-57cm)
Materials
- Yarn: Approximately 100 yards of bulky (5) weight yarn for smaller sizes, and approximately 175 yards for larger sizes (I used Plymouth Baby Alpaca Grande for mine).
- Knitting Needles: Size 5.5mm (US 9) Straight Needles and Double Pointed Needles (or use the magic loop method) OR whatever size is needed to achieve gauge
- Yarn or Tapestry Needle
Gauge
8 sts and 11 rows = 2 inches (5 centimeters) in stockinette stitch
***It is important to check your gauge!***
Abbreviations
- K: Knit
- P: Purl
- C4B: Cable 4 Back: Slip next 2 sts onto cable needle, and hold in back of work, K2, then K2 from the cable needle.
- K2tog: Knit the next two sts together
- **: Repeat the section in between the two stars as specified
Toddler Pattern
Cast on 27 sts onto Straight Needles
Row 1: *K1, P1* Repeat across
Repeat row 1 until your piece measures approx. 1.5 inches (3.75cm) from the cast on edge.
*Note: Your work may tighten up during the next few rows, causing the beginning section to be wider than the end. This is normal and will be addressed later in the pattern*
Row 2 (Right Side): P1, K2, P1, *K4, P1, K2, P1* Repeat once, *P1, K1* Repeat 2 more times, P1
Row 3: P1, *K1, P1* Repeat 2 more times, *K1, P2, K1, P4* Repeat once, K1, P2, K1
Row 4: Repeat row 2
Row 5: Repeat row 3
Row 6: Repeat row 2
Row 7: Repeat row 3
Row 8: P1, K2, P1, *C4B, P1, K2, P1* Repeat once, *P1, K1* Repeat 2 more times, P1
Row 9: P1, *K1, P1* Repeat 2 more times, *K1, P2, K1, P4* Repeat once, K1, P2, K1
Row 10: P1, K2, P1, *K4, P1, K2, P1* Repeat once, *P1, K1* Repeat 2 more times, P1
Row 11: Repeat row 9
Row 12: Repeat row 10
Row 13: Repeat row 9
Repeat rows 8-13 until your piece measures approx. 19 inches (48.25cm) from the starting edge. End on a repeat of row 13.
Bind off as if to knit.
Secure work, and using your yarn or tapestry needle, sew the cast on edge of your work over the bind off edge of your work with a 1 inch (2.5cm) overlap. If the starting section is slightly wider than the ending section due to the tension of the cables, fold down the top of the starting section and secure it to the inside of your hat so your piece is even all the way around. When picking up sts during the next section, you can either pull sts from the top of this fold or from the overlapped section behind it.
This creates the majority of your hat. Now we’ll be closing the top section.
Pick up and Knit 72 sts around the top of your hat using Double Pointed Needles or Magic Loop Method. Make sure the stitches are evenly spaced, and that you’re doing your knit stitch around the single purl stitch we did along this edge. Join in the round and place stitch marker. Knit side should be facing out.
Decreases:
Round 1: *K2tog, K4* Repeat around (60 total sts)
Round 2: *K2tog, K3* Repeat around (48 total sts)
Round 3: *K2tog, K2* Repeat around (36 total sts)
Round 4: *K2tog, K1* Repeat around (24 total sts)
Round 5: *K2tog* Repeat around (12 total sts)
Round 6: *K2tog* Repeat around (6 total sts)
Do not bind off. Cut approx. 7 inch tail. Using yarn needle, remove all sts from DPNs or magic loop, as if to purl. Pull tail through to cinch the top of hat. Using yarn needle, pull tail through to the inside of the hat. Tie a knot and secure and weave in all ends.
Add two matching buttons (I used 1.5”) stacked one on top of the other over the overlapping section of your hat. Then, fold up approx. 1.5 inches (3.75cm) of the brim of hat on the opposite side from the buttons. Leave the front section slanting down as pictured. You can either leave this just as a fold or choose to use your yarn or tapestry needle to tack this section in place. Secure and weave in all ends.
Child Pattern
Cast on 29 sts onto Straight Needles
Row 1: *K1, P1* Repeat across
Repeat row 1 until your piece measures approx. 1.5 inches (3.75cm) from the cast on edge.
*Note: Your work may tighten up during the next few rows, causing the beginning section to be wider than the end. This is normal and will be addressed later in the pattern*
Row 2 (Right Side): P1, *K2, P1, K4, P1* Repeat once, K2, P1, *K1, P1* Repeat 3 more times, K1
Row 3: *K1, P1* Repeat 3 more times, K2, P2, *K1, P4, K1, P2* Repeat once, K1
Row 4: Repeat row 2
Row 5: Repeat row 3
Row 6: Repeat row 2
Row 7: Repeat row 3
Row 8: P1, *K2, P1, C4B, P1* Repeat once, K2, P1, *K1, P1* Repeat 3 more times, K1
Row 9: *K1, P1* Repeat 3 more times, K2, P2, *K1, P4, K1, P2* Repeat once, K1
Row 10: P1, *K2, P1, K4, P1* Repeat once, K2, P1, *K1, P1* Repeat 3 more times, K1
Row 11: Repeat row 9
Row 12: Repeat row 10
Row 13: Repeat row 9
Repeat rows 8-13 until your piece measures approx. 20 inches (50.75cm) from the starting edge. End on a repeat of row 13.
Bind off as if to knit.
Secure work, and using your yarn or tapestry needle, sew the cast on edge of your work over the bind off edge of your work with a 1 inch (2.5cm) overlap. If the starting section is slightly wider than the ending section due to the tension of the cables, fold down the top of the starting section and secure it to the inside of your hat so your piece is even all the way around. When picking up sts during the next section, you can either pull sts from the top of this fold or from the overlapped section behind it.
This creates the majority of your hat. Now we’ll be closing the top section.
Pick up and Knit 72 sts around the top of your hat using Double Pointed Needles or Magic Loop Method. Make sure the stitches are evenly spaced, and that you’re doing your knit stitch around the single purl stitch we did along this edge. Join in the round and place stitch marker. Knit side should be facing out.
Decreases:
Round 1: *K2tog, K4* Repeat around (60 total sts)
Round 2: *K2tog, K3* Repeat around (48 total sts)
Round 3: *K2tog, K2* Repeat around (36 total sts)
Round 4: *K2tog, K1* Repeat around (24 total sts)
Round 5: *K2tog* Repeat around (12 total sts)
Round 6: *K2tog* Repeat around (6 total sts)
Do not bind off. Cut approx. 7 inch tail. Using yarn needle, remove all sts from DPNs or magic loop, as if to purl. Pull tail through to cinch the top of hat. Using yarn needle, pull tail through to the inside of the hat. Tie a knot and secure and weave in all ends.
Add two matching buttons (I used 1.5”) stacked one on top of the other over the overlapping section of your hat. Then, fold up approx. 1.5 inches (3.75cm) of the brim of hat on the opposite side from the buttons. Leave the front section slanting down as pictured. You can either leave this just as a fold or choose to use your yarn or tapestry needle to tack this section in place. Secure and weave in all ends.
Adult Pattern
Cast on 33 sts onto Straight Needles
Row 1: *K1, P1* Repeat across
Repeat row 1 until your piece measures approx. 2 inches (5cm) from the cast on edge.
*Note: Your work may tighten up during the next few rows, causing the beginning section to be wider than the end. This is normal and will be addressed later in the pattern*
Row 2 (Right Side): P1, *K4, P1, K2, P1* Repeat two more times, *P1, K1* Repeat 3 more times
Row 3: *K1, P1* Repeat 3 more times, *K1, P2, K1, P4* Repeat two more times, K1
Row 4: Repeat row 2
Row 5: Repeat row 3
Row 6: Repeat row 2
Row 7: Repeat row 3
Row 8: P1, *C4B, P1, K2, P1* Repeat two more times, *P1, K1* Repeat 3 more times
Row 9: *K1, P1* Repeat 3 more times, *K1, P2, K1, P4* Repeat two more times, K1
Row 10: P1, *K4, P1, K2, P1* Repeat two more times, *P1, K1* Repeat 3 more times
Row 11: Repeat row 9
Row 12: Repeat row 10
Row 13: Repeat row 9
Repeat rows 8-13 until your piece measures approx. 22 inches (55.75cm) from the starting edge. End on a repeat of row 13.
Bind off as if to knit.
Secure work, and using your yarn or tapestry needle, sew the cast on edge of your work over the bind off edge of your work with a 1 inch (2.5cm) overlap. If the starting section is slightly wider than the ending section due to the tension of the cables, fold down the top of the starting section and secure it to the inside of your hat so your piece is even all the way around. When picking up sts during the next section, you can either pull sts from the top of this fold or from the overlapped section behind it.
This creates the majority of your hat. Now we’ll be closing the top section.
Pick up and Knit 84 sts around the top of your hat using Double Pointed Needles or Magic Loop Method. Make sure the stitches are evenly spaced, and that you’re doing your knit stitch around the single purl stitch we did along this edge. Join in the round and place stitch marker. Knit side should be facing out.
Decreases:
Round 1: *K2tog, K5* Repeat around (72 total sts)
Round 2: *K2tog, K4* Repeat around (60 total sts)
Round 3: *K2tog, K3* Repeat around (48 total sts)
Round 4: *K2tog, K2* Repeat around (36 total sts)
Round 5: *K2tog, K1* Repeat around (24 total sts)
Round 6: *K2tog* Repeat around (12 total sts)
Round 7: *K2tog* Repeat around (6 total sts)
Do not bind off. Cut approx. 7 inch tail. Using yarn needle, remove all sts from DPNs or magic loop, as if to purl. Pull tail through to cinch the top of hat. Using yarn needle, pull tail through to the inside of the hat. Tie a knot and secure and weave in all ends.
Add two matching buttons (I used 1.5”) stacked one on top of the other over the overlapping section of your hat. Then, fold up approx. 2 inches (5cm) of the brim of hat on the opposite side from the buttons. Leave the front section slanting down as pictured. You can either leave this just as a fold or choose to use your yarn or tapestry needle to tack this section in place. Secure and weave in all ends.
This design, a written work and images are a copyright of
©MelodysMakings and may not be copied or reproduced in any way.
You have permission to sell finished products made from this pattern, but please leave a link to my website, www.melodys-makings.com, in your product listing specifying that I am the designer of this pattern. Thank you for supporting me as a work at home mother!
I love making cables. They are really easy. Have so many sweaters and Christmas decorations with cables.
I loved knitting this pattern. Thank you for sharing.
Thankyou for sharing…but…I find there are too many patterns out there for beanies etc. It is good to start knitting with as I did! But what about…cardigan, pullover, etc? I have just started experimenting with sock patterns! Haven’t found one I really love yet!