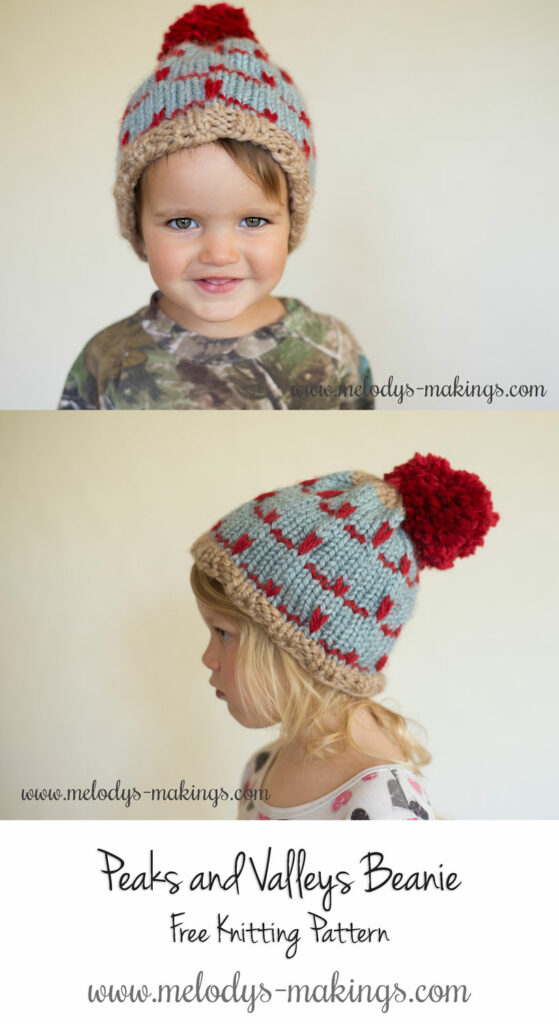
Peaks and Valleys Beanie
Peaks and Valleys is an adorable knit slouchy beanie pattern you’re sure to enjoy. Made using Super Bulky yarn and large needles, it’s quick to work up and makes a super cozy hat.

I suppose I’ve always been a big fan of peaks and valleys. Growing up just off the Rocky Mountains will do that for you.
So this hat was inspired by the gorgeous mountains and valleys, and the need for WARM wonderful clothes during the winter months.
This pattern calls for Super Bulky yarn for a quick and fun project. You can also make it using 3-4 strands of worsted weight yarn (great opportunity to use up old skeins!).
Peaks and Valleys Beanie Knitting Pattern
Materials:
- Yarn: Approximately 75-150 yards of super bulky (6) yarn (I used Loops and Threads – Cozy Wool)
- Approx. 25 yards of Color 1 (tan) for smaller sizes and approx. 50 yards for larger size
- Approx. 25 yards of Color 2 (blue) for smaller sizes and approx. 50 yards for larger size
- Approx. 25 yards of Color 3 (red) for smaller sizes and approx. 50 yards for larger size
- Knitting Needles: Size 10.0 mm (US 15) Double Pointed Needles (or use the magic loop method)
- Yarn or Tapestry Needle
Abbreviations:
- K: Knit
- Sl: Slip the next stitch (as if to purl)
- K2tog: Knit two stitches together
- **: Repeat the section in between the two stars as specified
Gauge:
5 sts and 10 rows = 2 inches (5 centimeters) in stockinette stitch
***It is important to check your gauge!***
Finished Measurements:
Peaks and Valleys Knit Beanie Pattern
Love this pattern and my work?

Help support this blog by purchasing an ad-free PDF copy of this pattern!
For each ad-free copy (of ANY pattern!) purchased now through 11/30/19, you’ll be entered to win a $50 Etsy or Amazon gift card (you choose).
Get the ad-free copy on Ravelry here.
Get the ad-free copy on Etsy here.
Baby Pattern:
Using Color 1 (tan) yarn, loosely Cast on 40 sts onto Double Pointed Needles (or use the Magic Loop Method)
Join in the round and place stitch marker
Round 1: *K2, P2* Repeat around
Repeat round 1 until your piece measures approx. 1” (2.5cm) from the cast on edge
Drop and cut Color 1 (tan) and pick up Color 2 (blue)
Round 2: Knit
Drop Color 2 (blue) and pick up Color 3 (red)
Round 3: Knit
Drop Color 3 (red) and pick up Color 2 (blue)
Round 4: *Sl1, K3* Repeat around
Round 5: Repeat Round 4
Round 6: *Sl1, K7* Repeat around
Round 7: Repeat Round 6
Rounds 8&9: Knit
Drop Color 2 (blue) and pick up Color 3 (red)
Round 10: Knit
Drop Color 3 (red) and pick up Color 2 (blue)
Round 11: *Sl1, K3* Repeat around
Round 12: Repeat Round 11
Round 13: K4, *Sl1, K7* Repeat around to last 4 sts, Sl1, K3
Round 14: Repeat Round 13
Rounds 15&16: Knit
Rounds 17-23: Repeat Rounds 3-9
Your project should now measure approx. 5.5” (14cm) in length from the cast on edge.
Using Color 2 (blue)
Continue to knit each round until your project measures approx. 6” (15.25cm) in total length.
Drop Color 2 (blue) yarn and pick up Color 1 (tan) yarn
Decreases:
Round 1: *K2tog, K6* Repeat around (35 total sts)
Round 2: *K2tog, K5* Repeat around (30 total sts)
Round 3: *K2tog, K4* Repeat around (25 total sts)
Round 4: *K2tog, K3* Repeat around (20 total sts)
Round 5: *K2tog, K2* Repeat around (15 total sts)
Round 6: *K2tog, K1* Repeat around (10 total sts)
Do not bind off. Cut approx. 12” (30.5cm) tail. Using yarn needle, remove all sts from DPNs or magic loop, as if to purl. Pull yarn tail through to cinch the top of hat. Tie a knot and weave in ends.
For Pom-Pom: Using Color 2 (red) yarn, wrap around 4 fingers approx. 50 times. Remove from fingers. Use separate piece of yarn to tie in the middle (make sure to leave 5-7 inch tails). Cut all loops on both sides of the tie. Trim pom to desired length. Using yarn needle, attach pom to the top of the hat with the piece of yarn that you used to tie the center.
Toddler/Child Pattern:
Using Color 1 (tan) yarn, loosely Cast on 48 sts onto Double Pointed Needles (or use the Magic Loop Method)
Join in the round and place stitch marker
Round 1: *K2, P2* Repeat around
Repeat round 1 until your piece measures approx. 1” (2.5cm) from the cast on edge
Drop and cut Color 1 (tan) and pick up Color 2 (blue)
Round 2: Knit
Drop Color 2 (blue) and pick up Color 3 (red)
Round 3: Knit
Drop Color 3 (red) and pick up Color 2 (blue)
Round 4: *Sl1, K3* Repeat around
Round 5: Repeat Round 4
Round 6: *Sl1, K7* Repeat around
Round 7: Repeat Round 6
Rounds 8&9: Knit
Drop Color 2 (blue) and pick up Color 3 (red)
Round 10: Knit
Drop Color 3 (red) and pick up Color 2 (blue)
Round 11: *Sl1, K3* Repeat around
Round 12: Repeat Round 11
Round 13: K4, *Sl1, K7* Repeat around to last 4 sts, Sl1, K3
Round 14: Repeat Round 13
Rounds 15&16: Knit
Rounds 17-23: Repeat Rounds 3-9
Your project should now measure approx. 5.5” (14cm) in length from the cast on edge.
Using Color 2 (blue)
Continue to knit each round until your project measures approx. 6.5” (16.5cm) in total length.
Drop Color 2 (blue) yarn and pick up Color 1 (tan) yarn
Decreases:
Round 1: *K2tog, K14* Repeat around (45 total sts)
Round 2: *K2tog, K7* Repeat around (40 total sts)
Round 3: *K2tog, K6* Repeat around (35 total sts)
Round 4: *K2tog, K5* Repeat around (30 total sts)
Round 5: *K2tog, K4* Repeat around (25 total sts)
Round 6: *K2tog, K3* Repeat around (20 total sts)
Round 7: *K2tog, K2* Repeat around (15 total sts)
Round 8: *K2tog, K1* Repeat around (10 total sts)
Do not bind off. Cut approx. 12” (30.5cm) tail. Using yarn needle, remove all sts from DPNs or magic loop, as if to purl. Pull yarn tail through to cinch the top of hat. Tie a knot and weave in ends.
For Pom-Pom: Using Color 2 (red) yarn, wrap around 4 fingers approx. 50 times. Remove from fingers. Use separate piece of yarn to tie in the middle (make sure to leave 5-7 inch tails). Cut all loops on both sides of the tie. Trim pom to desired length. Using yarn needle, attach pom to the top of the hat with the piece of yarn that you used to tie the center.
Adult Pattern:
Using Color 1 (tan) yarn, loosely Cast on 56 sts onto Double Pointed Needles (or use the Magic Loop Method)
Join in the round and place stitch marker
Round 1: *K2, P2* Repeat around
Repeat round 1 until your piece measures approx. 1” (2.5cm) from the cast on edge
Drop and cut Color 1 (tan) and pick up Color 2 (blue)
Round 2: Knit
Drop Color 2 (blue) and pick up Color 3 (red)
Round 3: Knit
Drop Color 3 (red) and pick up Color 2 (blue)
Round 4: *Sl1, K3* Repeat around
Round 5: Repeat Round 4
Round 6: *Sl1, K7* Repeat around
Round 7: Repeat Round 6
Rounds 8&9: Knit
Drop Color 2 (blue) and pick up Color 3 (red)
Round 10: Knit
Drop Color 3 (red) and pick up Color 2 (blue)
Round 11: *Sl1, K3* Repeat around
Round 12: Repeat Round 11
Round 13: K4, *Sl1, K7* Repeat around to last 4 sts, Sl1, K3
Round 14: Repeat Round 13
Rounds 15&16: Knit
Rounds 17-23: Repeat Rounds 3-9
Rounds 24-30: Repeat Rounds 3-9
Your project should now measure approx. 7” (17.75cm) in length from the cast on edge.
Drop Color 2 (blue) yarn and pick up Color 1 (tan) yarn
Decreases:
Round 1: K2tog, K54 Repeat around (55 total sts)
Round 2: *K2tog, K9* Repeat around (50 total sts)
Round 3: *K2tog, K8* Repeat around (45 total sts)
Round 4: *K2tog, K7* Repeat around (40 total sts)
Round 5: *K2tog, K6* Repeat around (35 total sts)
Round 6: *K2tog, K5* Repeat around (30 total sts)
Round 7: *K2tog, K4* Repeat around (25 total sts)
Round 8: *K2tog, K3* Repeat around (20 total sts)
Round 9: *K2tog, K2* Repeat around (15 total sts)
Round 10: *K2tog, K1* Repeat around (10 total sts)
Do not bind off. Cut approx. 12” (30.5cm) tail. Using yarn needle, remove all sts from DPNs or magic loop, as if to purl. Pull yarn tail through to cinch the top of hat. Tie a knot and weave in ends.
For Pom-Pom: Using Color 2 (red) yarn, wrap around 4 fingers approx. 50 times. Remove from fingers. Use separate piece of yarn to tie in the middle (make sure to leave 5-7 inch tails). Cut all loops on both sides of the tie. Trim pom to desired length. Using yarn needle, attach pom to the top of the hat with the piece of yarn that you used to tie the center.
This design, a written work and
images are a copyright of
©MelodysMakings and may not be copied or reproduced in any way.
You have permission to sell finished products made from this pattern, but please leave a link to my website, www.melodys-makings.com, in your product listing specifying that I am the designer of this pattern. Thank you for supporting me as a work at home mother!
[activecampaign form=13]

This beanie is adorable and rugged at the same time. I love how you incorporated both elements into the design so flawlessly. After living in western KS for 25 yrs, I miss going to the Rocky Mtns. too. Too far to goo now, sadly.
Since I don’t knit this is not helpful to me. But it does look nice.