North Star {Monster Truck Slippers}
This is the eighteenth post in my North Star November series….a soul centered discussion about depression. Each day this month, I’ll be sharing a piece of my soul’s journey, along with a free pattern to thank you for taking part in such an important conversation! Catch up by reading Day 17. Move forward to Day 19.
I mentioned a really big thing in my last post….the ability to identify and fill your own needs.
To some, this may seem like a really obvious life skill. To others, like me, it may seem nearly impossible at the start of a soul centered journey.
I was raised to be very aware of all the people around me. To use my manners, to give my best effort, and to generally be a pleasant addition to society.
I’m glad I learned those things.
Equally important, though, and extremely undervalued, is to learn how to be a soul centered person.
To learn to identify your feelings, describe and bring awareness to them, and to recognize that there is still a deeper, wiser being centered within your soul is the goal.
We are not our emotions and feelings.
These are simply neighbors we’re living in close proximity with…and we happen to bump into them from time to time.
There are two ways to handle nuisance neighbors. You can avoid them at all costs and whine when they come around to “waste” your time. Or you can greet them with a smile, lend them a compassionate ear, reflect back a sense of connection and gently watch as they happily mosey away after.
One option definitely takes more time….but it’s also the one that leave everyone feeling intact and positive (both you and the neighbor) at the end.
Learning how to greet, communicate with, and simply “be” in the presence of this neighbor is the challenge here.
Learning how to recognize (through awareness and mindfulness), describe, and “be” with our bodily feelings is the only way to gently move them on.
Comment and tell me…
Does it make you uncomfortable to “feel” and recognize the feelings in your body? Do you have any sticky feelings lodged in your body (Ex. I have an anxious ball of tense grey energy that likes to spin on the upper side of my stomach)?
{Though I do try to check all comments here on my blog regularly, it is not monitored 24/7. If you’re struggling with suicidal thoughts, please reach out for help! This suicide hotline is available 24 hours a day to support you: 1-800-273-8255}
Please Share!
1. Head over to Ravelry, add this pattern to your favorites and queue the pattern listing. This is a great way to help designers connect with new customers, and we always super appreciate you taking that extra moment!
You’ll find the Ravelry listing here.
2. Share this blog post with your crafty friends. Please use the handy social sharing buttons at the bottom of this post so your crafty friends can take advantage of this free pattern too.
3. Scroll down to view the pattern OR if you’d like an ad-free PDF copy of this pattern (or to add the pattern to your Rav. library), simply input your email address into this form and I’ll email one over:
Monster Truck Slippers Crochet Pattern
Average Foot Sizes:
Materials
- Yarn: Approximately 60 yards of worsted (4) yarn for smaller sizes (approx. 40 yards of base color 1, and approx. 20 yards each of windshield color 2 and tire color 3) and approx. 200 yards (approx. 150 yards of base color 1, and approx. 50 yards each of windshield color 2 and tire color 3) for larger sizes (I used Red Heart Super Saver)
- Crochet Hook: Size 5.5 mm (I/9) OR whatever size is needed to obtain gauge
- Yarn or Tapestry Needle
Gauge
7 sts and 4 rows = 2 inches (5 centimeters) in Double Crochet
***It is important to check your gauge!***
Abbreviations
DC: Double Crochet
SC: Single Crochet
CH: Chain
FPHDC: Front Post Half Double Crochet
BPHDC: Back Post Half Double Crochet
**: Repeat the section in between the two stars as specified
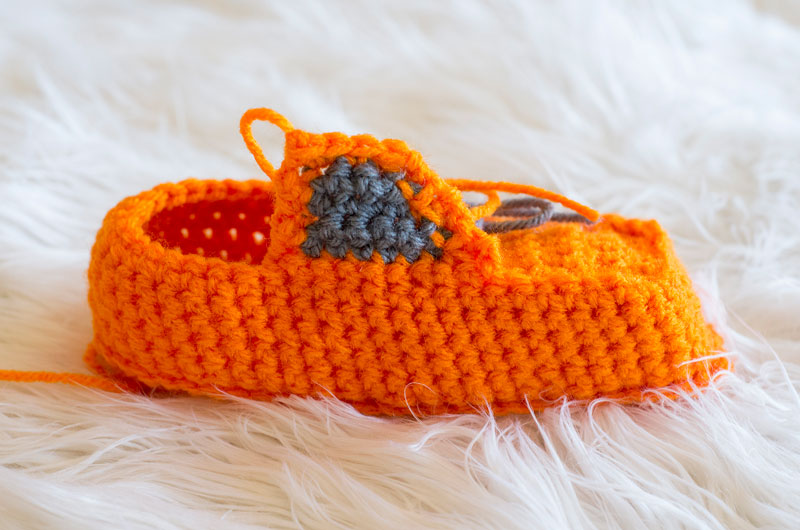
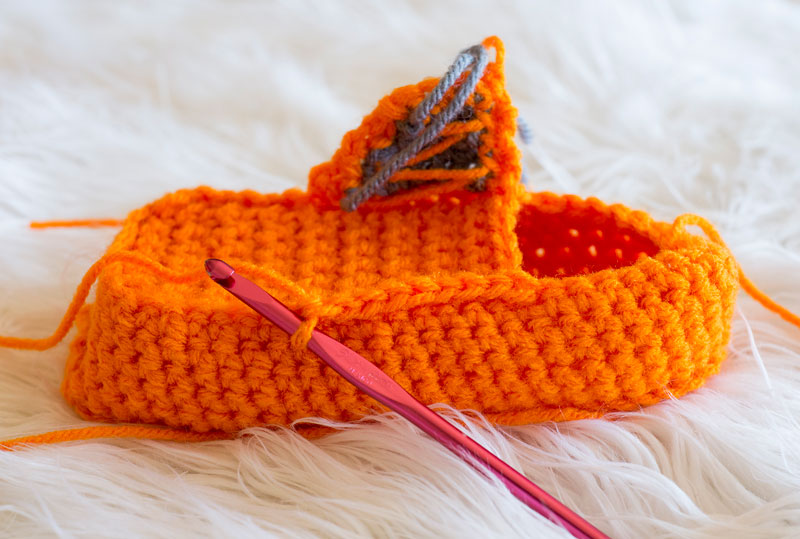
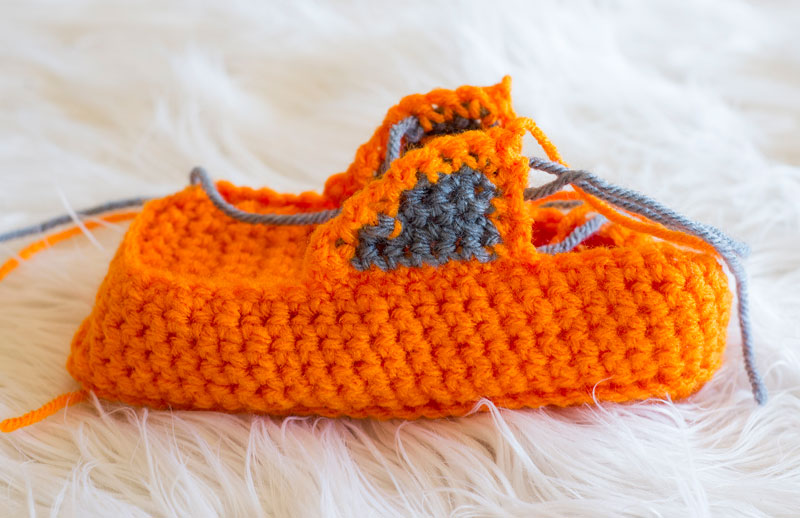
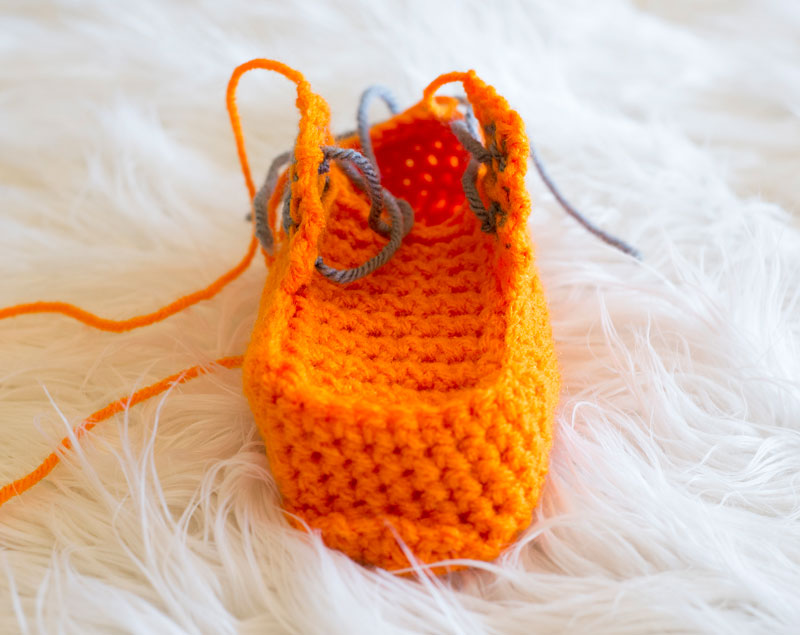
Photos are located at the bottom of this blog post (after all pattern sizes)
Child Size 0-4 Pattern
Slipper Sole (worked in flat rounds):
Chain 11
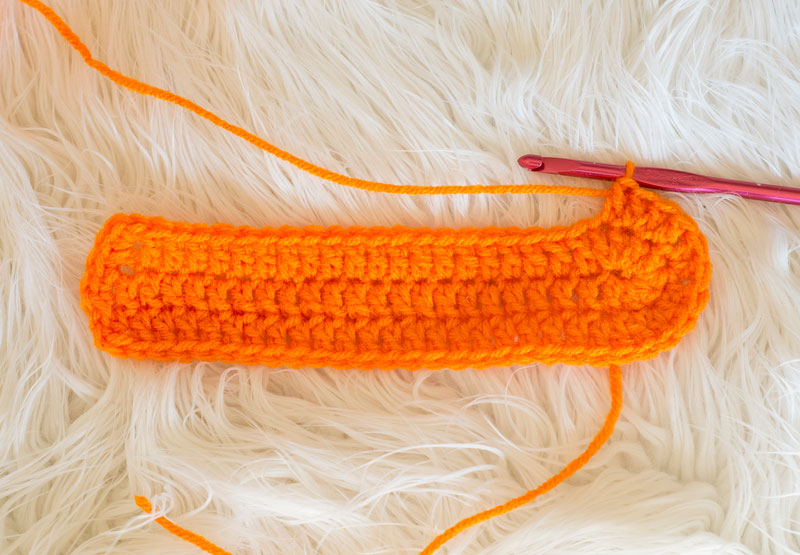
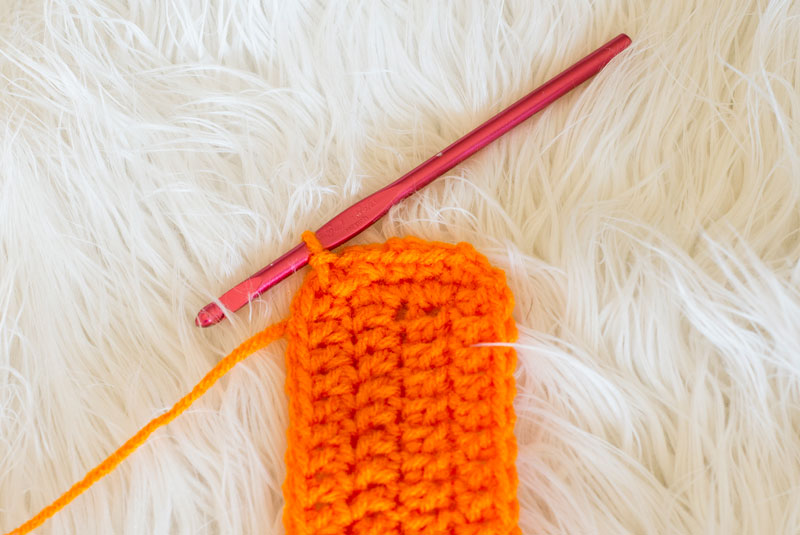
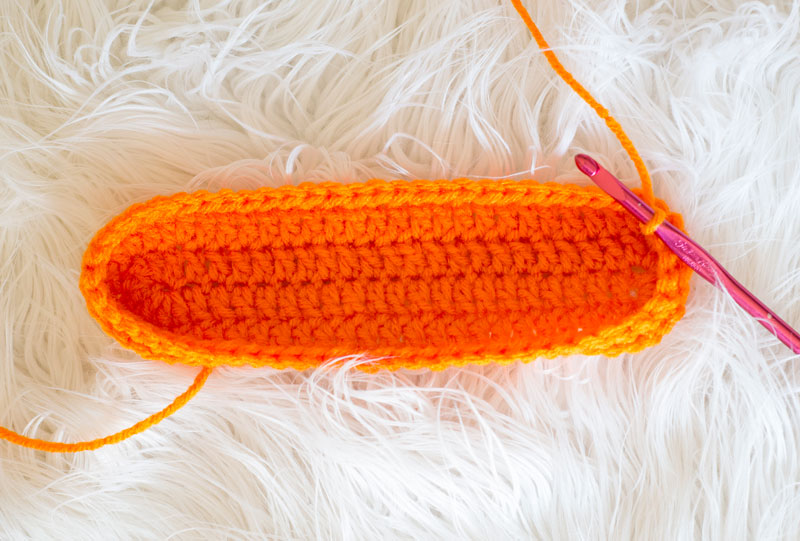
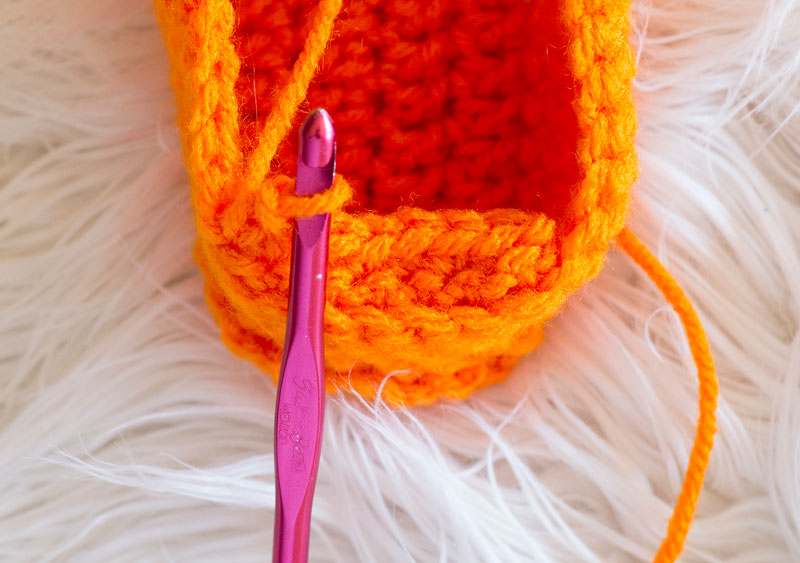
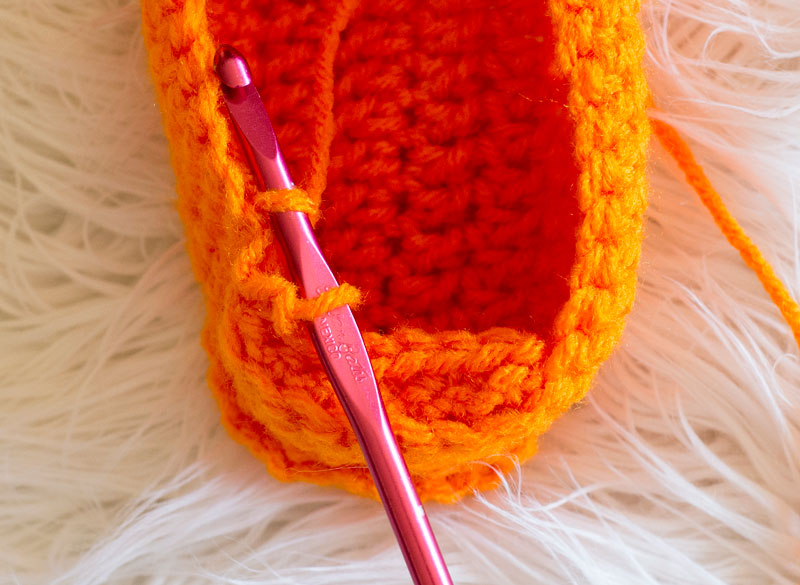
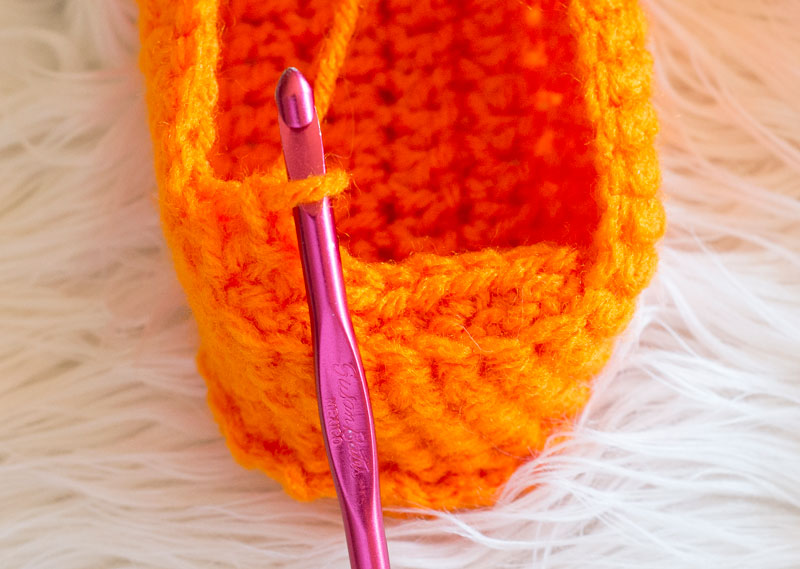
Round 1: Double crochet into the second chain from hook and each chain across to the last one, 8 DC sts in the last chain (causes you to turn and work down the opposite side of your project) {Ref. Photo 1}, DC into the bottom edge of each chain across {Ref. Photo 2}, Turn around corner and 2 SC into edge of first stitch, and 2 SC into edge of second stitch (this will flatten out the toe of your sole) {Ref. Photo 3}, Slip stitch into first stitch (28 total sts not including initial chain)
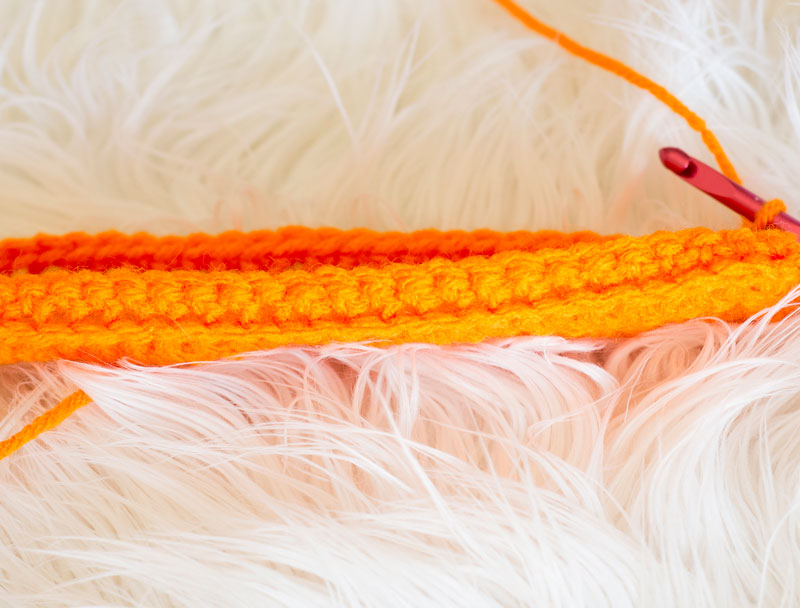
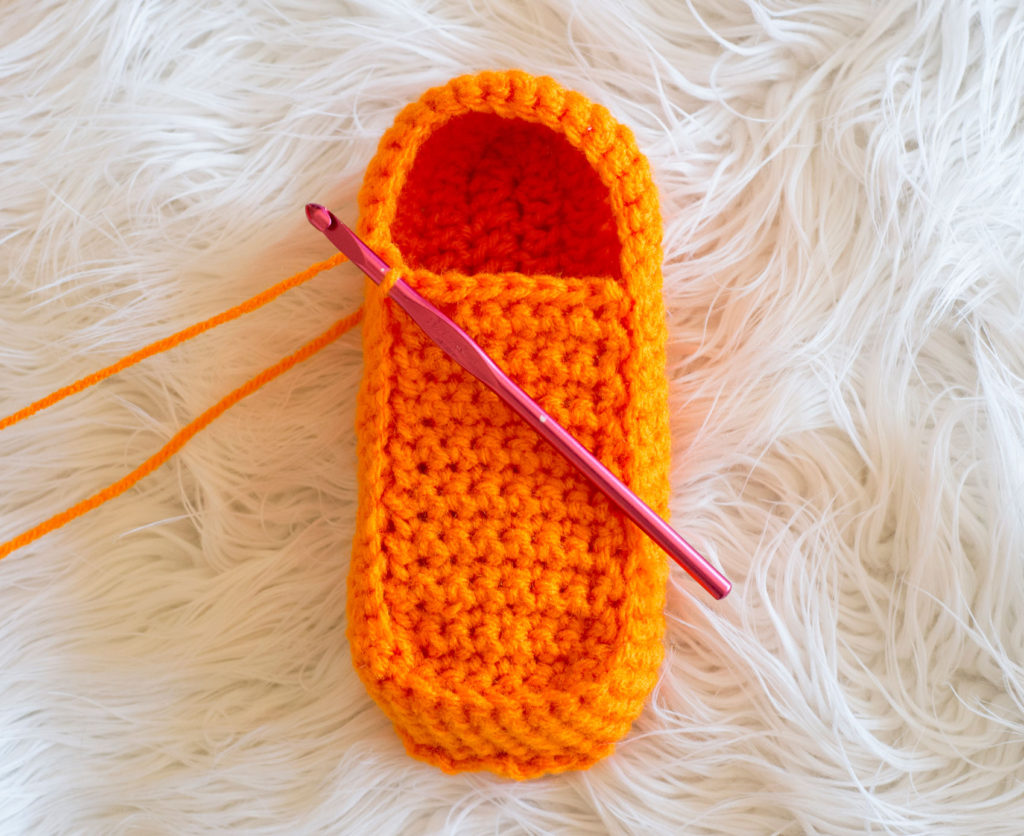
Round 2: CH1, SC in each of next 8 sts, *2 SC in next st, 1 SC in next st* Repeat 3 more times (causes you to turn and work down the opposite side of your project again) {Ref. Photo 4}, SC in each of next 8 sts, CH1, SC in corner stitch, CH1, SC in next two sts, CH1, SC in corner stitch, CH1, slip stitch into first stitch {Ref. Photo 5} (36 total sts)
Edges of Slipper (worked in continuous rounds)
Place stitch marker
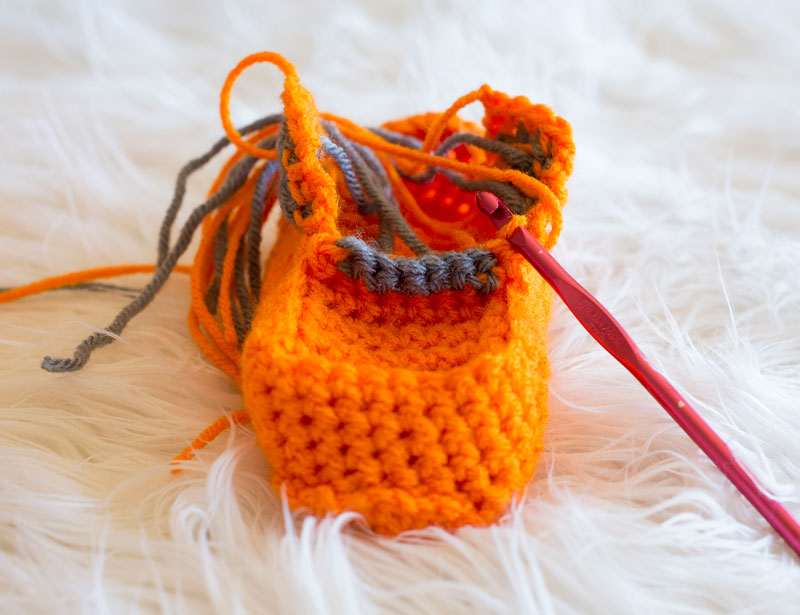
Round 3: Working through the front loop only, SC each stitch around (skip the CH1 spaces from the last round when working around the front corners. Only SC into the actual SC sts from last round) {Ref. Photos 6&7} (32 total sts)
Rounds 4&5: SC each stitch around
Round 6: SC each stitch around to last 4 sts, SC last 4 sts working through the front loop only, slip stitch into first stitch of next round {Ref. Photos 8&9}, Turn Work
Hood Section (worked in rows)
Row 1: Skip the first stitch that you slipped into on the last row, and SC into the next 4 sts, slip stitch into the inside loop of the stitch two rows up from where you’re now working {Ref Photos 10-12), Turn work
Repeat row 1 until you’re approx. 5 sts from the center back of the heel on either side. End on the left side (with toe facing you) as shown in photo.
{Ref Photo 13}
Turn slipper so heel is on the right and work the next row towards the toe.
Side of Truck Cab
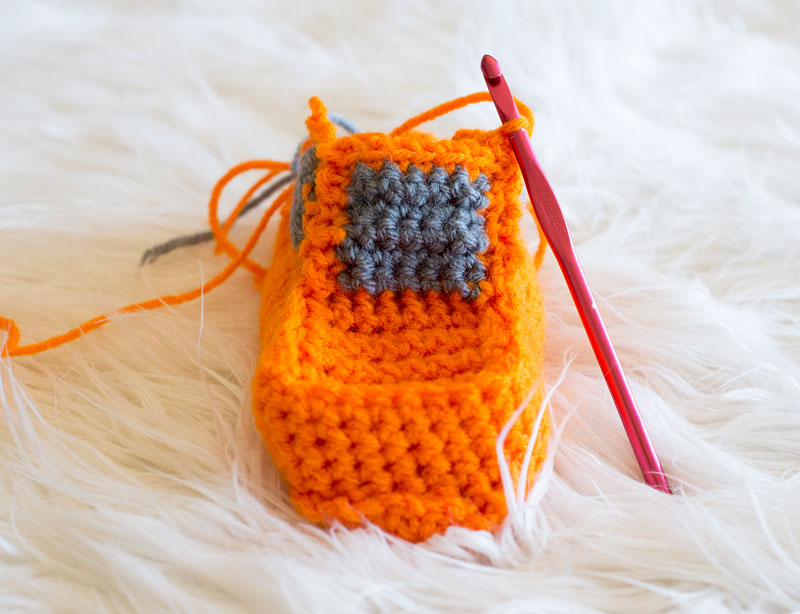
Row 1: Working through the un-worked, outside loop, SC next 5 sts, CH1, Turn work
{Ref Photo 14}
Pick up window color yarn and alternate between the two colors, carrying the un-used yarn along the inside of your work.
Row 2: SC1 (base color), SC3 (window color), SC1 (base color), CH1, Turn Work
Row 3: SC1 (base color), SC2 (window color), SC2tog (base color), CH1, Turn Work (4 total sts)
Drop and cut window color yarn
Row 4: SC2tog, SC last 2 sts (3 total sts)
Cut yarn, and secure all ends. Don’t worry about weaving ends in.
{Ref Photos 15&16}
Turn slipper so heel is on right and work towards toe on left again.
Row 1: Pick up and SC, through outside un-worked loop only, 5 sts for the other side of cab. Start with the first stitch towards the toe starting from the open heel section. CH1, Turn Work
{Ref Photo 17}
Pick up window color yarn and alternate between the two colors, carrying the un-used yarn along the inside of your work.
Row 2: SC1 (base color), SC3 (window color), SC1 (base color), CH1, Turn Work
Row 3: SC1 (base color), SC2 (window color), SC2tog (base color), CH1, Turn Work (4 total sts)
Drop and cut window color yarn
Row 4: SC2tog, SC last 2 sts (3 total sts)
Cut yarn, and secure all ends. Don’t worry about weaving ends in.
{Ref Photos 18&19}
Windshield Section
Row 1: Picking up sts from the hood area (directly between the front of cab sections), pick up and SC 4 sts. Work from right to left with toe facing you, slip stitch into very base outside edge of cab section (counts as turning chain), TW
{Ref Photo 20}
Pick up window color yarn and alternate between the two colors, carrying the un-used yarn along the inside of your work.
Row 2: Skip slip stitch from last row, SC1 (base color), SC2 (window color), SC1 (base color), slip stitch into base of outside edge (move this stitch up by one each row), CH1, TW {Ref Photo 21}
Row 3: Repeat row 2
Drop and cut window color yarn. Secure ends. Don’t worry about weaving them in.
Row 4: Skip slip stitch from last row, SC all 4 sts. You should now be at the roof line of the cab. Slip stitch into the edge of next stitch of roof, TW
Roof Section
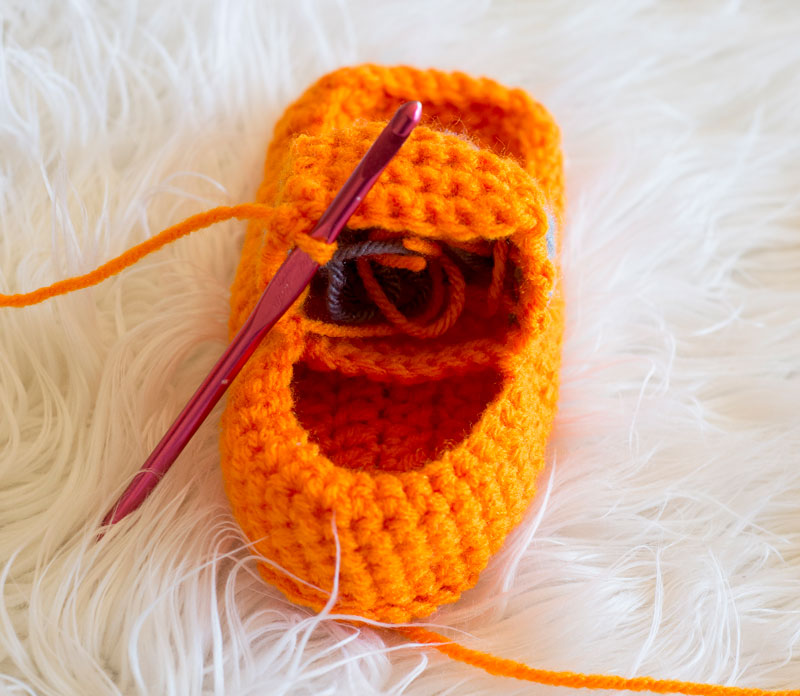
Row 1: Skip slip stitch from last row, working through inside loop only, SC all 4 sts, slip stitch into edge of next stitch on roof, TW {Ref Photo 22}
Row 2: Skip slip stitch from last row, SC each stitch across, slip stitch into edge of next stitch on roof, TW
Repeat Row 2 to back edge of roof {Ref Photo 23}
Stuff all the secured loose ends inside of the cab.
Back of Cab
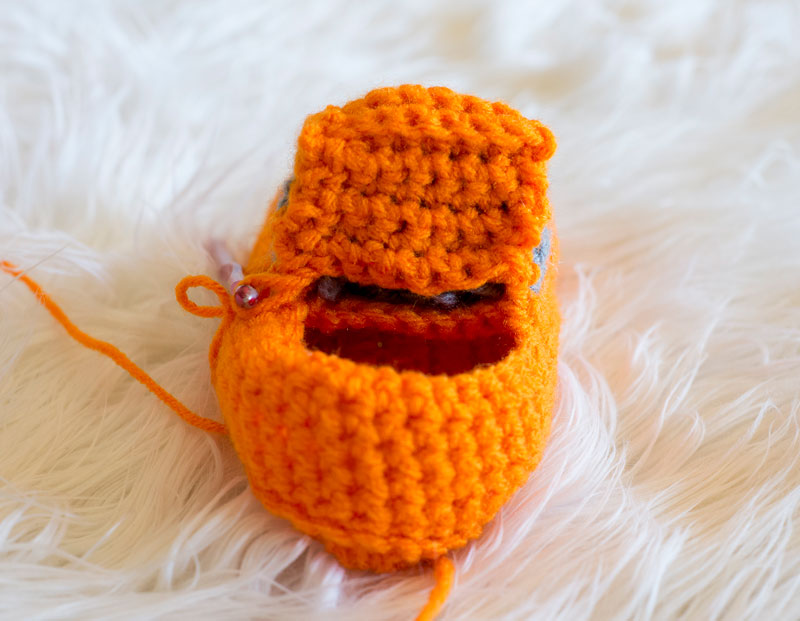
Row 1: Start working down the back side of cab now, Skip slip stitch from last row, SC into the back loop of each stitch, slip stitch into edge of next stitch on back of cab, TW
Row 2: Skip slip stitch from last row, SC each stitch across, slip stitch into edge of next stitch on back of cab, TW
Repeat row 2 down the back of cab until gap is nearly closed. Stuff cab with scrap yarn or fiber fill until it holds its shape well.
{Ref Photo 24}
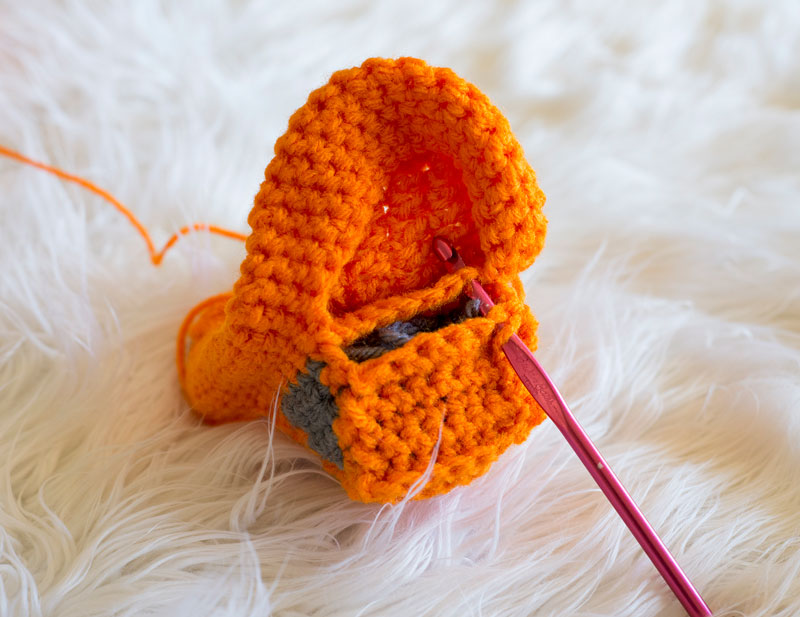
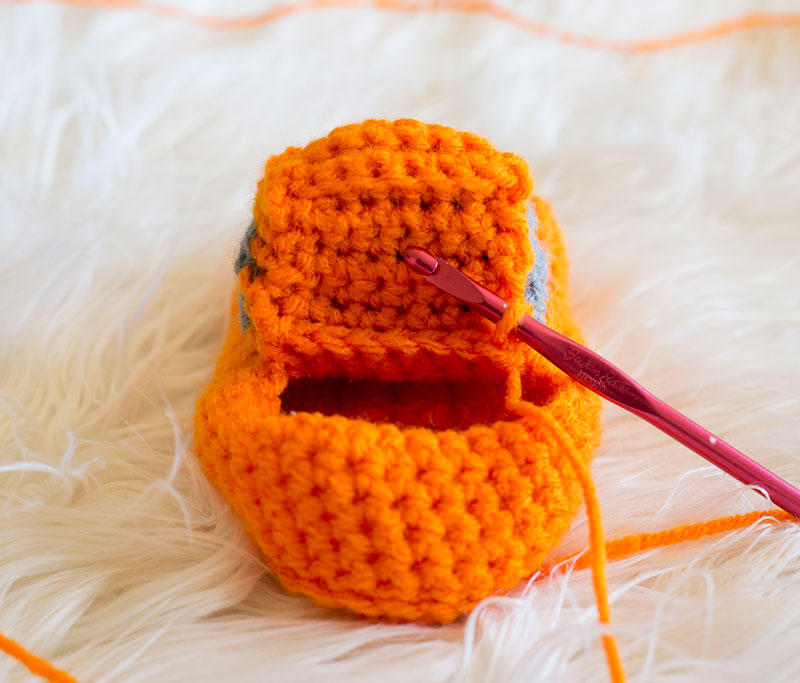
Row 3: In order to close the gap, SC through two sts at once (one from this row and one from the edge next to the heel hole) across row. Do not cut yarn. {Ref Photos 25&26}
Move to edge of heel and *FPHDC into each of next two sts, BPHDC into each of next two sts* Repeat around in order to give it a bit more cinch around the heel. Fasten Off.
{Ref Photo 27}
Wheel Pattern (Make 4)
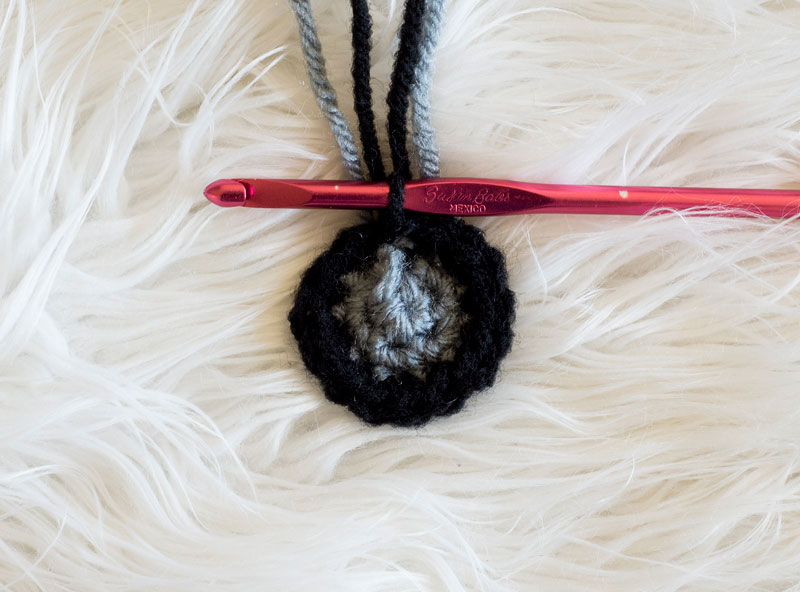
Create magic circle with 3 SC sts in center using hub cap color yarn, slip stitch into first stitch
Row 1: 2 SC in each stitch around (6 total sts), slip stitch into first st
Drop and cut hub cap color yarn and pick up black wheel yarn {Ref Photo 28}
Row 2: *2 SC in first stitch, 1 SC in next* Repeat around (9 total sts)
Row 3: Working through the back loop only, SC in each stitch around, slip stitch into first st
Row 4: SC in each stitch around, slip stitch into first stitch
Secure ends inside of wheel at this point. Don’t worry about weaving them in.
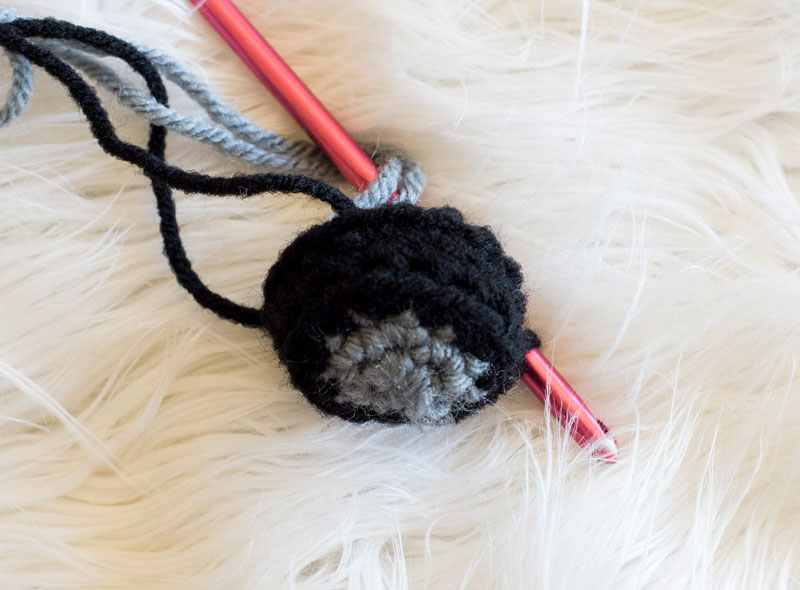
Row 5: Working through back loop only, *SC2tog, SC1* Repeat around, slip stitch into first stitch (6 total sts)
Stuff all yarn ends into center of wheel at this point. If wheel still needs more filling to hold shape, add it here. {Ref Photo 29}
Row 6: *SC2tog* Repeat around (3 total sts)
Continue to SC2tog until the hole at the back of your wheel is closed. Cut yarn with an approx. 7 inch yarn tail. Use your yarn or tapestry needle to secure the hole, and secure end. Use this end to sew your wheel onto side of truck. {Ref Photo 30}
Child Size 4-8 Pattern
Slipper Sole (worked in flat rounds):
Chain 15
Round 1: Double crochet into the second chain from hook and each chain across to the last one, 8 DC sts in the last chain (causes you to turn and work down the opposite side of your project) {Ref. Photo 1}, DC into the bottom edge of each chain across {Ref. Photo 2}, Turn around corner and 2 SC into edge of first stitch, and 2 SC into edge of second stitch (this will flatten out the toe of your sole) {Ref. Photo 3}, Slip stitch into first stitch (36 total sts not including initial chain)
Round 2: CH1, HDC in each of next 12 sts, *2 HDC in next st, 1 HDC in next st* Repeat 3 more times (causes you to turn and work down the opposite side of your project again) {Ref. Photo 4}, HDC in each of next 12 sts, CH1, SC in corner stitch, CH1, SC in next two sts, CH1, SC in corner stitch, CH1, slip stitch into first stitch {Ref. Photo 5} (44 total sts)
Edges of Slipper (worked in continuous rounds)
Place stitch marker
Round 3: Working through the front loop only, SC each stitch around (skip the CH1 spaces from the last round when working around the front corners. Only SC into the actual SC sts from last round) {Ref. Photos 6&7} (40 total sts)
Rounds 4-6: SC each stitch around
Round 7: SC each stitch around to last 5 sts, SC last 5 sts working through the front loop only, plus the first stitch of next round, slip stitch into second stitch of next round (6 total sts SC through front loop at front of toe) {Ref. Photos 8&9}, Turn Work
Hood Section (worked in rows)
Row 1: Skip the first stitch that you slipped into on the last row, and SC into the next 6 sts, slip stitch into the inside loop of the stitch two rows up from where you’re now working {Ref Photos 10-12), Turn work
Repeat row 1 until you’re approx. 7 sts from the center back of the heel on either side. End on the left side (with toe facing you) as shown in photo.
{Ref Photo 13}
Turn slipper so heel is on the right and work the next row towards the toe.
Side of Truck Cab
Row 1: Working through the un-worked, outside loop, SC next 6 sts, CH1, Turn work
{Ref Photo 14}
Pick up window color yarn and alternate between the two colors, carrying the un-used yarn along the inside of your work.
Row 2: S1 (base color), SC4 (window color), SC1 (base color), CH1, Turn Work (6 total sts)
Row 3: SC1 (base color), SC3 (window color), SC2tog (base color), CH1, Turn Work (5 total sts)
Row 4: SC2tog (base color), SC2 (window color), SC1 (base color), CH1, Turn Work (4 total sts)
Drop and cut window color yarn
Row 5: SC2, SC2tog (3 total sts)
Cut yarn, and secure all ends. Don’t worry about weaving ends in.
{Ref Photos 15&16}
Turn slipper so heel is on right and work towards toe on left again.
Row 1: Pick up and SC, through outside un-worked loop only, 6 sts for the other side of cab. Start with the first stitch towards the toe starting from the open heel section. CH1, Turn Work
{Ref Photo 17}
Pick up window color yarn and alternate between the two colors, carrying the un-used yarn along the inside of your work.
Row 2: S1 (base color), SC4 (window color), SC1 (base color), CH1, Turn Work (6 total sts)
Row 3: SC1 (base color), SC3 (window color), SC2tog (base color), CH1, Turn Work (5 total sts)
Row 4: SC2tog (base color), SC2 (window color), SC1 (base color), CH1, Turn Work (4 total sts)
Drop and cut window color yarn
Row 5: SC2, SC2tog (3 total sts)
Cut yarn, and secure all ends. Don’t worry about weaving ends in.
{Ref Photos 18&19}
Windshield Section
Row 1: Picking up sts from the hood area (directly between the front of cab sections), pick up and SC 6 sts. Work from right to left with toe facing you, slip stitch into very base outside edge of cab section (counts as turning chain), Turn Work
{Ref Photo 20}
Pick up window color yarn and alternate between the two colors, carrying the un-used yarn along the inside of your work.
Row 2: Skip slip stitch from last row, SC1 (base color), SC4 (window color), SC1 (base color), slip stitch into base of outside edge (move this stitch up by one each row), CH1, Turn Work
{Ref Photo 21}
Rows 3&4: Repeat row 2
Drop and cut window color yarn. Secure ends. Don’t worry about weaving them in.
Row 5: Skip slip stitch from last row, SC all 6 sts. You should now be at the roof line of the cab. Slip stitch into the edge of next stitch of roof, Turn Work
Roof Section
Row 1: Skip slip stitch from last row, working through inside loop only, SC all 6 sts, slip stitch into edge of next stitch on roof, Turn Work {Ref Photo 22}
Row 2: Skip slip stitch from last row, SC each stitch across, slip stitch into edge of next stitch on roof, Turn Work
Repeat Row 2 to back edge of roof {Ref Photo 23}
Stuff all the secured loose ends inside of the cab.
Back of Cab
Row 1: Start working down the back side of cab now, Skip slip stitch from last row, SC into the back loop of each stitch, slip stitch into edge of next stitch on back of cab, Turn Work
Row 2: Skip slip stitch from last row, SC each stitch across, slip stitch into edge of next stitch on back of cab, Turn Work
Repeat row 2 down the back of cab until gap is nearly closed. Stuff cab with scrap yarn or fiber fill until it holds its shape well.
{Ref Photo 24}
Row 3: In order to close the gap, SC through two sts at once (one from this row and one from the edge next to the heel hole) across row. Do not cut yarn. {Ref Photos 25&26}
Move to edge of heel and *FPHDC into each of next two sts, BPHDC into each of next two sts* Repeat around in order to give it a bit more cinch around the heel. Fasten Off.
{Ref Photo 27}
Wheel Pattern (Make 4)
Create magic circle with 5 SC sts in center using hub cap color yarn, slip stitch into first stitch
Row 1: 2 SC in each stitch around (10 total sts), slip stitch into first st
Drop and cut hub cap color yarn and pick up black wheel yarn {Ref Photo 28}
Row 2: *2 SC in first stitch, 1 SC in next* Repeat around (15 total sts)
Row 3: Working through the back loop only, SC in each stitch around, slip stitch into first st
Row 4: SC in each stitch around, slip stitch into first stitch
Secure ends inside of wheel at this point. Don’t worry about weaving them in.
Row 5: Working through back loop only, *SC2tog, SC1* Repeat around, slip stitch into first stitch (10 total sts)
Stuff all yarn ends into center of wheel at this point. If wheel still needs more filling to hold shape, add it here. {Ref Photo 29}
Row 6: *SC2tog* Repeat around (5 total sts)
Continue to SC2tog until the hole at the back of your wheel is closed. Cut yarn with an approx. 7 inch yarn tail. Use your yarn or tapestry needle to secure the hole, and secure end. Use this end to sew your wheel onto side of truck. {Ref Photo 30}
Child Size 7-11 Pattern
Slipper Sole (worked in flat rounds):
Chain 21
Round 1: Double crochet into the second chain from hook and each chain across to the last one, 8 DC sts in the last chain (causes you to turn and work down the opposite side of your project) {Ref. Photo 1}, DC into the bottom edge of each chain across {Ref. Photo 2}, Turn around corner and 2 SC into edge of first stitch, and 2 SC into edge of second stitch (this will flatten out the toe of your sole) {Ref. Photo 3}, Slip stitch into first stitch (48 total sts not including initial chain)
Round 2: CH1, DC in each of next 18 sts, *2 DC in next st, 1 DC in next st* Repeat 3 more times (causes you to turn and work down the opposite side of your project again) {Ref. Photo 4}, DC in each of next 18 sts, CH1, SC in corner stitch, CH1, SC in next two sts, CH1, SC in corner stitch, CH1, slip stitch into first stitch {Ref. Photo 5} (56 total sts)
Edges of Slipper (worked in continuous rounds)
Place stitch marker
Round 3: Working through the front loop only, SC each stitch around (skip the CH1 spaces from the last round when working around the front corners. Only SC into the actual SC sts from last round) {Ref. Photos 6&7} (52 total sts)
Rounds 4-7: SC each stitch around
Round 8: SC each stitch around to last 6 sts, SC last 6 sts working through the front loop only, plus the first two stitches of next round, slip stitch into third stitch of next round (8 total sts SC through front loop at front of toe) {Ref. Photos 8&9}, Turn Work
Hood Section (worked in rows)
Row 1: Skip the first stitch that you slipped into on the last row, and SC into the next 8 sts, slip stitch into the inside loop of the stitch two rows up from where you’re now working {Ref Photos 10-12), Turn work
Repeat row 1 until you’re approx. 9 sts from the center back of the heel on either side. End on the left side (with toe facing you) as shown in photo.
{Ref Photo 13}
Turn slipper so heel is on the right and work the next row towards the toe.
Side of Truck Cab
Row 1: Working through the un-worked, outside loop, SC next 8 sts, CH1, Turn work
{Ref Photo 14}
Pick up window color yarn and alternate between the two colors, carrying the un-used yarn along the inside of your work.
Row 2: SC2tog (base color), SC5 (window color), SC1 (base color), CH1, Turn Work (7 total sts)
Row 3: SC1 (base color), SC4 (window color), SC2tog (base color), CH1, Turn Work (6 total sts)
Row 4: SC2tog (base color), SC3 (window color), SC1 (base color), CH1, Turn Work (5 total sts)
Row 5: SC1 (base color), SC2 (window color), SC2tog (base color), CH1, Turn Work (4 total sts)
Drop and cut window color yarn
Row 6: SC2tog, SC2 (4 total sts)
Cut yarn, and secure all ends. Don’t worry about weaving ends in.
{Ref Photos 15&16}
Turn slipper so heel is on right and work towards toe on left again.
Row 1: Pick up and SC, through outside un-worked loop only, 8 sts for the other side of cab. Start with the first stitch towards the toe starting from the open heel section. CH1, Turn Work
{Ref Photo 17}
Pick up window color yarn and alternate between the two colors, carrying the un-used yarn along the inside of your work.
Row 2: SC2tog (base color), SC5 (window color), SC1 (base color), CH1, Turn Work (7 total sts)
Row 3: SC1 (base color), SC4 (window color), SC2tog (base color), CH1, Turn Work (6 total sts)
Row 4: SC2tog (base color), SC3 (window color), SC1 (base color), CH1, Turn Work (5 total sts)
Row 5: SC1 (base color), SC2 (window color), SC2tog (base color), CH1, Turn Work (4 total sts)
Drop and cut window color yarn
Row 6: SC2tog, SC2 (4 total sts)
Cut yarn, and secure all ends. Don’t worry about weaving ends in.
{Ref Photos 18&19}
Windshield Section
Row 1: Picking up sts from the hood area (directly between the front of cab sections), pick up and SC 8 sts. Work from right to left with toe facing you, slip stitch into very base outside edge of cab section (counts as turning chain), Turn Work
{Ref Photo 20}
Pick up window color yarn and alternate between the two colors, carrying the un-used yarn along the inside of your work.
Row 2: Skip slip stitch from last row, SC1 (base color), SC6 (window color), SC1 (base color), slip stitch into base of outside edge (move this stitch up by one each row), CH1, Turn Work
{Ref Photo 21}
Rows 3-5: Repeat row 2
Drop and cut window color yarn. Secure ends. Don’t worry about weaving them in.
Row 6: Skip slip stitch from last row, SC all 8 sts. You should now be at the roof line of the cab. Slip stitch into the edge of next stitch of roof, Turn Work
Roof Section
Row 1: Skip slip stitch from last row, working through inside loop only, SC all 8 sts, slip stitch into edge of next stitch on roof, Turn Work {Ref Photo 22}
Row 2: Skip slip stitch from last row, SC each stitch across, slip stitch into edge of next stitch on roof, Turn Work
Repeat Row 2 to back edge of roof {Ref Photo 23}
Stuff all the secured loose ends inside of the cab.
Back of Cab
Row 1: Start working down the back side of cab now, Skip slip stitch from last row, SC into the back loop of each stitch, slip stitch into edge of next stitch on back of cab, Turn Work
Row 2: Skip slip stitch from last row, SC each stitch across, slip stitch into edge of next stitch on back of cab, Turn Work
Repeat row 2 down the back of cab until gap is nearly closed. Stuff cab with scrap yarn or fiber fill until it holds its shape well.
{Ref Photo 24}
Row 3: In order to close the gap, SC through two sts at once (one from this row and one from the edge next to the heel hole) across row. Do not cut yarn. {Ref Photos 25&26}
Move to edge of heel and *FPHDC into each of next two sts, BPHDC into each of next two sts* Repeat around in order to give it a bit more cinch around the heel. Fasten Off.
{Ref Photo 27}
Wheel Pattern (Make 4)
Create magic circle with 5 SC sts in center using hub cap color yarn, slip stitch into first stitch
Row 1: 2 SC in each stitch around (10 total sts), slip stitch into first st
Drop and cut hub cap color yarn and pick up black wheel yarn {Ref Photo 28}
Row 2: *2 SC in first stitch, 1 SC in next* Repeat around (15 total sts)
Row 3: Working through the back loop only, SC in each stitch around, slip stitch into first st
Row 4: SC in each stitch around, slip stitch into first stitch
Secure ends inside of wheel at this point. Don’t worry about weaving them in.
Row 5: Working through back loop only, *SC2tog, SC1* Repeat around, slip stitch into first stitch (10 total sts)
Stuff all yarn ends into center of wheel at this point. If wheel still needs more filling to hold shape, add it here. {Ref Photo 29}
Row 6: *SC2tog* Repeat around (5 total sts)
Continue to SC2tog until the hole at the back of your wheel is closed. Cut yarn with an approx. 7 inch yarn tail. Use your yarn or tapestry needle to secure the hole, and secure end. Use this end to sew your wheel onto side of truck. {Ref Photo 30}
Child Size 10-2 Pattern
Slipper Sole (worked in flat rounds):
Chain 19
Round 1: Double crochet into the second chain from hook and each chain across to the last one, 8 DC sts in the last chain (causes you to turn and work down the opposite side of your project) {Ref. Photo 1}, DC into the bottom edge of each chain across {Ref. Photo 2}, Turn around corner and 3 SC into edge of first stitch, and 3 SC into edge of second stitch (this will flatten out the toe of your sole) {Ref. Photo 3}, Slip stitch into first stitch (46 total sts not including initial chain)
Round 2: CH1, DC in each of next 16 sts, *2 DC in next st, 1 DC in next st* Repeat 3 more times (causes you to turn and work down the opposite side of your project again) {Ref. Photo 4}, DC in each of next 16 sts, CH1, SC in corner stitch, CH1, SC in next four sts, CH1, SC in corner stitch, CH1, slip stitch into first stitch {Ref. Photo 5} (54 total sts)
Round 3: CH1, SC in each of next 16 sts, *2 SC in next st, 1 SC in next* Repeat 5 more times (causes you to turn and work down the opposite side of your project again), SC in each of next 16 sts {Don’t count the previous round’s chain section as sts for the following}, CH2, SC in corner stitch, CH2, SC in next four sts, CH2, SC in corner stitch, CH2, slip stitch into first stitch (64 total sts)
Edges of Slipper (worked in continuous rounds)
Place stitch marker
Round 4: Working through the front loop only, SC each stitch around (skip the CH2 spaces from the last round when working around the front corners. Only SC into the actual SC sts from last round) {Ref. Photos 6&7} (56 total sts)
Rounds 5-9: SC each stitch around
Round 10: SC each stitch around to last 8 sts, SC last 8 sts working through the front loop only, plus the first two stitches of next round, slip stitch into third stitch of next round (10 total sts SC through front loop at front of toe) {Ref. Photos 8&9}, Turn Work
Hood Section (worked in rows)
Row 1: Skip the first stitch that you slipped into on the last row, and SC into the next 10 sts, slip stitch into the inside loop of the stitch two rows up from where you’re now working {Ref Photos 10-12), Turn work
Repeat row 1 until you’re approx. 11 sts from the center back of the heel on either side. End on the left side (with toe facing you) as shown in photo.
{Ref Photo 13}
Turn slipper so heel is on the right and work the next row towards the toe.
Side of Truck Cab
Row 1: Working through the un-worked, outside loop, SC next 8 sts, CH1, Turn work
{Ref Photo 14}
Pick up window color yarn and alternate between the two colors, carrying the un-used yarn along the inside of your work.
Row 2: SC2tog (base color), SC5 (window color), SC1 (base color), CH1, Turn Work (7 total sts)
Row 3: SC1 (base color), SC4 (window color), SC2tog (base color), CH1, Turn Work (6 total sts)
Row 4: SC2tog (base color), SC3 (window color), SC1 (base color), CH1, Turn Work (5 total sts)
Row 5: SC1 (base color), SC2 (window color), SC2tog (base color), CH1, Turn Work (4 total sts)
Drop and cut window color yarn
Row 6: SC2tog, SC2 (3 total sts)
Cut yarn, and secure all ends. Don’t worry about weaving ends in.
{Ref Photos 15&16}
Turn slipper so heel is on right and work towards toe on left again.
Row 1: Pick up and SC, through outside un-worked loop only, 8 sts for the other side of cab. Start with the first stitch towards the toe starting from the open heel section. CH1, Turn Work
{Ref Photo 17}
Pick up window color yarn and alternate between the two colors, carrying the un-used yarn along the inside of your work.
Row 2: SC2tog (base color), SC5 (window color), SC1 (base color), CH1, Turn Work (7 total sts)
Row 3: SC1 (base color), SC4 (window color), SC2tog (base color), CH1, Turn Work (6 total sts)
Row 4: SC2tog (base color), SC3 (window color), SC1 (base color), CH1, Turn Work (5 total sts)
Row 5: SC1 (base color), SC2 (window color), SC2tog (base color), CH1, Turn Work (4 total sts)
Drop and cut window color yarn
Row 6: SC2tog, SC2 (3 total sts)
Cut yarn, and secure all ends. Don’t worry about weaving ends in.
{Ref Photos 18&19}
Windshield Section
Row 1: Picking up sts from the hood area (directly between the front of cab sections), pick up and SC 10 sts. Work from right to left with toe facing you, slip stitch into very base outside edge of cab section (counts as turning chain), Turn Work
{Ref Photo 20}
Pick up window color yarn and alternate between the two colors, carrying the un-used yarn along the inside of your work.
Row 2: Skip slip stitch from last row, SC1 (base color), SC8 (window color), SC1 (base color), slip stitch into base of outside edge (move this stitch up by one each row), CH1, Turn Work
{Ref Photo 21}
Rows 3-5: Repeat row 2
Drop and cut window color yarn. Secure ends. Don’t worry about weaving them in.
Row 6: Skip slip stitch from last row, SC all 10 sts. You should now be at the roof line of the cab. Slip stitch into the edge of next stitch of roof, Turn Work
Roof Section
Row 1: Skip slip stitch from last row, working through inside loop only, SC all 10 sts, slip stitch into edge of next stitch on roof, Turn Work {Ref Photo 22}
Row 2: Skip slip stitch from last row, SC each stitch across, slip stitch into edge of next stitch on roof, Turn Work
Repeat Row 2 to back edge of roof {Ref Photo 23}
Stuff all the secured loose ends inside of the cab.
Back of Cab
Row 1: Start working down the back side of cab now, Skip slip stitch from last row, SC into the back loop of each stitch, slip stitch into edge of next stitch on back of cab, Turn, Work
Row 2: Skip slip stitch from last row, SC each stitch across, slip stitch into edge of next stitch on back of cab, Turn Work
Repeat row 2 down the back of cab until gap is nearly closed. Stuff cab with scrap yarn or fiber fill until it holds its shape well.
{Ref Photo 24}
Row 3: In order to close the gap, SC through two sts at once (one from this row and one from the edge next to the heel hole) across row. Do not cut yarn. {Ref Photos 25&26}
Move to edge of heel and *FPHDC into each of next two sts, BPHDC into each of next two sts* Repeat around in order to give it a bit more cinch around the heel. Fasten Off.
{Ref Photo 27}
Wheel Pattern (Make 4)
Create magic circle with 6 SC sts in center using hub cap color yarn, slip stitch into first stitch
Row 1: 2 SC in each stitch around (12 total sts), slip stitch into first st
Drop and cut hub cap color yarn and pick up black wheel yarn {Ref Photo 28}
Row 2: *2 SC in first stitch, 1 SC in next* Repeat around (18 total sts)
Row 3: Working through the back loop only, SC in each stitch around, slip stitch into first st
Row 4: SC in each stitch around, slip stitch into first stitch
Secure ends inside of wheel at this point. Don’t worry about weaving them in.
Row 5: Working through back loop only, *SC2tog, SC1* Repeat around, slip stitch into first stitch (12 total sts)
Stuff all yarn ends into center of wheel at this point. If wheel still needs more filling to hold shape, add it here. {Ref Photo 29}
Row 6: *SC2tog* Repeat around (6 total sts)
Continue to SC2tog until the hole at the back of your wheel is closed. Cut yarn with an approx. 7 inch yarn tail. Use your yarn or tapestry needle to secure the hole, and secure end. Use this end to sew your wheel onto side of truck. {Ref Photo 30}
Child Size 2-6 Pattern
Slipper Sole (worked in flat rounds):
Chain 21
Round 1: Double crochet into the second chain from hook and each chain across to the last one, 8 DC sts in the last chain (causes you to turn and work down the opposite side of your project) {Ref. Photo 1}, DC into the bottom edge of each chain across {Ref. Photo 2}, Turn around corner and 3 SC into edge of first stitch, and 3 SC into edge of second stitch (this will flatten out the toe of your sole) {Ref. Photo 3}, Slip stitch into first stitch (50 total sts not including initial chain)
Round 2: CH1, DC in each of next 18 sts, *2 DC in next st, 1 DC in next st* Repeat 3 more times (causes you to turn and work down the opposite side of your project again) {Ref. Photo 4}, DC in each of next 18 sts, CH1, SC in corner stitch, CH1, SC in next four sts, CH1, SC in corner stitch, CH1, slip stitch into first stitch {Ref. Photo 5} (58 total sts)
Round 3: CH1, SC in each of next 18 sts, *2 SC in next st, 1SC in next* Repeat 5 more times (causes you to turn and work down the opposite side of your project again), SC in each of next 18 sts {Don’t count the previous round’s chain section as sts for the following}, CH2, SC in corner stitch, CH2, SC in next four sts, CH2, SC in corner stitch, CH2, slip stitch into first stitch (68 total sts)
Edges of Slipper (worked in continuous rounds)
Place stitch marker
Round 4: Working through the front loop only, SC each stitch around (skip the CH2 spaces from the last round when working around the front corners. Only SC into the actual SC sts from last round) {Ref. Photos 6&7} (60 total sts)
Rounds 5-9: SC each stitch around
Round 10: SC each stitch around to last 8 sts, SC last 8 sts working through the front loop only, plus the first two stitches of next round, slip stitch into third stitch of next round (10 total sts SC through front loop at front of toe) {Ref. Photos 8&9}, Turn Work
Hood Section (worked in rows)
Row 1: Skip the first stitch that you slipped into on the last row, and SC into the next 10 sts, slip stitch into the inside loop of the stitch two rows up from where you’re now working {Ref Photos 10-12), Turn work
Repeat row 1 until you’re approx. 11 sts from the center back of the heel on either side. End on the left side (with toe facing you) as shown in photo.
{Ref Photo 13}
Turn slipper so heel is on the right and work the next row towards the toe.
Side of Truck Cab
Row 1: Working through the un-worked, outside loop, SC next 9 sts, CH1, Turn work
{Ref Photo 14}
Pick up window color yarn and alternate between the two colors, carrying the un-used yarn along the inside of your work.
Row 2: SC2tog (base color), SC6 (window color), SC1 (base color), CH1, Turn Work (8 total sts)
Row 3: SC1 (base color), SC5 (window color), SC2tog (base color), CH1, Turn Work (7 total sts)
Row 4: SC2tog (base color), SC4 (window color), SC1 (base color), CH1, Turn Work (6 total sts)
Row 5: SC1 (base color), SC3 (window color), SC2tog (base color), CH1, Turn Work (5 total sts)
Row 6: SC2tog (base color), SC2 (window color), SC1 (base color), CH1, Turn Work (4 total sts)
Drop and cut window color yarn
Row 7: SC2tog, SC2 (3 total sts)
Cut yarn, and secure all ends. Don’t worry about weaving ends in.
{Ref Photos 15&16}
Turn slipper so heel is on right and work towards toe on left again.
Row 1: Pick up and SC, through outside un-worked loop only, 9 sts for the other side of cab. Start with the first stitch towards the toe starting from the open heel section. CH1, Turn Work
{Ref Photo 17}
Pick up window color yarn and alternate between the two colors, carrying the un-used yarn along the inside of your work.
Row 2: SC2tog (base color), SC6 (window color), SC1 (base color), CH1, Turn Work (8 total sts)
Row 3: SC1 (base color), SC5 (window color), SC2tog (base color), CH1, Turn Work (7 total sts)
Row 4: SC2tog (base color), SC4 (window color), SC1 (base color), CH1, Turn Work (6 total sts)
Row 5: SC1 (base color), SC3 (window color), SC2tog (base color), CH1, Turn Work (5 total sts)
Row 6: SC2tog (base color), SC2 (window color), SC1 (base color), CH1, Turn Work (4 total sts)
Drop and cut window color yarn
Row 7: SC2tog, SC2 (3 total sts)
Cut yarn, and secure all ends. Don’t worry about weaving ends in.
{Ref Photos 18&19}
Windshield Section
Row 1: Picking up sts from the hood area (directly between the front of cab sections), pick up and SC 10 sts. Work from right to left with toe facing you, slip stitch into very base outside edge of cab section (counts as turning chain), Turn Work
{Ref Photo 20}
Pick up window color yarn and alternate between the two colors, carrying the un-used yarn along the inside of your work.
Row 2: Skip slip stitch from last row, SC1 (base color), SC8 (window color), SC1 (base color), slip stitch into base of outside edge (move this stitch up by one each row), CH1, Turn Work
{Ref Photo 21}
Rows 3-6: Repeat row 2
Drop and cut window color yarn. Secure ends. Don’t worry about weaving them in.
Row 7: Skip slip stitch from last row, SC all 10 sts. You should now be at the roof line of the cab. Slip stitch into the edge of next stitch of roof, Turn Work
Roof Section
Row 1: Skip slip stitch from last row, working through inside loop only, SC all 10 sts, slip stitch into edge of next stitch on roof, Turn Work {Ref Photo 22}
Row 2: Skip slip stitch from last row, SC each stitch across, slip stitch into edge of next stitch on roof, Turn Work
Repeat Row 2 to back edge of roof {Ref Photo 23}
Stuff all the secured loose ends inside of the cab.
Back of Cab
Row 1: Start working down the back side of cab now, Skip slip stitch from last row, SC into the back loop of each stitch, slip stitch into edge of next stitch on back of cab, Turn Work
Row 2: Skip slip stitch from last row, SC each stitch across, slip stitch into edge of next stitch on back of cab, Turn Work
Repeat row 2 down the back of cab until gap is nearly closed. Stuff cab with scrap yarn or fiber fill until it holds its shape well.
{Ref Photo 24}
Row 3: In order to close the gap, SC through two sts at once (one from this row and one from the edge next to the heel hole) across row. Do not cut yarn. {Ref Photos 25&26}
Move to edge of heel and *FPHDC into each of next two sts, BPHDC into each of next two sts* Repeat around in order to give it a bit more cinch around the heel. Fasten Off.
{Ref Photo 27}
Wheel Pattern (Make 4)
Create magic circle with 6 SC sts in center using hub cap color yarn, slip stitch into first stitch
Row 1: 2 SC in each stitch around (12 total sts), slip stitch into first st
Drop and cut hub cap color yarn and pick up black wheel yarn {Ref Photo 28}
Row 2: *2 SC in first stitch, 1 SC in next* Repeat around (18 total sts)
Row 3: Working through the back loop only, SC in each stitch around, slip stitch into first st
Row 4: SC in each stitch around, slip stitch into first stitch
Secure ends inside of wheel at this point. Don’t worry about weaving them in.
Row 5: Working through back loop only, *SC2tog, SC1* Repeat around, slip stitch into first stitch (12 total sts)
Stuff all yarn ends into center of wheel at this point. If wheel still needs more filling to hold shape, add it here. {Ref Photo 29}
Row 6: *SC2tog* Repeat around (6 total sts)
Continue to SC2tog until the hole at the back of your wheel is closed. Cut yarn with an approx. 7 inch yarn tail. Use your yarn or tapestry needle to secure the hole, and secure end. Use this end to sew your wheel onto side of truck. {Ref Photo 30}
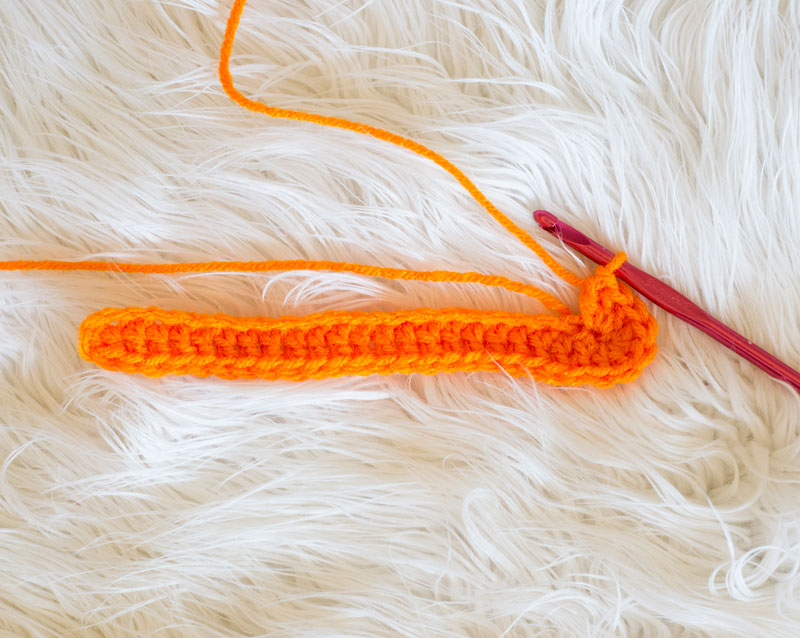
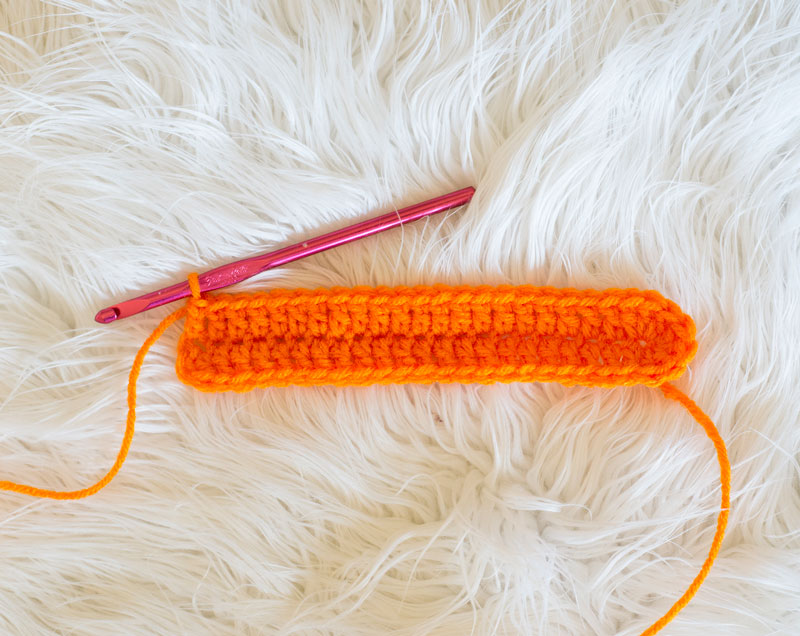
Photo 1- Shows how the group of DC sts worked In the middle of round 1 will turn your work, lining your sts up to be worked along the other side.
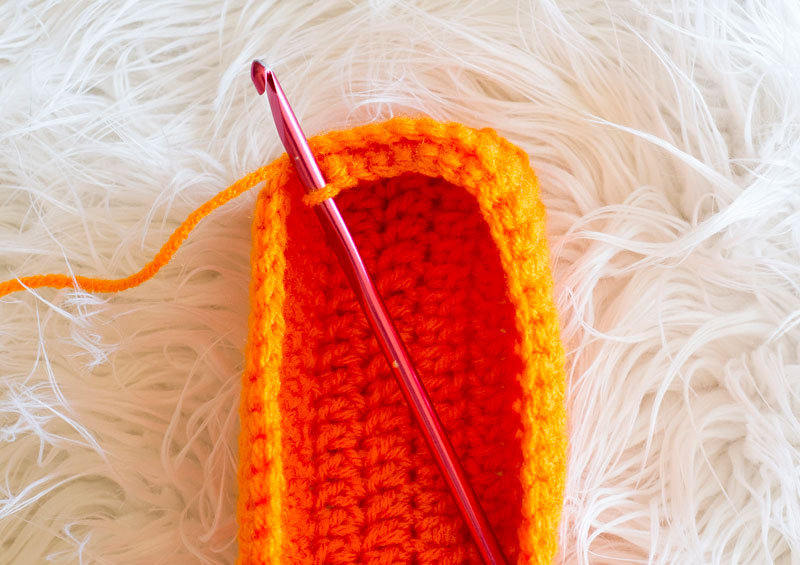
Photo 8 – Shows how specific number of sts should be worked through front loop only when transitioning to the hood portion of pattern.
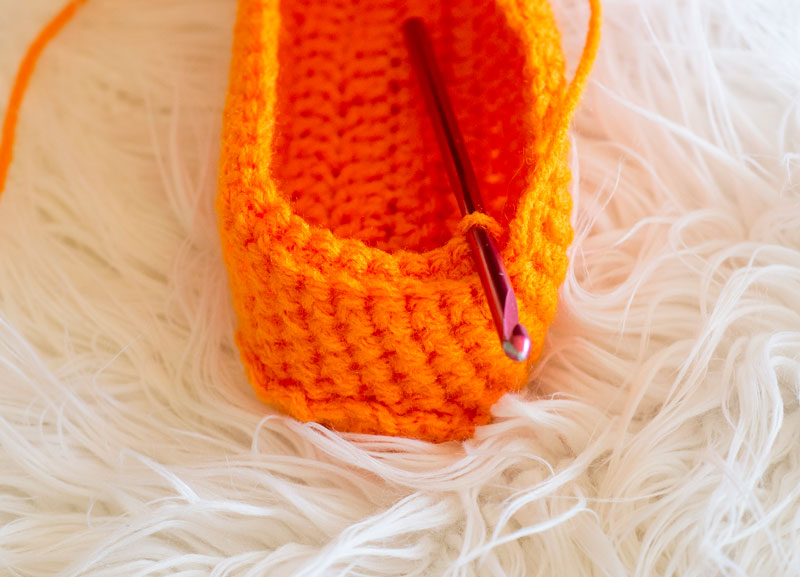
Photo 9 – Shows the toe section after working specific number of sts through front loop from snother angle.
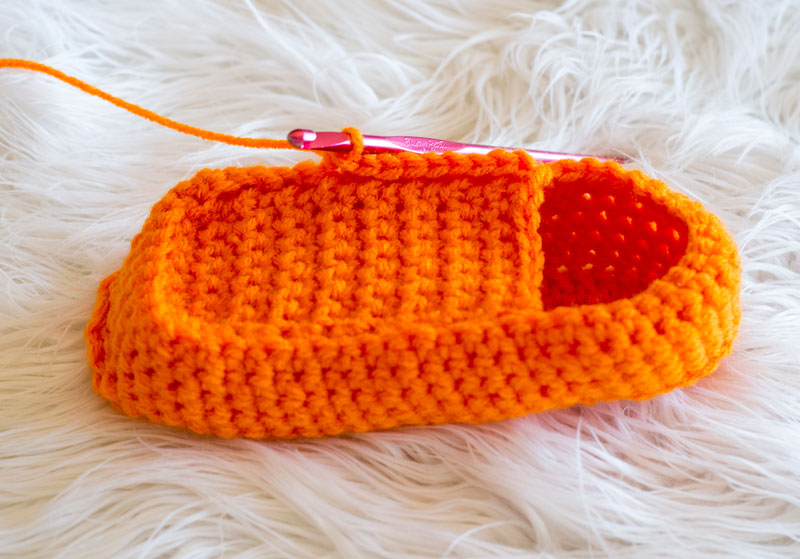
Photo 14 – Shows sample of what sts worked through outside loop for edge of truck cab will look like.
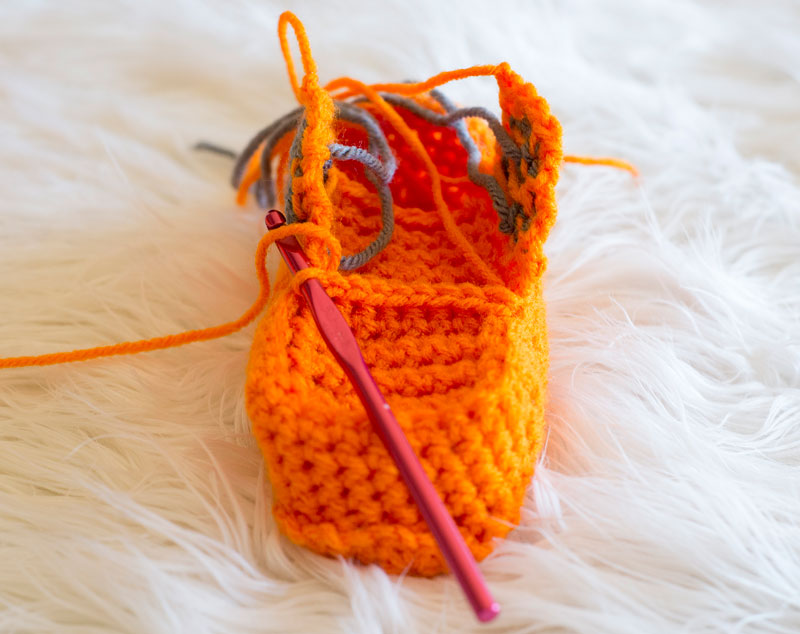
Photo 20 – Shows first row of windshield section where sts have been picked up directly from the front.
This design, a written work and images are a copyright of
©MelodysMakings and may not be copied or reproduced in any way.
You have permission to sell finished products made from this pattern, but please leave a link to my website, www.melodys-makings.com, in your product listing specifying that I am the designer of this pattern. Thank you for supporting me as a work at home mother!






I think a lot of women, especially my generation were raised to take care of everyone else. My Mom had 5 children in 6 1/2 years and I would be surprised if my father ever changed a diaper or gave a bath. Even now, I’ve had bronchitis for a month but I feel guilty if my husband sweeps or washed the dishes.
Agreed! Self care is a new thing to many women, especially in older generations. I’m really lucky that my husband is probably a better caretaker than I am. It seems to be shifting as the generations move forward…but it really is a new concept!
there was a time I like to greet and genuinely care for neighbors,
but not so much now. I just find indifference, muddling, no investment
outside their own world. It is odd. So I don’t put myself out there
then I don’t suffer with rejection. Yeah, I know I’m wrong, but then
it is my feeling. I just know my place and stay in my craft room.
It is really hard to find authentic people, I tire of Fake.
It’s a metaphor really for our feelings…simply trying to say that acknowledging our feelings (even when they’re ones we don’t like) can really help to move them along 🙂 You’re not wrong – protecting your mental space is also important!
I’m always the one doing for others so it is strange to think of what is going on with me. But also when I do speak up, honestly, most don’t listen. It’s an on going joke around here when I say something people around me don’t hear. It’s not that my voice is soft or I’m speaking low. I have literally recorded myself and others will say I said nothing but then play it back and they are like wow, you did speak. I don’t know if it’s the pitch or what but I’m so used to it I don’t bother most times. But I have found lately that my youngest is bad about saying everything is ok when I can tell it’s not so working with him on expressing himself better is slowly helping me to do so too.
Even just internally holding space for your feelings (acknowledging them to yourself) can often times be enough! I tend to try to shove off any negative feelings…which in the long run seems to just make them worse. It’s fun to be learning all of this stuff alongside our children. I feel lucky to be able to share a teensy bit of this knowledge with them. Cool that you’re doing that too. Way to go!
I just want you to know, I’m knitting your pattern “Lacy Leaf Bonnet” and I just LOVE it!
I hesitated because each row is different, but the pattern is so well written! and it’s turning out soooooooo pretty!!!
I love your patterns! You are so talented!!! Thank you!!!
So glad you’re loving it! I’d love to see a picture when you finish. I love that stitch pattern….so pretty!
I actually have been working on this to some degree and having good luck when I do it. Usually, I wait until I’m pretty overwhelmed, but then do finally speak up and my husband will respond. Work in progress…
Isn’t it always a work in progress? I’m also working on noticing these feelings and holding space for them at least internally earlier on. Sometimes it works and sometimes it doesn’t 🙂
This post really hit home for me. I am the oldest of my sister and I, I also have three sons, and I always feel obligated to be the one to take care of everyone but myself. Between my oldest son being in prison, the death of my dad, and the unhappiness of my mother and sister in their marriages, I try to avoid discussing my emotional baggage to anyone. Lately though it’s getting harder to hold it all in. I know I need to make changes in this, but just not sure where to start. Thank you so much for listening, it is so appreciated.
Sounds overwhelming! Sometimes even being the one to sit with and listen to yourself can really make the difference though. I’ve found that just really feeling my feelings in my body (like – there’s a big tense knot in my throat) and then naming them – stress – can help to ease them up and transition them on. Often times moving that energy a little can help you identify exactly what you need underneath that feeling. Sending love and hugs because I know the first step (starting to take care of yourself a little more!) is the hardest one.
I keep my feelings all good, I greet nice persons with a smile-have a nice day and keep to myself and away from trouble types in a nice way!
would like a copy of truck slippers, please. Thanks!!