Cadence Cabled Cloche Crochet Pattern
Cadence Cabled Cloche Crochet Pattern
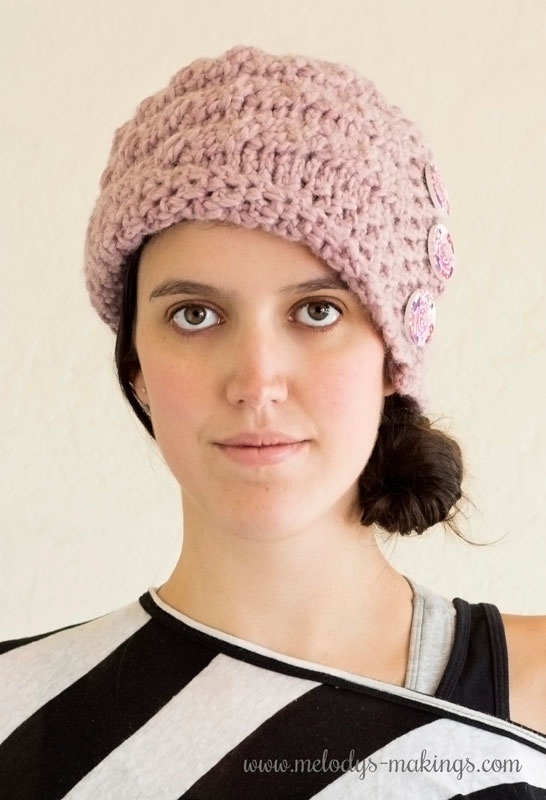
Occasionally you get one of those days where you simply don’t want to brush your hair. Or maybe even take a shower. It’s moments like those when having a super cute crochet hat comes in handy. Just throw your hair to the side or up under the hat, and you don’t have to worry about it.
That’s how my Cadence Cabled Cloche crochet hat pattern was born. It’s an elegant hat featuring gorgeous design elements that might help trick people into thinking you actually take care of yourself! Haha.
This free hat crochet pattern features bulky (5) weight yarn and size 6.5mm (K/10) crochet hook. Pattern features all sizes Toddler, Child, and Adult.
Please Pay With A Share!
1. Head over to Ravelry, add this pattern to your favorites and queue the pattern listing. This is a great way to help designers connect with new customers, and we always super appreciate you taking that extra moment!
You’ll find the crochet Ravelry listing here.
2. Share this blog post with your crafty friends. Please use the handy social sharing buttons at the bottom of this post so your crafty friends can take advantage of this free pattern too.
3. Scroll down to view the pattern OR if you’d like an ad-free PDF copy of this pattern (or to add the pattern to your Rav. library), simply input your email address into this form and I’ll email one over:
Cadence Cabled Cloche Crochet Pattern
Average Head Circumference Size Chart
18-20″ (45.75-50.75cm)
19-20.5” (48.25-52cm)
21.5-22.5″ (54.5-57cm)
Materials
- Yarn: Approximately 150 yards of bulky (5) weight yarn for smaller sizes, and approximately 220 yards for larger sizes (I used Ironstone Yarn – Harmony for mine).
- Crochet Hook: Size 6.5mm (K/10) OR whatever size is needed to achieve gauge
- Yarn or Tapestry Needle
- 3 Matching Buttons
Gauge
6 sts and 7 rows = 2 inches (5 centimeters) in single crochet
***It is important to check your gauge!***
Abbreviations
- SC: Single Crochet
- CH: Chain
- FPSC: Front Post Single Crochet – Insert hook around post of next stitch by placing between sts and coming through the back of the stitch and onto the other side. Yarn over, and pull loop through as if you were doing a normal SC stitch, Yarn over and pull through both loops.
- BPSC: Back Post Single Crochet – Insert hook around the post of next stitch by placing between sts on back side and coming around the front of the stitch and back to back side. Yarn over, and pull loop through as if you were doing a normal SC stitch, Yarn over and pull through both loops.
- Cable Sequence: Skip the first next two, sts, and front post double crochet around each of the following two sts. You will now have 2 FPDC sts that are leaning to the right. Go back to the first two skipped sts, and FPDC into the first and then the second stitch. This will create 2 sts that cross over the other two and slant to the left.
- SC2tog: Single crochet the next two stitches together
- **: Repeat the section in between the two stars as specified
Toddler Pattern
Chain 20
Row 1: Single crochet into the fourth chain from hook, *CH1, Skip one chain, SC in the next chain* Repeat across, Turn work (18 total sts including one stitch of turning chain)
Row 2: CH2, SC in the next CH1 space, *CH1, SC in the next CH1 space* Repeat across, finishing with a SC in the CH3 space at the start of row 1, Turn work (18 total sts including one stitch of turning chain)
Row 3: CH2, SC in the next CH1 space, *CH1, SC in the next CH1 space* Repeat across, finishing with a SC in the CH2 space at the start of the previous row, Turn work
Repeat row 3 until your piece measures approx. 1.5 inches (3.75cm) from the starting edge.
*Note: Your work may tighten up during the next few rows, causing the beginning section to be wider than the end. This is normal and will be addressed later in the pattern*
Row 4: CH2, SC in the next CH1 space, CH1, SC in the next CH1 space, SC across the remainder of row, Turn work (18 total sts including one stitch of turning chain)
Row 5: CH1, BPSC around each of next 2 sts, *FPSC around each of next 4 sts, BPSC around each of next 2 sts* Repeat once, CH1, SC into next CH1 space, CH1, SC in the CH2 space at the start of previous row, Turn work
Row 6: CH2, SC in the next CH1 space, CH1, SC in the next CH1 space, *FPSC around each of next 2 sts, BPSC around each of next 4 sts* Repeat once, FPSC around each of last two sts, Turn work
Row 7: CH1, BPSC around each of next 2 sts, *Cable Sequence over next 4 sts, BPSC around each of next 2 sts* Repeat once, CH1, SC into next CH1 space, CH1, SC in the CH2 space at the start of previous row, Turn work
Row 8: CH2, SC in the next CH1 space, CH1, SC in the next CH1 space, *FPSC around each of next 2 sts, BPSC around each of next 4 sts* Repeat once, FPSC around each of last two sts, Turn work
Row 9: CH1, BPSC around each of next 2 sts, *FPSC around each of next 4 sts, BPSC around each of next 2 sts* Repeat once, CH1, SC into next CH1 space, CH1, SC in the CH2 space at the start of previous row, Turn work
Row 10: CH2, SC in the next CH1 space, CH1, SC in the next CH1 space, *FPSC around each of next 2 sts, BPSC around each of next 4 sts* Repeat once, FPSC around each of last two sts, Turn work
Repeat rows 7-10 until your piece measures approx. 19 inches (48.25cm) from the starting edge. End on a repeat of row 10.
Secure work, and using your yarn or tapestry needle, sew the starting edge of your work over the ending edge of your work with a 1 inch (2.5cm) overlap. If the starting section is slightly wider than the ending section due to the tension of the cables, fold down the top of the starting section and secure it to the inside of your hat so your piece is even all the way around. When picking up sts during the next section, you can either pull sts from the top of this fold or from the overlapped section behind it.
This creates the majority of your hat. Now we’ll be closing the top section.
Pick up and Single Crochet 50 sts around the top of your hat. Make sure the stitches are evenly spaced, and that you’re doing your single crochet stitch around the outside BPSC stitch we did along this edge. We’ll be working in continuous rounds for the decrease section. Place stitch marker.
Decreases:
Round 1: *SC2tog, SC3* Repeat around (40 total sts)
Round 2: *SC2tog, SC2* Repeat around (30 total sts)
Round 3: *SC2tog, SC1* Repeat around (20 total sts)
Round 4: *SC2tog* Repeat around (10 total sts)
Round 5: *SC2tog* Repeat around (5 total sts)
Continue to SC2tog until the hole at the top of your hat is closed. Cut yarn with an approx. 7 inch yarn tail. Use your yarn or tapestry needle to secure the top hole, and secure and weave in all ends.
Add two or three matching buttons (I used 1.25”) stacked one on top of each other over the overlapping section of your hat. Then, fold up approx. 1.5 inches (3.75cm) of the brim of hat on the opposite side from the buttons. Leave the front section slanting down as pictured. You can either leave this just as a fold or choose to use your yarn or tapestry needle to tack this section in place. Secure and weave in all ends.
Child Pattern
Chain 22
Row 1: Single crochet into the fourth chain from hook, *CH1, Skip one chain, SC in the next chain* Repeat across, Turn work (20 total sts including one stitch of turning chain)
Row 2: CH2, SC in the next CH1 space, *CH1, SC in the next CH1 space* Repeat across, finishing with a SC in the CH3 space at the start of row 1, Turn work (20 total sts including one stitch of turning chain)
Row 3: CH2, SC in the next CH1 space, *CH1, SC in the next CH1 space* Repeat across, finishing with a SC in the CH2 space at the start of the previous row, Turn work
Repeat row 3 until your piece measures approx. 1.5 inches (3.75cm) from the starting edge.
*Note: Your work may tighten up during the next few rows, causing the beginning section to be wider than the end. This is normal and will be addressed later in the pattern*
Row 4: CH2, SC in the next CH1 space, *CH1, SC in the next CH1 space* Repeat once, SC across the remainder of row, Turn work (20 total sts including one stitch of turning chain)
Row 5: CH1, BPSC around each of next 2 sts, *FPSC around each of next 4 sts, BPSC around each of next 2 sts* Repeat once, CH1, *SC into next CH1 space, CH1* Repeat to end of row, finishing with a SC in the CH2 space at the start of previous row, Turn work
Row 6: CH2, SC in the next CH1 space, *CH1, SC in the next CH1 space* Repeat once, *FPSC around each of next 2 sts, BPSC around each of next 4 sts* Repeat once, FPSC around each of last two sts, Turn work
Row 7: CH1, BPSC around each of next 2 sts, *Cable Sequence over next 4 sts, BPSC around each of next 2 sts* Repeat once, CH1, *SC into next CH1 space, CH1* Repeat to end of row, finishing with a SC in the CH2 space at the start of previous row, Turn work
Row 8: CH2, SC in the next CH1 space, *CH1, SC in the next CH1 space* Repeat once, *FPSC around each of next 2 sts, BPSC around each of next 4 sts* Repeat once, FPSC around each of last two sts, Turn work
Row 9: CH1, BPSC around each of next 2 sts, *FPSC around each of next 4 sts, BPSC around each of next 2 sts* Repeat once, CH1, *SC into next CH1 space, CH1* Repeat to end of row, finishing with a SC in the CH2 space at the start of previous row, Turn work
Row 10: CH2, SC in the next CH1 space, *CH1, SC in the next CH1 space* Repeat once, *FPSC around each of next 2 sts, BPSC around each of next 4 sts* Repeat once, FPSC around each of last two sts, Turn work
Repeat rows 7-10 until your piece measures approx. 20 inches (50.75cm) from the starting edge. End on a repeat of row 10.
Secure work, and using your yarn or tapestry needle, sew the starting edge of your work over the ending edge of your work with a 1 inch (2.5cm) overlap. If the starting section is slightly wider than the ending section due to the tension of the cables, fold down the top of the starting section and secure it to the inside of your hat so your piece is even all the way around. When picking up sts during the next section, you can either pull sts from the top of this fold or from the overlapped section behind it.
This creates the majority of your hat. Now we’ll be closing the top section.
Pick up and Single Crochet 55 sts around the top of your hat. Make sure the stitches are evenly spaced, and that you’re doing your single crochet stitch around the outside BPSC stitch we did along this edge. We’ll be working in continuous rounds for the decrease section. Place stitch marker.
Decreases:
Round 1: *SC2tog, SC3* Repeat around (44 total sts)
Round 2: *SC2tog, SC2* Repeat around (33 total sts)
Round 3: *SC2tog, SC1* Repeat around (22 total sts)
Round 4: *SC2tog* Repeat around (11 total sts)
Continue to SC2tog until the hole at the top of your hat is closed. Cut yarn with an approx. 7 inch yarn tail. Use your yarn or tapestry needle to secure the top hole, and secure and weave in all ends.
Add three matching buttons (I used 1.25”) stacked one on top of each other over the overlapping section of your hat. Then, fold up approx. 1.5 inches (3.75cm) of the brim of hat on the opposite side from the buttons. Leave the front section slanting down as pictured. You can either leave this just as a fold or choose to use your yarn or tapestry needle to tack this section in place. Secure and weave in all ends.
Adult Pattern
Chain 28
Row 1: Single crochet into the fourth chain from hook, *CH1, Skip one chain, SC in the next chain* Repeat across, Turn work (26 total sts including one stitch of turning chain)
Row 2: CH2, SC in the next CH1 space, *CH1, SC in the next CH1 space* Repeat across, finishing with a SC in the CH3 space at the start of row 1, Turn work (26 total sts including one stitch of turning chain)
Row 3: CH2, SC in the next CH1 space, *CH1, SC in the next CH1 space* Repeat across, finishing with a SC in the CH2 space at the start of the previous row, Turn work
Repeat row 3 until your piece measures approx. 2 inches (5cm) from the starting edge.
*Note: Your work may tighten up during the next few rows, causing the beginning section to be wider than the end. This is normal and will be addressed later in the pattern*
Row 4: CH2, SC in the next CH1 space, *CH1, SC in the next CH1 space* Repeat 2 more times, SC across the remainder of row, finishing with two SC sts in the last stitch, Turn work (27 total sts including one stitch of turning chain)
Row 5: CH1, BPSC around first stitch, *FPSC around each of next 4 sts, BPSC around each of next 2 sts* Repeat 2 more times, CH1, *SC into next CH1 space, CH1* Repeat to end of row, finishing with a SC in the CH2 space at the start of previous row, Turn work
Row 6: CH2, SC in the next CH1 space, *CH1, SC in the next CH1 space* Repeat 2 more times, *FPSC around each of next 2 sts, BPSC around each of next 4 sts* Repeat 2 more times, FPSC around last stitch, Turn work
Row 7: CH1, BPSC around first stitch, *Cable Sequence over next 4 sts, BPSC around each of next 2 sts* Repeat 2 more times, CH1, *SC into next CH1 space, CH1* Repeat to end of row, finishing with a SC in the CH2 space at the start of previous row, Turn work
Row 8: CH2, SC in the next CH1 space, *CH1, SC in the next CH1 space* Repeat 2 more times, *FPSC around each of next 2 sts, BPSC around each of next 4 sts* Repeat 2 more times, FPSC around last stitch, Turn work
Row 9: CH1, BPSC around first stitch, *FPSC around each of next 4 sts, BPSC around each of next 2 sts* Repeat 2 more times, CH1, *SC into next CH1 space, CH1* Repeat to end of row, finishing with a SC in the CH2 space at the start of previous row, Turn work
Row 10: CH2, SC in the next CH1 space, *CH1, SC in the next CH1 space* Repeat 2 more times, *FPSC around each of next 2 sts, BPSC around each of next 4 sts* Repeat 2 more times, FPSC around last stitch, Turn work
Repeat rows 7-10 until your piece measures approx. 22 inches (55.75cm) from the starting edge. End on a repeat of row 10.
Secure work, and using your yarn or tapestry needle, sew the starting edge of your work over the ending edge of your work with a 1 inch (2.5cm) overlap. If the starting section is slightly wider than the ending section due to the tension of the cables, fold down the top of the starting section and secure it to the inside of your hat so your piece is even all the way around. When picking up sts during the next section, you can either pull sts from the top of this fold or from the overlapped section behind it.
This creates the majority of your hat. Now we’ll be closing the top section.
Pick up and Single Crochet 60 sts around the top of your hat. Make sure the stitches are evenly spaced, and that you’re doing your single crochet stitch around the single BPSC stitch we did along this edge. We’ll be working in continuous rounds for the decrease section. Place stitch marker.
Decreases:
Round 1: *SC2tog, SC4* Repeat around (50 total sts)
Round 2: *SC2tog, SC3* Repeat around (40 total sts)
Round 3: *SC2tog, SC2* Repeat around (30 total sts)
Round 4: *SC2tog, SC1* Repeat around (20 total sts)
Round 5: *SC2tog* Repeat around (10 total sts)
Round 6: *SC2tog* Repeat around (5 total sts)
Continue to SC2tog until the hole at the top of your hat is closed. Cut yarn with an approx. 7 inch yarn tail. Use your yarn or tapestry needle to secure the top hole, and secure and weave in all ends.
Add three matching buttons (I used 1.25”) stacked one on top of each other over the overlapping section of your hat. Then, fold up approx. 2 inches (5cm) of the brim of hat on the opposite side from the buttons. Leave the front section slanting down as pictured. You can either leave this just as a fold or choose to use your yarn or tapestry needle to tack this section in place. Secure and weave in all ends.
This design, a written work and images are a copyright of
©MelodysMakings and may not be copied or reproduced in any way.
You have permission to sell finished products made from this pattern, but please leave a link to my website, www.melodys-makings.com, in your product listing specifying that I am the designer of this pattern. Thank you for supporting me as a work at home mother!