Sun Struck Crochet Vest Pattern
You’ll find the Sun Struck Crochet Vest Pattern at the bottom of this post…
You may have noticed that I disappeared for the past few months.
I’ve been learning a new way of being, and incorporating the lessons into all areas of my life has been a practice.

The idea behind this new way of living, is to simply let the day move me.
In the past, I’ve spent a lot of time harnessing my own energy to create outcomes in my life. I’m currently learning to work with the universe and the energy that flows through us all, in order to let myself and my work be more of a universal expression than something created internally.
Will power is a mighty force….however, it’s like a birthday candle in the wind when compared to the energy and power living within the universe, God, or Spirit (whatever you want to call it).
Often times, we make decisions and move through life in reaction to all the events and people we interact with on a daily basis. We’re motivated by safety, competition, and fear.
Though these feelings and reactions certainly have a place in our lives, after living by and through them for the past decade (oh my goodness!!), I’ve decided that I no longer want to live my life based in fear.
Fear based decisions simply lead to more fear.
I choose to live my life based in love and to move through my days in that fashion.
The universe is made of pure love, abundance, and joy. It seems to me, that we need only put our faith in that fact, and then choose to live through those channels and some spectacular things happen in life. Have you noticed how GREEN the grass has been looking lately? Right here….right in front of me (not over there…) this grass looks lusciously cared for and green.
The past few weeks, I’ve noticed a universal nudge toward my creativity and the gifts I’m blessed to share here with you. So I’m back following that energy, and I hope it will bring some beautiful, pure, and universal expressions to life here on my blog once again.
I suspect that letting the need for financial support, the competitive ambitions, and all the other fear based motivations go might help open up some space for something truly made of love here. I hope you agree.
Comment and tell me…
Have you ever tried a different way of being? Have you made more decisions based in love than in fear? How did these changes show up in your life?
Sun Struck Crochet Vest Pattern
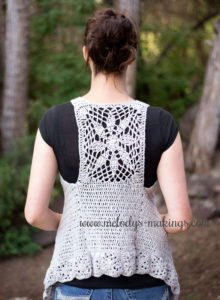
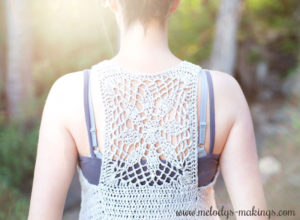
Today, enjoy my free crochet vest pattern – Sun Struck. This stunning vest features a gorgeous lacy block element on the back, and smaller lace blocks along the bottom. It’s a gorgeous pattern for welcoming back the loving sunshine of spring.
Please Share!
1. Head over to Ravelry, add this pattern to your favorites and queue the pattern listing. This is a great way to help designers connect with new customers, and we always super appreciate you taking that extra moment!
You’ll find the Ravelry listing here.
2. Share this blog post with your crafty friends. Please use the handy social sharing buttons at the bottom of this post so your crafty friends can take advantage of this free pattern too.
3. Scroll down to view the pattern OR if you’d like an ad-free PDF copy of this pattern (or to add the pattern to your Rav. library), simply input your email address into this form and I’ll email one over:
Sun Struck Vest Crochet Pattern
Girl Size Chart:
| Small | Medium | Large | |
| Age | 5-7 Years | 7-10 Years | 10-13 Years |
| Chest | 26″ | 28″ | 32″ |
Women Size Chart:
| Small | Medium | Large | XL | XXL | XXXL | |
| Bust | 33-35″ | 36-38″ | 39-41″ | 42-44″ | 45-48″ | 49-52″ |
Detailed Yarn Requirements:
Yarn Requirements
Approx. 350 yards of DK (3) Weight Yarn. This project can be made in one or two colors. If using two colors:
- Approx. 85 yards of Color 1
- Approx. 265 yards of Color 2
Yarn Requirements
Approx. 450 yards of DK (3) Weight Yarn. This project can be made in one or two colors. If using two colors:
- Approx. 108 yards of Color 1
- Approx. 342 yards of Color 2
Yarn Requirements
Approx. 500 yards of DK (3) Weight Yarn. This project can be made in one or two colors. If using two colors:
- Approx. 126 yards of Color 1
- Approx. 374 yards of Color 2
Yarn Requirements
Approx. 600 yards of DK (3) Weight Yarn. This project can be made in one or two colors. If using two colors:
- Approx. 154 yards of Color 1
- Approx. 446 yards of Color 2
Yarn Requirements
Approx. 725 yards of DK (3) Weight Yarn. This project can be made in one or two colors. If using two colors:
- Approx. 181 yards of Color 1
- Approx. 544 yards of Color 2
Yarn Requirements
Approx. 900 yards of DK (3) Weight Yarn. This project can be made in one or two colors. If using two colors:
- Approx. 230 yards of Color 1
- Approx. 670 yards of Color 2
Yarn Requirements
Approx. 1075 yards of DK (3) Weight Yarn. This project can be made in one or two colors. If using two colors:
- Approx. 269 yards of Color 1
- Approx. 806 yards of Color 2
Yarn Requirements
Approx. 1125 yards of DK (3) Weight Yarn. This project can be made in one or two colors. If using two colors:
- Approx. 280 yards of Color 1
- Approx. 845 yards of Color 2
Yarn Requirements
Approx. 1300 yards of DK (3) Weight Yarn. This project can be made in one or two colors. If using two colors:
- Approx. 324 yards of Color 1
- Approx. 976 yards of Color 2
Yarn Requirements
Approx. 1350 yards of DK (3) Weight Yarn. This project can be made in one or two colors. If using two colors:
- Approx. 338 yards of Color 1
- Approx. 1012 yards of Color 2
Yarn Suggestions:
Recommended yarn is a DK (3) weight yarn OR whatever size you’re able to achieve gauge with. I suggest using a natural fiber good for the warmer weather months like linen or cotton. This will also help with blocking at the end of the project.
Yarns I’ve used for this project:
- Juniper Moon Farms Zooey
- Berroco Indigo (listed as a worsted weight, but I was able to make gauge)
Materials
- Yarn: Approximately 150-300 yards of DK (3) yarn (I used Berroco Folio)
- Crochet Hook: Size 5.0mm (H/8) OR whatever size is needed to achieve gauge
- Yarn or Tapestry Needle
Gauge
8 sts and 5 rows = 2 inches (5 centimeters) in Double Crochet
***It is important to check your gauge!***
Abbreviations
- SC: Single Crochet
- CH: Chain
- HDC: Half Double Crochet
- DC: Double Crochet
- TRC: Triple Crochet
- DTRC: Double Triple Crochet
- SC2tog: Single Crochet the next 2 sts
- together (SC decrease)
- DC2tog: Double Crochet the next 2 sts
- together (DC decrease)
- HDC3tog: Half Double Crochet the next 3 sts
- together (HDC decrease by 2 stitches
- **: Repeat the section in between the two stars as specified
**Pattern is written in US terms**
**“Next stitch” when used at the beginning of a round will always indicate the very first stitch of that round.**
**Chain stitches at beginning of rounds do not count as stitches.**
Video Resource Page:
Video Password:SUNSMCALC060117
Toddler Pattern
Small Lace Block Pattern (Make 12)
See Video 1 for intro. & help with starting instructions
Create a Magic Circle with 6 SC sts in the center using Color 1 Yarn
Join in the round by slip stitching first and last stitches together
Round 1: CH1,2 SC in each stitch around, slip stitch into first stitch (12 total sts)
See Video 2 for help with Round 2
Round 2: CH2, *3 HDC in next stitch, CH2, skip the next stitch* Repeat around, slip stitch into first stitch (30 total sts including center chains)
See Video 3 for help with Round 3
Round 3: CH2, *HDC3tog, CH5, slip stitch in next CH space, CH5* Repeat around, slip stitch into first stitch (72 total sts including center chains)
Drop Color 1 yarn and pick up Color 2 yarn
See Video 4 for help with Round 4
Round 4: CH4, *5 TRC in next CH space, (DC, HDC) in next CH space, (HDC, DC) in next CH space* Repeat 3 more times, slip stitch into first stitch (36 total sts)
Fasten off. Secure and weave in all ends.
Your project should measure 3” (7.5cm) x 3” (7.5cm) at this point.
Large Lace Block Pattern
Create a Magic Circle with 8 DC sts in the center using Color 1 Yarn
Join in the round by slip stitching first and last stitches together
Round 1: CH2, 2 DC in each stitch around, slip stitch into first stitch (16 total sts)
See Video 5 for help with Round 2
Round 2: CH2, *2 DC in next stitch, CH2, skip the next stitch* Repeat around, slip stitch into first stitch (32 total sts including center chains)
See Video 6 for help with Round 3
Round 3: CH2, *2 DC in each of next 2 sts, CH5, skip next CH space* Repeat around, slip stitch into first stitch (72 total sts including center chains)
See Video 7 for help with Round 4
Round 4: CH2, *DC2tog, DC2tog, CH5, slip stitch into next CH space, CH5* Repeat around, slip stitch into first stitch (104 total sts including center chains)
See Video 8 for help with Round 5
Round 5: CH2, *SC2tog, CH5, slip stitch into next CH space, CH5, slip stitch into next CH space, CH5* Repeat around, slip stitch into first stitch (144 total sts including center chains)
See Video 9 for help with Round 6
Round 6: CH5, skip the first CH space, slip stitch into next CH space, *CH5, slip stitch into next CH space* Repeat around, slip stitch into first stitch (23 total CH spaces)
See Video 10 for help with Round 7
Drop Color 1 yarn and pick up Color 2 yarn
Round 7: CH3, *5 TRC in next CH space, 3 DC in next CH space, 3 HDC in next CH space, 3 SC in next CH space, 3 HDC in next CH space, 3 DC in next CH space* Repeat 3 more times, placing last 3 DC in same CH space as the prior HDC, slip stitch into first stitch (80 total sts)
Your project should measure 6.5” (16.5cm) x 6.5” (16.5cm) at this point.
See Video 11 for help with next section
Slip stitch into each of the next 3 sts (which should bring you to the corner stitch).
We’ll now be working in rows. Turn work.
Row 1: CH2, DC into each stitch across to the corner stitch, turn work
(20 total sts not including turning chain)
Row 2: CH2, DC in each stitch across, turn work (20 total sts)
Repeat Row 2 until your project measures 7” (17.75cm) in length from the upper edge of square. Do not turn work on last repeat. Fasten off.
See Video 12 for help with next section
Seam 2 of the small lace blocks together and then seam that piece to the bottom edge you just completed. Block as desired.
See Diagram 1
First Front Side Pattern
See Video 13 for help with next section
Return to the upper edge of the Large Lace Block piece you just created (upper edge is the opposite side of the edge you just extended). Attach a new strand of Color 2 yarn to the top right corner stitch with the right side of the project facing you.
Row 1: CH2, DC in each of next 6 sts, turn work (6 total sts)
Row 2: CH2, DC2tog, DC in each of next 4 sts, turn work (5 total sts)
Row 3: CH2, DC in each of next 3 sts, DC2tog, turn work (4 total sts)
Row 4: CH2, DC2tog, DC in each of next 2 sts, turn work (3 total sts)
Row 5: CH2, DC in next stitch, 3 DC in center stitch, DC in next stitch, turn work
(5 total sts)
See Video 14 for help with next section
Row 6: CH2, DC in each stitch across to center stitch, 3 DC in center stitch, DC in each remaining stitch across, turn work (7 total sts – increased by 2 sts)
Repeat Row 6 until you’ve increased to 51 total sts. Do not turn work on last repeat. Fasten off.
Seam 2 of the small lace blocks together. Seam 3 of the small lace blocks together. Seam these two pieces to the bottom edge you just created with the smaller, 2 block piece on the side closest to the back panel and the longer, 3 block piece on the side closest to the front opening.
See Diagram 2
Second Front Side Pattern
Return to the upper edge of the Large Lace Block piece you previously created (upper edge is the opposite side of the edge you just extended). Count 6 sts in from the top left corner stitch. Attach a new strand of Color 2 yarn to the stitch you just counted to with the right side of the project facing you.
Row 1: CH2, DC in each of next 6 sts, turn work (6 total sts)
Row 2: CH2, DC in each of next 4 sts, DC2tog, turn work (5 total sts)
Row 3: CH2, DC2tog, DC in each of next 3 sts, turn work (4 total sts)
Row 4: CH2, DC in each of next 2 sts, DC2tog, turn work (3 total sts)
Row 5: CH2, DC in next stitch, 3 DC in center stitch, DC in next stitch, turn work (5 total sts)
Row 6: CH2, DC in each stitch across to center stitch, 3 DC in center stitch, DC in each remaining stitch across, turn work (7 total sts – increased by 2 sts)
Repeat Row 6 until you’ve increased to 51 total sts. Do not turn work on last repeat. Fasten off.
Seam 2 of the small lace blocks together. Seam 3 of the small lace blocks together. Seam these two pieces to the bottom edge you just created with the smaller, 2 block piece on the side closest to the back panel and the longer, 3 block piece on the side closest to the front opening. Block as desired.
Lining up the front and back Small Lace Blocks, seam the back panel to the front sides of vest. Leave desired space for arm hole. I chose to leave 8” (20.25cm) open for the arm hole on my sample.
Add a SC border around all outside edges of the project. Fasten off. Secure and weave in all ends.
Child Small Pattern
Small Lace Block Pattern (Make 12)
See Video 1 for intro. & help with starting instructions
Create a Magic Circle with 6 SC sts in the center using Color 1 Yarn
Join in the round by slip stitching first and last stitches together
Round 1: CH1,2 SC in each stitch around, slip stitch into first stitch (12 total sts)
See Video 2 for help with Round 2
Round 2: CH2, *3 HDC in next stitch, CH2, skip the next stitch* Repeat around, slip stitch into first stitch (30 total sts including center chains)
See Video 3 for help with Round 3
Round 3: CH2, *HDC3tog, CH5, slip stitch in next CH space, CH5* Repeat around, slip stitch into first stitch (72 total sts including center chains)
Drop Color 1 yarn and pick up Color 2 yarn
See Video 4 for help with Round 4
Round 4: CH4, *5 TRC in next CH space, (DC, HDC) in next CH space, (HDC, DC) in next CH space* Repeat 3 more times, slip stitch into first stitch (36 total sts)
Fasten off. Secure and weave in all ends.
Your project should measure 3” (7.5cm) x 3” (7.5cm) at this point.
Large Lace Block Pattern
Create a Magic Circle with 8 DC sts in the center using Color 1 Yarn
Join in the round by slip stitching first and last stitches together
Round 1: CH2, 2 DC in each stitch around, slip stitch into first stitch (16 total sts)
See Video 5 for help with Round 2
Round 2: CH2, *2 DC in next stitch, CH2, skip the next stitch* Repeat around, slip stitch into first stitch (32 total sts including center chains)
See Video 6 for help with Round 3
Round 3: CH2, *2 DC in each of next 2 sts, CH5, skip next CH space* Repeat around, slip stitch into first stitch (48 total sts including center chains)
See Video 7 for help with Round 4
Round 4: CH2, *DC2tog, DC2tog, CH5, slip stitch into next CH space, CH5* Repeat around, slip stitch into first stitch (104 total sts including center chains)
See Video 8 for help with Round 5
Round 5: CH2, *SC2tog, CH5, slip stitch into next CH space, CH5, slip stitch into next CH space, CH5* Repeat around, slip stitch into first stitch (144 total sts including center chains)
See Video 9 for help with Round 6
Round 6: CH5, skip the first CH space, slip stitch into next CH space, *CH5, slip stitch into next CH space* Repeat around, slip stitch into first stitch (23 total CH spaces)
See Video 10 for help with Round 7
Drop Color 1 yarn and pick up Color 2 yarn
Round 7: CH3, *5 TRC in next CH space, 3 DC in next CH space, 3 HDC in next CH space, 3 SC in next CH space, 3 HDC in next CH space, 3 DC in next CH space* Repeat 3 more times, placing last 3 DC in same CH space as the prior HDC, slip stitch into first stitch (80 total sts)
Round 8: CH2, DC in each of next 2 sts, *4 DC in next stitch, DC in each of next 19 sts* Repeat 2 more times, 4 DC in next stitch, DC in each of next 17 sts, slip stitch into first stitch (92 total sts)
Your project should measure 7.5” (19cm) x 7.5” (19cm) at this point.
See Video 11 for help with next section
Slip stitch into each of the next 4 sts (which should bring you to the corner stitch).
We’ll now be working in rows. Turn work.
Row 1: CH2, DC into each stitch across to the corner stitch, turn work
(23 total sts not including turning chain)
Row 2: CH2, DC in each stitch across, turn work (23 total sts)
Repeat Row 2 until your project measures 8” (20.25cm) in length from the upper edge of square. Do not turn work on last repeat. Fasten off.
See Video 12 for help with next section
Seam 2 of the small lace blocks together, adding some SC sts in between the two blocks to make this piece the same width as the piece you just completed, and then seam that piece to the bottom edge you just completed. Block as desired.
See Diagram 1.
First Front Side Pattern
See Video 13 for help with next section
Return to the upper edge of the Large Lace Block piece you just created (upper edge is the opposite side of the edge you just extended). Attach a new strand of Color 2 yarn to the top right corner stitch with the right side of the project facing you.
Row 1: CH2, DC in each of next 6 sts, turn work (6 total sts)
Row 2: CH2, DC2tog, DC in each of next 4 sts, turn work (5 total sts)
Row 3: CH2, DC in each of next 3 sts, DC2tog, turn work (4 total sts)
Row 4: CH2, DC2tog, DC in each of next 2 sts, turn work (3 total sts)
Row 5: CH2, DC in next stitch, 3 DC in center stitch, DC in next stitch, turn work (5 total sts)
See Video 14 for help with next section
Row 6: CH2, DC in each stitch across to center stitch, 3 DC in center stitch, DC in each remaining stitch across, turn work (7 total sts – increased by 2 sts)
Repeat Row 6 until you’ve increased to 55 total sts. Do not turn work on last repeat. Fasten off.
Seam 2 of the small lace blocks together. Seam 3 of the small lace blocks together. Seam these two pieces to the bottom edge you just created with the smaller, 2 block piece on the side closest to the back panel and the longer, 3 block piece on the side closest to the front opening.
See Diagram 2
Second Front Side Pattern
Return to the upper edge of the Large Lace Block piece you previously created (upper edge is the opposite side of the edge you just extended). Count 6 sts in from the top left corner stitch. Attach a new strand of Color 2 yarn to the stitch you just counted to with the right side of the project facing you.
Row 1: CH2, DC in each of next 6 sts, turn work (6 total sts)
Row 2: CH2, DC in each of next 4 sts, DC2tog, turn work (5 total sts)
Row 3: CH2, DC2tog, DC in each of next 3 sts, turn work (4 total sts)
Row 4: CH2, DC in each of next 2 sts, DC2tog, turn work (3 total sts)
Row 5: CH2, DC in next stitch, 3 DC in center stitch, DC in next stitch, turn work (5 total sts)
Row 6: CH2, DC in each stitch across to center stitch, 3 DC in center stitch, DC in each remaining stitch across, turn work (7 total sts – increased by 2 sts)
Repeat Row 6 until you’ve increased to 55 total sts. Do not turn work on last repeat. Fasten off.
Seam 2 of the small lace blocks together. Seam 3 of the small lace blocks together. Seam these two pieces to the bottom edge you just created with the smaller, 2 block piece on the side closest to the back panel and the longer, 3 block piece on the side closest to the front opening. Block as desired.
Lining up the front and back Small Lace Blocks, seam the back panel to the front sides of vest. Leave desired space for arm hole. I chose to leave 8” (20.25cm) open for the arm hole on my sample.
Add a SC border around all outside edges of the project. Fasten off. Secure and weave in all ends.
Child Medium Pattern
Small Lace Block Pattern (Make 13)
See Video 1 for intro. & help with starting instructions
Create a Magic Circle with 6 SC sts in the center using Color 1 Yarn Join in the round by slip stitching first and last stitches together
Round 1: CH1,2 SC in each stitch around, slip stitch into first stitch (12 total sts)
See Video 2 for help with Round 2
Round 2: CH2, *3 HDC in next stitch, CH2, skip the next stitch* Repeat around, slip stitch into first stitch (30 total sts including center chains)
See Video 3 for help with Round 3
Round 3: CH2, *HDC3tog, CH5, slip stitch in next CH space, CH5* Repeat around, slip stitch into first stitch (72 total sts including center chains)
Drop Color 1 yarn and pick up Color 2 yarn
See Video 4 for help with Round 4
Round 4: CH4, *5 TRC in next CH space, (DC, HDC) in next CH space, (HDC, DC) in next CH space* Repeat 3 more times, slip stitch into first stitch (36 total sts)
Fasten off. Secure and weave in all ends.
Your project should measure 3” (7.5cm) x 3” (7.5cm) at this point.
Large Lace Block Pattern
Create a Magic Circle with 8 DC sts in the center using Color 1 Yarn
Join in the round by slip stitching first and last stitches together
Round 1: CH2, 2 DC in each stitch around, slip stitch into first stitch (16 total sts)
See Video 5 for help with Round 2
Round 2: CH2, *2 DC in next stitch, CH2, skip the next stitch* Repeat around, slip stitch into first stitch (32 total sts including center chains)
See Video 6 for help with Round 3
Round 3: CH2, *2 DC in each of next 2 sts, CH5, skip next CH space* Repeat around, slip stitch into first stitch (48 total sts including center chains)
See Video 7 for help with Round 4
Round 4: CH2, *DC2tog, DC2tog, CH5, slip stitch into next CH space, CH5* Repeat around, slip stitch into first stitch (104 total sts including center chains)
See Video 8 for help with Round 5
Round 5: CH2, *SC2tog, CH5, slip stitch into next CH space, CH5, slip stitch into next CH space, CH5* Repeat around, slip stitch into first stitch (144 total sts including center chains)
See Video 9 for help with Round 6
Round 6: CH5, skip the first CH space, slip stitch into next CH space, *CH5, slip stitch into next CH space* Repeat around, slip stitch into first stitch (23 total CH spaces)
See Video 10 for help with Round 7
Drop Color 1 yarn and pick up Color 2 yarn
Round 7: CH3, *5 TRC in next CH space, 3 DC in next CH space, 3 HDC in next CH space, 3 SC in next CH space, 3 HDC in next CH space, 3 DC in next CH space* Repeat 3 more times, placing last 3 DC in same CH space as the prior HDC, slip stitch into first stitch (80 total sts)
Round 8: CH2, DC in each of next 2 sts, *5 DC in next stitch, DC in each of next 19 sts* Repeat 2 more times, 5 DC in next stitch, DC in each of next 17 sts, slip stitch into first stitch (96 total sts)
Round 9: CH2, DC in each of next 4 sts, *4 DC in next stitch, DC in each of next 23 sts* Repeat 2 more times, 4 DC in next stitch, DC in each of next 19 sts, slip stitch into first stitch (108 total sts)
Your project should measure 8” (20.25cm) x 8” (20.25cm) at this point.
See Video 11 for help with next section
Slip stitch into each of the next 6 sts (which should bring you to the corner stitch).
We’ll now be working in rows. Turn work.
Row 1: CH2, DC into each stitch across to the corner stitch, turn work
(27 total sts not including turning chain)
Row 2: CH2, DC in each stitch across, turn work (27 total sts)
Repeat Row 2 until your project measures 9” (22.75cm) in length from the upper edge of square. Do not turn work on last repeat. Fasten off.
See Video 12 for help with next section
Seam 3 of the small lace blocks together, and then seam that piece to the bottom edge you just completed. Block as desired.
See Diagram 1.
First Front Side Pattern
See Video 13 for help with next section
Return to the upper edge of the Large Lace Block piece you just created (upper edge is the opposite side of the edge you just extended). Attach a new strand of Color 2 yarn to the top right corner stitch with the right side of the project facing you.
Row 1: CH2, DC in each of next 7 sts, turn work (7 total sts)
Row 2: CH2, DC2tog, DC in each of next 5 sts, turn work (6 total sts)
Row 3: CH2, DC in each of next 4 sts, DC2tog, turn work (5 total sts)
Row 4: CH2, DC2tog, DC in each of next 3 sts, turn work (4 total sts)
Row 5: CH2, DC in each of next 2 sts, DC2tog, turn work (3 total sts)
Row 6: CH2, DC in next stitch, 3 DC in center stitch, DC in next stitch, turn work (5 total sts)
See Video 14 for help with next section
Row 7: CH2, DC in each stitch across to center stitch, 3 DC in center stitch, DC in each remaining stitch across, turn work (7 total sts – increased by 2 sts)
Repeat Row 7 until you’ve increased to 65 total sts. Do not turn work on last repeat. Fasten off.
Seam 2 of the small lace blocks together, adding in some additional SC in between the two blocks to make it long enough to match one side of the front portion you just created. Seam 3 of the small lace blocks together, doing the same thing between them. Seam these two pieces to the bottom edge you just created with the smaller, 2 block piece on the side closest to the back panel and the longer, 3 block piece on the side closest to the front opening.
See Diagram 2
Second Front Side Pattern
Return to the upper edge of the Large Lace Block piece you previously created (upper edge is the opposite side of the edge you just extended). Count 7 sts in from the top left corner stitch. Attach a new strand of Color 2 yarn to the stitch you just counted to with the right side of the project facing you.
Row 1: CH2, DC in each of next 7 sts, turn work (7 total sts)
Row 2: CH2, DC in each of next 5 sts, DC2tog, turn work (6 total sts)
Row 3: CH2, DC2tog, DC in each of next 4 sts, turn work (5 total sts)
Row 4: CH2, DC in each of next 3 sts, DC2tog, turn work (4 total sts)
Row 5: CH2, DC2tog, DC in each of next 2 sts, turn work (3 total sts)
Row 6: CH2, DC in next stitch, 3 DC in center stitch, DC in next stitch, turn work (5 total sts)
Row 7: CH2, DC in each stitch across to center stitch, 3 DC in center stitch, DC in each remaining stitch across, turn work (7 total sts – increased by 2 sts)
Repeat Row 7 until you’ve increased to 65 total sts. Do not turn work on last repeat. Fasten off.
Seam 2 of the small lace blocks together, adding in some additional SC in between the two blocks to make it long enough to match one side of the front portion you just created. Seam 3 of the small lace blocks together, doing the same thing between them. Seam these two pieces to the bottom edge you just created with the smaller, 2 block piece on the side closest to the back panel and the longer, 3 block piece on the side closest to the front opening.
Lining up the front and back Small Lace Blocks, seam the back panel to the front sides of vest. Leave desired space for arm hole. I chose to leave 9” (22.75cm) open for the arm hole on my sample.
Add a SC border around all outside edges of the project. Fasten off. Secure and weave in all ends.
Child Large Pattern
Small Lace Block Pattern (Make 13)
See Video 1 for intro. & help with starting instructions
Create a Magic Circle with 6 SC sts in the center using Color 1 Yarn
Join in the round by slip stitching first and last stitches together
Round 1: CH1,2 SC in each stitch around, slip stitch into first stitch (12 total sts)
See Video 2 for help with Round 2
Round 2: CH2, *3 HDC in next stitch, CH2, skip the next stitch* Repeat around, slip stitch into first stitch (30 total sts including center chains)
See Video 3 for help with Round 3
Round 3: CH2, *HDC3tog, CH5, slip stitch in next CH space, CH5* Repeat around, slip stitch into first stitch (72 total sts including center chains)
Drop Color 1 yarn and pick up Color 2 yarn
See Video 4 for help with Round 4
Round 4: CH4, *5 TRC in next CH space, (DC, HDC) in next CH space, (HDC, DC) in next CH space* Repeat 3 more times, slip stitch into first stitch (36 total sts)
Fasten off. Secure and weave in all ends.
Your project should measure 3” (7.5cm) x 3” (7.5cm) at this point.
Large Lace Block Pattern
Create a Magic Circle with 8 DC sts in the center using Color 1 Yarn
Join in the round by slip stitching first and last stitches together
Round 1: CH2, 2 DC in each stitch around, slip stitch into first stitch (16 total sts)
See Video 5 for help with Round 2
Round 2: CH2, *2 DC in next stitch, CH2, skip the next stitch* Repeat around, slip stitch into first stitch (32 total sts including center chains)
See Video 6 for help with Round 3
Round 3: CH2, *2 DC in each of next 2 sts, CH5, skip next CH space* Repeat around, slip stitch into first stitch (48 total sts including center chains)
See Video 7 for help with Round 4
Round 4: CH2, *DC2tog, DC2tog, CH5, slip stitch into next CH space, CH5* Repeat around, slip stitch into first stitch (104 total sts including center chains)
See Video 8 for help with Round 5
Round 5: CH2, *SC2tog, CH5, slip stitch into next CH space, CH5, slip stitch into next CH space, CH5* Repeat around, slip stitch into first stitch (144 total sts including center chains)
See Video 9 for help with Round 6
Round 6: CH5, skip the first CH space, slip stitch into next CH space, *CH5, slip stitch into next CH space* Repeat around, slip stitch into first stitch (23 total CH spaces)
See Video 10 for help with Round 7
Drop Color 1 yarn and pick up Color 2 yarn
Round 7: CH3, *5 TRC in next CH space, 3 DC in next CH space, 3 HDC in next CH space, 3 SC in next CH space, 3 HDC in next CH space, 3 DC in next CH space* Repeat 3 more times, placing last 3 DC in same CH space as the prior HDC, slip stitch into first stitch (80 total sts)
Round 8: CH2, DC in each of next 2 sts, *5 DC in next stitch, DC in each of next 19 sts* Repeat 2 more times, 5 DC in next stitch, DC in each of next 17 sts, slip stitch into first stitch (96 total sts)
Round 9: CH2, DC in each of next 4 sts, *5 DC in next stitch, DC in each of next 23 sts* Repeat 2 more times, 5 DC in next stitch, DC in each of next 19 sts, slip stitch into first stitch (112 total sts)
Round 10: CH2, DC in each of next 6 sts, *4 DC in next stitch, DC in each of next 27 sts* Repeat 2 more times, 4 DC in next stitch, DC in each of next 21 sts, slip stitch into first stitch (124 total sts)
Your project should measure 9” (22.75cm) x 9” (22.75cm) at this point.
See Video 11 for help with next section
Slip stitch into each of the next 8 sts (which should bring you to the corner stitch).
We’ll now be working in rows. Turn work.
Row 1: CH2, DC into each stitch across to the corner stitch, turn work
(31 total sts not including turning chain)
Row 2: CH2, DC in each stitch across, turn work (31 total sts)
Repeat Row 2 until your project measures 10” (25.5cm) in length from the upper edge of square. Do not turn work on last repeat. Fasten off.
See Video 12 for help with next section
Seam 3 of the small lace blocks together, and then seam that piece to the bottom edge you just completed. Block as desired.
See Diagram 1.
First Front Side Pattern
See Video 13 for help with next section
Return to the upper edge of the Large Lace Block piece you just created (upper edge is the opposite side of the edge you just extended). Attach a new strand of Color 2 yarn to the top right corner stitch with the right side of the project facing you.
Row 1: CH2, DC in each of next 8 sts, turn work (8 total sts)
Row 2: CH2, DC2tog, DC in each of next 6 sts, turn work (7 total sts)
Row 3: CH2, DC in each of next 5 sts, DC2tog, turn work (6 total sts)
Row 4: CH2, DC2tog, DC in each of next 4 sts, turn work (5 total sts)
Row 5: CH2, DC in each of next 2 sts, 3 DC in center stitch, DC in each of next 2 sts, turn work (7 total sts)
See Video 14 for help with next section
Row 6: CH2, DC in each stitch across to center stitch, 3 DC in center stitch, DC in each remaining stitch across, turn work (9 total sts – increased by 2 sts)
Repeat Row 6 until you’ve increased to 67 total sts. Do not turn work on last repeat. Fasten off.
Seam 2 of the small lace blocks together, adding in some additional SC in between the two blocks to make it long enough to match one side of the front portion you just created. Seam 3 of the small lace blocks together, doing the same thing between them. Seam these two pieces to the bottom edge you just created with the smaller, 2 block piece on the side closest to the back panel and the longer, 3 block piece on the side closest to the front opening.
See Diagram 2
Second Front Side Pattern
Return to the upper edge of the Large Lace Block piece you previously created (upper edge is the opposite side of the edge you just extended). Count 7 sts in from the top left corner stitch. Attach a new strand of Color 2 yarn to the stitch you just counted to with the right side of the project facing you.
Row 1: CH2, DC in each of next 8 sts, turn work (8 total sts)
Row 2: CH2, DC in each of next 6 sts, DC2tog, turn work (7 total sts)
Row 3: CH2, DC2tog, DC in each of next 5 sts, turn work (6 total sts)
Row 4: CH2, DC in each of next 4 sts, DC2tog, turn work (5 total sts)
Row 5: CH2, DC in next stitch, 3 DC in center stitch, DC in next stitch, turn work (7 total sts)
Row 6: CH2, DC in each stitch across to center stitch, 3 DC in center stitch, DC in each remaining stitch across, turn work (9 total sts – increased by 2 sts)
Repeat Row 6 until you’ve increased to 67 total sts. Do not turn work on last repeat. Fasten off.
Seam 2 of the small lace blocks together, adding in some additional SC in between the two blocks to make it long enough to match one side of the front portion you just created. Seam 3 of the small lace blocks together, doing the same thing between them. Seam these two pieces to the bottom edge you just created with the smaller, 2 block piece on the side closest to the back panel and the longer, 3 block piece on the side closest to the front opening.
Lining up the front and back Small Lace Blocks, seam the back panel to the front sides of vest. Leave desired space for arm hole. I chose to leave 9” (22.75cm) open for the arm hole on my sample.
Add a SC border around all outside edges of the project. Fasten off. Secure and weave in all ends.
Adult Small Pattern
Small Lace Block Pattern (Make 21)
See Video 1 for intro. & help with starting instructions
Create a Magic Circle with 6 SC sts in the center using Color 1 Yarn
Join in the round by slip stitching first and last stitches together
Round 1: CH1,2 SC in each stitch around, slip stitch into first stitch (12 total sts)
See Video 2 for help with Round 2
Round 2: CH2, *3 HDC in next stitch, CH2, skip the next stitch* Repeat around, slip stitch into first stitch (30 total sts including center chains)
See Video 3 for help with Round 3
Round 3: CH2, *HDC3tog, CH5, slip stitch in next CH space, CH5* Repeat around, slip stitch into first stitch (72 total sts including center chains)
Drop Color 1 yarn and pick up Color 2 yarn
See Video 4 for help with Round 4
Round 4: CH4, *5 TRC in next CH space, (DC, HDC) in next CH space, (HDC, DC) in next CH space* Repeat 3 more times, slip stitch into first stitch (36 total sts)
Fasten off. Secure and weave in all ends.
Your project should measure 3” (7.5cm) x 3” (7.5cm) at this point.
Large Lace Block Pattern
Create a Magic Circle with 8 DC sts in the center using Color 1 Yarn
Join in the round by slip stitching first and last stitches together
Round 1: CH2, 2 DC in each stitch around, slip stitch into first stitch (16 total sts)
See Video 5 for help with Round 2
Round 2: CH2, *2 DC in next stitch, CH2, skip the next stitch* Repeat around, slip stitch into first stitch (32 total sts including center chains)
See Video 6 for help with Round 3
Round 3: CH2, *2 DC in each of next 2 sts, CH2, skip next CH space* Repeat around, slip stitch into first stitch (48 total sts including center chains)
Round 4: CH2, *DC in next stitch, 2 DC in each of next 2 sts, DC in next stitch, CH5, skip next CH space* Repeat around, slip stitch into first stitch (88 total sts including center chains)
See Video 7 for help with Round 5
Round 5: CH2, *DC in next stitch, DC2tog, DC2tog, DC in next stitch, CH5, slip stitch into next CH space, CH5* Repeat around, slip stitch into first stitch (120 total sts including center chains)
Round 6: CH2, *DC2tog, DC2tog, CH5, slip stitch into next CH space, CH5, slip stitch into next CH space, CH5* Repeat around, slip stitch into first stitch (152 total sts including center chains)
See Video 8 for help with Round 7
Round 7: CH1, *SC2tog, CH5, slip stitch into next CH space, CH5, slip stitch into next CH space, CH5, slip stitch into next CH space, CH5* Repeat around, slip stitch into first stitch (192 total sts including center chains)
See Video 9 for help with Round 8
Round 8: CH5, skip the first CH space, slip stitch into next CH space, *CH5, slip stitch into next CH space* Repeat around, slip stitch into first stitch (32 total CH spaces)
See Video 10 for help with Round 9
Drop Color 1 yarn and pick up Color 2 yarn
Round 9: CH4, *7 DTRC in next CH space, 3 TRC in next CH space, 3 DC in next CH space, 3 HDC in next CH space, 3 SC in next CH space, 3 HDC in next CH space, 3 DC in next CH space, 3 TRC in next CH space* Repeat around, slip stitch into first stitch (112 total sts)
Round 10: CH2, DC in each of next 3 sts, *5 DC in next stitch, DC in each of next 27 sts* Repeat 2 more times, 5 DC in next stitch, DC in each of next 24 sts, slip stitch into first stitch (128 total sts)
Your project should measure 9.25” (23.5cm) x 9.25” (23.5cm) at this point.
See Video 11 for help with next section
Slip stitch into each of the next 5 sts (which should bring you to the corner stitch).
We’ll now be working in rows. Turn work.
Row 1: CH2, DC into each stitch across to 2 sts away from the last corner stitch, turn work
(32 total sts not including turning chain)
Row 2: CH2, DC in each stitch across, turn work (32 total sts)
Repeat Row 2 until your project measures 15” (38cm) in length from the upper edge of square. Do not turn work on last repeat. Fasten off.
See Video 12 for help with next section
Seam 3 of the small lace blocks together and then seam that piece to the bottom edge you just completed. Block as desired.
See Diagram 1.
First Front Side Pattern
See Video 13 for help with next section
Return to the upper edge of the Large Lace Block piece you just created (upper edge is the opposite side of the edge you just extended). Attach a new strand of Color 2 yarn to the top right corner stitch with the right side of the project facing you.
Row 1: CH2, DC in each of next 10 sts, turn work (10 total sts)
Row 2: CH2, DC2tog, DC in each of next 8 sts, turn work (9 total sts)
Row 3: CH2, DC in each of next 7 sts, DC2tog, turn work (8 total sts)
Row 4: CH2, DC2tog, DC in each of next 6 sts, turn work (7 total sts)
Row 5: CH2, DC in each of next 5 sts, DC2tog, turn work (6 total sts)
Row 6: CH2, DC2tog, DC in each of next 4 sts, turn work (5 total sts)
Row 7: CH2, DC in each of next 2 sts, 3 DC in center stitch, DC in each of next 2 sts, turn work (7 total sts)
See Video 14 for help with next section
Row 8: CH2, DC in each stitch across to center stitch, 3 DC in center stitch, DC in each remaining stitch across, turn work (9 total sts – increased by 2 sts)
Repeat Row 8 until you’ve increased to 91 total sts. Do not turn work on last repeat. Fasten off.
Seam 4 of the small lace blocks together. Seam 5 of the small lace blocks together. Seam these two pieces to the bottom edge you just created with the smaller, 4 block piece on the side closest to the back panel and the longer, 5 block piece on the side closest to the front opening.
See Diagram 2
Second Front Side Pattern
Return to the upper edge of the Large Lace Block piece you previously created (upper edge is the opposite side of the edge you just extended). Count 10 sts in from the top left corner stitch. Attach a new strand of Color 2 yarn to the stitch you just counted to with the right side of the project facing you.
Row 1: CH2, DC in each of next 10 sts, turn work (10 total sts)
Row 2: CH2, DC in each of next 8 sts, DC2tog, turn work (9 total sts)
Row 3: CH2, DC2tog, DC in each of next 7 sts, turn work (8 total sts)
Row 4: CH2, DC in each of next 6 sts, DC2tog, turn work (7 total sts)
Row 5: CH2, DC2tog, DC in each of next 5 sts, turn work (6 total sts)
Row 6: CH2, DC in each of next 4 sts, DC2tog, turn work (5 total sts)
Row 7: CH2, DC in each of next 2 sts, 3 DC in center stitch, DC in each of next 2 sts, turn work (7 total sts)
Row 8: CH2, DC in each stitch across to center stitch, 3 DC in center stitch, DC in each remaining stitch across, turn work (9 total sts – increased by 2 sts)
Repeat Row 8 until you’ve increased to 91 total sts. Do not turn work on last repeat. Fasten off.
Seam 4 of the small lace blocks together. Seam 5 of the small lace blocks together. Seam these two pieces to the bottom edge you just created with the smaller, 4 block piece on the side closest to the back panel and the longer, 5 block piece on the side closest to the front opening. Block as desired.
Lining up the front and back Small Lace Blocks, seam the back panel to the front sides of vest. Leave desired space for arm hole. I chose to leave 11” (28cm) open for the arm hole on my sample.
Add a SC border around all outside edges of the project. Fasten off. Secure and weave in all ends.
Adult Medium Pattern
Small Lace Block Pattern (Make 21)
Create a Magic Circle with 6 SC sts in the center using Color 1 Yarn
See Video 1 for intro. & help with starting instructions
Join in the round by slip stitching first and last stitches together
Round 1: CH1,2 SC in each stitch around, slip stitch into first stitch (12 total sts)
See Video 2 for help with Round 2
Round 2: CH2, *3 HDC in next stitch, CH2, skip the next stitch* Repeat around, slip stitch into first stitch (30 total sts including center chains)
See Video 3 for help with Round 3
Round 3: CH2, *HDC3tog, CH5, slip stitch in next CH space, CH5* Repeat around, slip stitch into first stitch (72 total sts including center chains)
Drop Color 1 yarn and pick up Color 2 yarn
See Video 4 for help with Round 4
Round 4: CH4, *5 TRC in next CH space, (DC, HDC) in next CH space, (HDC, DC) in next CH space* Repeat 3 more times, slip stitch into first stitch (36 total sts)
Fasten off. Secure and weave in all ends.
Your project should measure 3” (7.5cm) x 3” (7.5cm) at this point.
Large Lace Block Pattern
Create a Magic Circle with 8 DC sts in the center using Color 1 Yarn
Join in the round by slip stitching first and last stitches together
Round 1: CH2, 2 DC in each stitch around, slip stitch into first stitch (16 total sts)
See Video 5 for help with Round 2
Round 2: CH2, *2 DC in next stitch, CH2, skip the next stitch* Repeat around, slip stitch into first stitch (32 total sts including center chains)
See Video 6 for help with Round 3
Round 3: CH2, *2 DC in each of next 2 sts, CH2, skip next CH space* Repeat around, slip stitch into first stitch (48 total sts including center chains)
Round 4: CH2, *DC in next stitch, 2 DC in each of next 2 sts, DC in next stitch, CH5, skip next CH space* Repeat around, slip stitch into first stitch (88 total sts including center chains)
See Video 7 for help with Round 5
Round 5: CH2, *DC in next stitch, DC2tog, DC2tog, DC in next stitch, CH5, slip stitch into next CH space, CH5* Repeat around, slip stitch into first stitch (120 total sts including center chains)
Round 6: CH2, *DC2tog, DC2tog, CH5, slip stitch into next CH space, CH5, slip stitch into next CH space, CH5* Repeat around, slip stitch into first stitch (152 total sts including center chains)
See Video 8 for help with Round 7
Round 7: CH1, *SC2tog, CH5, slip stitch into next CH space, CH5, slip stitch into next CH space, CH5, slip stitch into next CH space, CH5* Repeat around, slip stitch into first stitch (192 total sts including center chains)
See Video 9 for help with Round 8
Round 8: CH5, skip the first CH space, slip stitch into next CH space, *CH5, slip stitch into next CH space* Repeat around, slip stitch into first stitch (32 total CH spaces)
See Video 10 for help with Round 9
Drop Color 1 yarn and pick up Color 2 yarn
Round 9: CH4, *7 DTRC in next CH space, 3 TRC in next CH space, 3 DC in next CH space, 3 HDC in next CH space, 3 SC in next CH space, 3 HDC in next CH space, 3 DC in next CH space, 3 TRC in next CH space* Repeat around, slip stitch into first stitch (112 total sts)
Round 10: CH2, DC in each of next 3 sts, *5 DC in next stitch, DC in each of next 27 sts* Repeat 2 more times, 5 DC in next stitch, DC in each of next 24 sts, slip stitch into first stitch (128 total sts)
Your project should measure 9.25” (23.5cm) x 9.25” (23.5cm) at this point.
See Video 11 for help with next section
Slip stitch into each of the next 6 sts (which should bring you to the corner stitch).
We’ll now be working in rows. Turn work.
Row 1: CH2, DC into each stitch across to corner stitch, turn work (33 total sts not including turning chain)
Row 2: CH2, DC in each stitch across, turn work (33 total sts)
Repeat Row 2 until your project measures 16” (40.5cm) in length from the upper edge of square. Do not turn work on last repeat. Fasten off.
See Video 12 for help with next section
Seam 3 of the small lace blocks together and then seam that piece to the bottom edge you just completed. Block as desired.
See Diagram 1.
First Front Side Pattern
See Video 13 for help with next section
Return to the upper edge of the Large Lace Block piece you just created (upper edge is the opposite side of the edge you just extended). Attach a new strand of Color 2 yarn to the top right corner stitch with the right side of the project facing you.
Row 1: CH2, DC in each of next 10 sts, turn work (10 total sts)
Row 2: CH2, DC2tog, DC in each of next 8 sts, turn work (9 total sts)
Row 3: CH2, DC in each of next 7 sts, DC2tog, turn work (8 total sts)
Row 4: CH2, DC2tog, DC in each of next 6 sts, turn work (7 total sts)
Row 5: CH2, DC in each of next 5 sts, DC2tog, turn work (6 total sts)
Row 6: CH2, DC2tog, DC in each of next 4 sts, turn work (5 total sts)
Row 7: CH2, DC in each of next 2 sts, 3 DC in center stitch, DC in each of next 2 sts, turn work (7 total sts)
See Video 14 for help with next section
Row 8: CH2, DC in each stitch across to center stitch, 3 DC in center stitch, DC in each remaining stitch across, turn work (9 total sts – increased by 2 sts)
Repeat Row 8 until you’ve increased to 95 total sts. Do not turn work on last repeat. Fasten off.
Seam 4 of the small lace blocks together. Seam 5 of the small lace blocks together. Seam these two pieces to the bottom edge you just created with the smaller, 4 block piece on the side closest to the back panel and the longer, 5 block piece on the side closest to the front opening.
See Diagram 2
Second Front Side Pattern
Return to the upper edge of the Large Lace Block piece you previously created (upper edge is the opposite side of the edge you just extended). Count 10 sts in from the top left corner stitch. Attach a new strand of Color 2 yarn to the stitch you just counted to with the right side of the project facing you.
Row 1: CH2, DC in each of next 10 sts, turn work (10 total sts)
Row 2: CH2, DC in each of next 8 sts, DC2tog, turn work (9 total sts)
Row 3: CH2, DC2tog, DC in each of next 7 sts, turn work (8 total sts)
Row 4: CH2, DC in each of next 6 sts, DC2tog, turn work (7 total sts)
Row 5: CH2, DC2tog, DC in each of next 5 sts, turn work (6 total sts)
Row 6: CH2, DC in each of next 4 sts, DC2tog, turn work (5 total sts)
Row 7: CH2, DC in each of next 2 sts, 3 DC in center stitch, DC in each of next 2 sts, turn work (7 total sts)
Row 8: CH2, DC in each stitch across to center stitch, 3 DC in center stitch, DC in each remaining stitch across, turn work (9 total sts – increased by 2 sts)
Repeat Row 8 until you’ve increased to 95 total sts. Do not turn work on last repeat. Fasten off.
Seam 4 of the small lace blocks together. Seam 5 of the small lace blocks together. Seam these two pieces to the bottom edge you just created with the smaller, 4 block piece on the side closest to the back panel and the longer, 5 block piece on the side closest to the front opening. Block as desired.
Lining up the front and back Small Lace Blocks, seam the back panel to the front sides of vest. Leave desired space for arm hole. I chose to leave 11” (28cm) open for the arm hole on my sample.
Add a SC border around all outside edges of the project. Fasten off. Secure and weave in all ends.
Adult Large Pattern
Small Lace Block Pattern (Make 25)
See Video 1 for intro. & help with starting instructions
Create a Magic Circle with 6 SC sts in the center using Color 1 Yarn
Join in the round by slip stitching first and last stitches together
Round 1: CH1,2 SC in each stitch around, slip stitch into first stitch (12 total sts)
See Video 2 for help with Round 2
Round 2: CH2, *3 HDC in next stitch, CH2, skip the next stitch* Repeat around, slip stitch into first stitch (30 total sts including center chains)
See Video 3 for help with Round 3
Round 3: CH2, *HDC3tog, CH5, slip stitch in next CH space, CH5* Repeat around, slip stitch into first stitch (72 total sts including center chains)
Drop Color 1 yarn and pick up Color 2 yarn
See Video 4 for help with Round 4
Round 4: CH4, *5 TRC in next CH space, (DC, HDC) in next CH space, (HDC, DC) in next CH space* Repeat 3 more times, slip stitch into first stitch (36 total sts)
Fasten off. Secure and weave in all ends.
Your project should measure 3” (7.5cm) x 3” (7.5cm) at this point.
Large Lace Block Pattern
Create a Magic Circle with 8 DC sts in the center using Color 1 Yarn
Join in the round by slip stitching first and last stitches together
Round 1: CH2, 2 DC in each stitch around, slip stitch into first stitch (16 total sts)
See Video 5 for help with Round 2
Round 2: CH2, *2 DC in next stitch, CH2, skip the next stitch* Repeat around, slip stitch into first stitch (32 total sts including center chains)
See Video 6 for help with Round 3
Round 3: CH2, *2 DC in each of next 2 sts, CH2, skip next CH space* Repeat around, slip stitch into first stitch (48 total sts including center chains)
Round 4: CH2, *DC in next stitch, 2 DC in each of next 2 sts, DC in next stitch, CH5, skip next CH space* Repeat around, slip stitch into first stitch (88 total sts including center chains)
See Video 7 for help with Round 5
Round 5: CH2, *DC in next stitch, DC2tog, DC2tog, DC in next stitch, CH5, slip stitch into next CH space, CH5* Repeat around, slip stitch into first stitch (120 total sts including center chains)
Round 6: CH2, *DC2tog, DC2tog, CH5, slip stitch into next CH space, CH5, slip stitch into next CH space, CH5* Repeat around, slip stitch into first stitch (152 total sts including center chains)
See Video 8 for help with Round 7
Round 7: CH1, *SC2tog, CH5, slip stitch into next CH space, CH5, slip stitch into next CH space, CH5, slip stitch into next CH space, CH5* Repeat around, slip stitch into first stitch (192 total sts including center chains)
See Video 9 for help with Round 8
Round 8: CH5, skip the first CH space, slip stitch into next CH space, *CH5, slip stitch into next CH space* Repeat around, slip stitch into first stitch (32 total CH spaces)
See Video 10 for help with Round 9
Drop Color 1 yarn and pick up Color 2 yarn
Round 9: CH4, *7 DTRC in next CH space, 3 TRC in next CH space, 3 DC in next CH space, 3 HDC in next CH space, 3 SC in next CH space, 3 HDC in next CH space, 3 DC in next CH space, 3 TRC in next CH space* Repeat around, slip stitch into first stitch (112 total sts)
Round 10: CH2, DC in each of next 3 sts, *5 DC in next stitch, DC in each of next 27 sts* Repeat 2 more times, 5 DC in next stitch, DC in each of next 24 sts, slip stitch into first stitch (128 total sts)
Round 11: CH2, DC in each of next 5 sts, *4 DC in next stitch, DC in each of next 31 sts* Repeat 2 more times, 4 DC in next stitch, DC in each of next 26 sts, slip stitch into first stitch (140 total sts)
Your project should measure 10.25” (26cm) x 10.25” (26cm) at this point.
See Video 11 for help with next section
Slip stitch into each of the next 7 sts (which should bring you to the corner stitch).
We’ll now be working in rows. Turn work.
Row 1: CH2, DC into each stitch across to corner stitch, turn work
(35 total sts not including turning chain)
Row 2: CH2, DC in each stitch across, turn work (35 total sts)
Repeat Row 2 until your project measures 17” (43.25cm) in length from the upper edge of square. Do not turn work on last repeat. Fasten off.
See Video 12 for help with next section
Seam 3 of the small lace blocks together, adding a few additional SC rows between each block in order to make this piece the appropriate width, and then seam that piece to the bottom edge you just completed. Block as desired.
See Diagram 1.
First Front Side Pattern
See Video 13 for help with next section
Return to the upper edge of the Large Lace Block piece you just created (upper edge is the opposite side of the edge you just extended). Attach a new strand of Color 2 yarn to the top right corner stitch with the right side of the project facing you.
Row 1: CH2, DC in each of next 10 sts, turn work (10 total sts)
Row 2: CH2, DC2tog, DC in each of next 8 sts, turn work (9 total sts)
Row 3: CH2, DC in each of next 7 sts, DC2tog, turn work (8 total sts)
Row 4: CH2, DC2tog, DC in each of next 6 sts, turn work (7 total sts)
Row 5: CH2, DC in each of next 5 sts, DC2tog, turn work (6 total sts)
Row 6: CH2, DC2tog, DC in each of next 4 sts, turn work (5 total sts)
Row 7: CH2, DC in each of next 2 sts, 3 DC in center stitch, DC in each of next 2 sts, turn work (7 total sts)
See Video 14 for help with next section
Row 8: CH2, DC in each stitch across to center stitch, 3 DC in center stitch, DC in each remaining stitch across, turn work (9 total sts – increased by 2 sts)
Repeat Row 8 until you’ve increased to 111 total sts. Do not turn work on last repeat. Fasten off.
Seam 5 of the small lace blocks together. Seam 6 of the small lace blocks together. Seam these two pieces to the bottom edge you just created with the smaller, 5 block piece on the side closest to the back panel and the longer, 6 block piece on the side closest to the front opening.
See Diagram 2
Second Front Side Pattern
Return to the upper edge of the Large Lace Block piece you previously created (upper edge is the opposite side of the edge you just extended). Count 10 sts in from the top left corner stitch. Attach a new strand of Color 2 yarn to the stitch you just counted to with the right side of the project facing you.
Row 1: CH2, DC in each of next 10 sts, turn work (10 total sts)
Row 2: CH2, DC in each of next 8 sts, DC2tog, turn work (9 total sts)
Row 3: CH2, DC2tog, DC in each of next 7 sts, turn work (8 total sts)
Row 4: CH2, DC in each of next 6 sts, DC2tog, turn work (7 total sts)
Row 5: CH2, DC2tog, DC in each of next 5 sts, turn work (6 total sts)
Row 6: CH2, DC in each of next 4 sts, DC2tog, turn work (5 total sts)
Row 7: CH2, DC in each of next 2 sts, 3 DC in center stitch, DC in each of next 2 sts, turn work (7 total sts)
Row 8: CH2, DC in each stitch across to center stitch, 3 DC in center stitch, DC in each remaining stitch across, turn work (9 total sts – increased by 2 sts)
Repeat Row 8 until you’ve increased to 111 total sts. Do not turn work on last repeat. Fasten off.
Seam 5 of the small lace blocks together. Seam 6 of the small lace blocks together. Seam these two pieces to the bottom edge you just created with the smaller, 5 block piece on the side closest to the back panel and the longer, 6 block piece on the side closest to the front opening. Block as desired.
Lining up the front and back Small Lace Blocks, seam the back panel to the front sides of vest. Leave desired space for arm hole. I chose to leave 12” (30.5cm) open for the arm hole on my sample.
Add a SC border around all outside edges of the project. Fasten off. Secure and weave in all ends.
Adult X-Large Pattern
Small Lace Block Pattern (Make 25)
See Video 1 for intro. & help with starting instructions
Create a Magic Circle with 6 SC sts in the center using Color 1 Yarn
Join in the round by slip stitching first and last stitches together
Round 1: CH1,2 SC in each stitch around, slip stitch into first stitch (12 total sts)
See Video 2 for help with Round 2
Round 2: CH2, *3 HDC in next stitch, CH2, skip the next stitch* Repeat around, slip stitch into first stitch (30 total sts including center chains)
See Video 3 for help with Round 3
Round 3: CH2, *HDC3tog, CH5, slip stitch in next CH space, CH5* Repeat around, slip stitch into first stitch (72 total sts including center chains)
Drop Color 1 yarn and pick up Color 2 yarn
See Video 4 for help with Round 4
Round 4: CH4, *5 TRC in next CH space, (DC, HDC) in next CH space, (HDC, DC) in next CH space* Repeat 3 more times, slip stitch into first stitch (36 total sts)
Fasten off. Secure and weave in all ends.
Your project should measure 3” (7.5cm) x 3” (7.5cm) at this point.
Large Lace Block Pattern
Create a Magic Circle with 8 DC sts in the center using Color 1 Yarn
Join in the round by slip stitching first and last stitches together
Round 1: CH2, 2 DC in each stitch around, slip stitch into first stitch (16 total sts)
See Video 5 for help with Round 2
Round 2: CH2, *2 DC in next stitch, CH2, skip the next stitch* Repeat around, slip stitch into first stitch (32 total sts including center chains)
See Video 6 for help with Round 3
Round 3: CH2, *2 DC in each of next 2 sts, CH2, skip next CH space* Repeat around, slip stitch into first stitch (48 total sts including center chains)
Round 4: CH2, *DC in next stitch, 2 DC in each of next 2 sts, DC in next stitch, CH5, skip next CH space* Repeat around, slip stitch into first stitch (88 total sts including center chains)
See Video 7 for help with Round 5
Round 5: CH2, *DC in next stitch, DC2tog, DC2tog, DC in next stitch, CH5, slip stitch into next CH space, CH5* Repeat around, slip stitch into first stitch (120 total sts including center chains)
Round 6: CH2, *DC2tog, DC2tog, CH5, slip stitch into next CH space, CH5, slip stitch into next CH space, CH5* Repeat around, slip stitch into first stitch (152 total sts including center chains)
See Video 8 for help with Round 7
Round 7: CH1, *SC2tog, CH5, slip stitch into next CH space, CH5, slip stitch into next CH space, CH5, slip stitch into next CH space, CH5* Repeat around, slip stitch into first stitch (192 total sts including center chains)
See Video 9 for help with Round 8
Round 8: CH5, skip the first CH space, slip stitch into next CH space, *CH5, slip stitch into next CH space* Repeat around, slip stitch into first stitch (32 total CH spaces)
See Video 10 for help with Round 9
Drop Color 1 yarn and pick up Color 2 yarn
Round 9: CH4, *7 DTRC in next CH space, 3 TRC in next CH space, 3 DC in next CH space, 3 HDC in next CH space, 3 SC in next CH space, 3 HDC in next CH space, 3 DC in next CH space, 3 TRC in next CH space* Repeat around, slip stitch into first stitch (112 total sts)
Round 10: CH2, DC in each of next 3 sts, *5 DC in next stitch, DC in each of next 27 sts* Repeat 2 more times, 5 DC in next stitch, DC in each of next 24 sts, slip stitch into first stitch (128 total sts)
Round 11: CH2, DC in each of next 5 sts, *4 DC in next stitch, DC in each of next 31 sts* Repeat 2 more times, 4 DC in next stitch, DC in each of next 26 sts, slip stitch into first stitch (140 total sts)
Your project should measure 10.25” (26cm) x 10.25” (26cm) at this point.
See Video 11 for help with next section
Slip stitch into each of the next 7 sts (which should bring you to the corner stitch).
We’ll now be working in rows. Turn work.
Row 1: CH2, DC into each stitch across to corner stitch, turn work
(35 total sts not including turning chain)
Row 2: CH2, DC in each stitch across, turn work (35 total sts)
Repeat Row 2 until your project measures 18” (45.75cm) in length from the upper edge of square. Do not turn work on last repeat. Fasten off.
See Video 12 for help with next section
Seam 3 of the small lace blocks together, adding a few additional SC rows between each block in order to make this piece the appropriate width, and then seam that piece to the bottom edge you just completed. Block as desired.
See Diagram 1.
First Front Side Pattern
See Video 13 for help with next section
Return to the upper edge of the Large Lace Block piece you just created (upper edge is the opposite side of the edge you just extended). Attach a new strand of Color 2 yarn to the top right corner stitch with the right side of the project facing you.
Row 1: CH2, DC in each of next 12 sts, turn work (12 total sts)
Row 2: CH2, DC2tog, DC in each of next 10 sts, turn work (11 total sts)
Row 3: CH2, DC in each of next 9 sts, DC2tog, turn work (10 total sts)
Row 4: CH2, DC2tog, DC in each of next 8 sts, turn work (9 total sts)
Row 5: CH2, DC in each of next 7 sts, DC2tog, turn work (8 total sts)
Row 6: CH2, DC2tog, DC in each of next 6 sts, turn work (7 total sts)
Row 7: CH2, DC in each of next 3 sts, 3 DC in center stitch, DC in each of next 3 sts, turn work (9 total sts)
See Video 14 for help with next section
Row 8: CH2, DC in each stitch across to center stitch, 3 DC in center stitch, DC in each remaining stitch across, turn work (11 total sts – increased by 2 sts)
Repeat Row 8 until you’ve increased to 115 total sts. Do not turn work on last repeat. Fasten off.
Seam 5 of the small lace blocks together. Seam 6 of the small lace blocks together. Seam these two pieces to the bottom edge you just created with the smaller, 5 block piece on the side closest to the back panel and the longer, 6 block piece on the side closest to the front opening.
See Diagram 2
Second Front Side Pattern
Return to the upper edge of the Large Lace Block piece you previously created (upper edge is the opposite side of the edge you just extended). Count 12 sts in from the top left corner stitch. Attach a new strand of Color 2 yarn to the stitch you just counted to with the right side of the project facing you.
Row 1: CH2, DC in each of next 12 sts, turn work (12 total sts)
Row 2: CH2, DC in each of next 10 sts, DC2tog, turn work (11 total sts)
Row 3: CH2, DC2tog, DC in each of next 9 sts, turn work (10 total sts)
Row 4: CH2, DC in each of next 8 sts, DC2tog, turn work (9 total sts)
Row 5: CH2, DC2tog, DC in each of next 7 sts, turn work (8 total sts)
Row 6: CH2, DC in each of next 6 sts, DC2tog, turn work (7 total sts)
Row 7: CH2, DC in each of next 3 sts, 3 DC in center stitch, DC in each of next 3 sts, turn work (9 total sts)
Row 8: CH2, DC in each stitch across to center stitch, 3 DC in center stitch, DC in each remaining stitch across, turn work (11 total sts – increased by 2 sts)
Repeat Row 8 until you’ve increased to 115 total sts. Do not turn work on last repeat. Fasten off.
Seam 5 of the small lace blocks together. Seam 6 of the small lace blocks together. Seam these two pieces to the bottom edge you just created with the smaller, 5 block piece on the side closest to the back panel and the longer, 6 block piece on the side closest to the front opening. Block as desired.
Lining up the front and back Small Lace Blocks, seam the back panel to the front sides of vest. Leave desired space for arm hole. I chose to leave 12” (30.5cm) open for the arm hole on my sample.
Add a SC border around all outside edges of the project. Fasten off. Secure and weave in all ends.
Adult 2X-Large Pattern
Small Lace Block Pattern (Make 25)
See Video 1 for intro. & help with starting instruction
Create a Magic Circle with 6 SC sts in the center using Color 1 Yarn
Join in the round by slip stitching first and last stitches together
Round 1: CH1,2 SC in each stitch around, slip stitch into first stitch (12 total sts)
See Video 2 for help with Round 2
Round 2: CH2, *3 HDC in next stitch, CH2, skip the next stitch* Repeat around, slip stitch into first stitch (30 total sts including center chains)
See Video 3 for help with Round 3
Round 3: CH2, *HDC3tog, CH5, slip stitch in next CH space, CH5* Repeat around, slip stitch into first stitch (72 total sts including center chains)
Drop Color 1 yarn and pick up Color 2 yarn
See Video 4 for help with Round 4
Round 4: CH4, *5 TRC in next CH space, (DC, HDC) in next CH space, (HDC, DC) in next CH space* Repeat 3 more times, slip stitch into first stitch (36 total sts)
Fasten off. Secure and weave in all ends.
Your project should measure 3” (7.5cm) x 3” (7.5cm) at this point.
Large Lace Block Pattern
Create a Magic Circle with 8 DC sts in the center using Color 1 Yarn
Join in the round by slip stitching first and last stitches together
Round 1: CH2, 2 DC in each stitch around, slip stitch into first stitch (16 total sts)
See Video 5 for help with Round 2
Round 2: CH2, *2 DC in next stitch, CH2, skip the next stitch* Repeat around, slip stitch into first stitch (32 total sts including center chains)
See Video 6 for help with Round 3
Round 3: CH2, *2 DC in each of next 2 sts, CH2, skip next CH space* Repeat around, slip stitch into first stitch (48 total sts including center chains)
Round 4: CH2, *DC in next stitch, 2 DC in each of next 2 sts, DC in next stitch, CH5, skip next CH space* Repeat around, slip stitch into first stitch (88 total sts including center chains)
See Video 7 for help with Round 5
Round 5: CH2, *DC in next stitch, DC2tog, DC2tog, DC in next stitch, CH5, slip stitch into next CH space, CH5* Repeat around, slip stitch into first stitch (120 total sts including center chains)
Round 6: CH2, *DC2tog, DC2tog, CH5, slip stitch into next CH space, CH5, slip stitch into next CH space, CH5* Repeat around, slip stitch into first stitch (152 total sts including center chains)
See Video 8 for help with Round 7
Round 7: CH1, *SC2tog, CH5, slip stitch into next CH space, CH5, slip stitch into next CH space, CH5, slip stitch into next CH space, CH5* Repeat around, slip stitch into first stitch (192 total sts including center chains)
See Video 9 for help with Round 8
Round 8: CH5, skip the first CH space, slip stitch into next CH space, *CH5, slip stitch into next CH space* Repeat around, slip stitch into first stitch (32 total CH spaces)
See Video 10 for help with Round 9
Drop Color 1 yarn and pick up Color 2 yarn
Round 9: CH4, *7 DTRC in next CH space, 3 TRC in next CH space, 3 DC in next CH space, 3 HDC in next CH space, 3 SC in next CH space, 3 HDC in next CH space, 3 DC in next CH space, 3 TRC in next CH space* Repeat around, slip stitch into first stitch (112 total sts)
Round 10: CH2, DC in each of next 3 sts, *5 DC in next stitch, DC in each of next 27 sts* Repeat 2 more times, 5 DC in next stitch, DC in each of next 24 sts, slip stitch into first stitch (128 total sts)
Round 11: CH2, DC in each of next 5 sts, *5 DC in next stitch, DC in each of next 31 sts* Repeat 2 more times, 5 DC in next stitch, DC in each of next 26 sts, slip stitch into first stitch (144 total sts)
Round 12: CH2, DC in each of next 7 sts, *4 DC in next stitch, DC in each of next 35 sts* Repeat 2 more times, 4 DC in next stitch, DC in each of next 28 sts, slip stitch into first stitch (156 total sts)
Your project should measure 11.25” (28.5cm) x 11.25” (28.5cm) at this point.
See Video 11 for help with next section
Slip stitch into each of the next 9 sts (which should bring you to the corner stitch).
We’ll now be working in rows. Turn work.
Row 1: CH2, DC into each stitch across to corner stitch, turn work
(39 total sts not including turning chain)
Row 2: CH2, DC in each stitch across, turn work (39 total sts)
Repeat Row 2 until your project measures 19” (48.25cm) in length from the upper edge of square. Do not turn work on last repeat. Fasten off.
See Video 12 for help with next section
Seam 3 of the small lace blocks together, adding a few additional SC rows between each block in order to make this piece the appropriate width, and then seam that piece to the bottom edge you just completed. Block as desired.
See Diagram 1.
First Front Side Pattern
See Video 13 for help with next section
Return to the upper edge of the Large Lace Block piece you just created (upper edge is the opposite side of the edge you just extended). Attach a new strand of Color 2 yarn to the top right corner stitch with the right side of the project facing you.
Row 1: CH2, DC in each of next 16 sts, turn work (16 total sts)
Row 2: CH2, DC2tog, DC in each of next 14 sts, turn work (15 total sts)
Row 3: CH2, DC in each of next 13 sts, DC2tog, turn work (14 total sts)
Row 4: CH2, DC2tog, DC in each of next 12 sts, turn work (13 total sts)
Row 5: CH2, DC in each of next 11 sts, DC2tog, turn work (12 total sts)
Row 6: CH2, DC2tog, DC in each of next 10 sts, turn work (11 total sts)
Row 7: CH2, DC in each of next 5 sts, 3 DC in center stitch, DC in each of next 5 sts, turn work (13 total sts)
See Video 14 for help with next section
Row 8: CH2, DC in each stitch across to center stitch, 3 DC in center stitch, DC in each remaining stitch across, turn work (15 total sts – increased by 2 sts)
Repeat Row 8 until you’ve increased to 125 total sts. Do not turn work on last repeat. Fasten off.
Seam 5 of the small lace blocks together. Seam 6 of the small lace blocks together. Seam these two pieces to the bottom edge you just created with the smaller, 5 block piece on the side closest to the back panel and the longer, 6 block piece on the side closest to the front opening.
See Diagram 2
Second Front Side Pattern
Return to the upper edge of the Large Lace Block piece you previously created (upper edge is the opposite side of the edge you just extended). Count 16 sts in from the top left corner stitch. Attach a new strand of Color 2 yarn to the stitch you just counted to with the right side of the project facing you.
Row 1: CH2, DC in each of next 16 sts, turn work (16 total sts)
Row 2: CH2, DC in each of next 14 sts, DC2tog, turn work (15 total sts)
Row 3: CH2, DC2tog, DC in each of next 13 sts, turn work (14 total sts)
Row 4: CH2, DC in each of next 12 sts, DC2tog, turn work (13 total sts)
Row 5: CH2, DC2tog, DC in each of next 11 sts, turn work (12 total sts)
Row 6: CH2, DC in each of next 10 sts, DC2tog, turn work (11 total sts)
Row 7: CH2, DC in each of next 5 sts, 3 DC in center stitch, DC in each of next 5 sts, turn work (13 total sts)
Row 8: CH2, DC in each stitch across to center stitch, 3 DC in center stitch, DC in each remaining stitch across, turn work (15 total sts – increased by 2 sts)
Repeat Row 8 until you’ve increased to 125 total sts. Do not turn work on last repeat. Fasten off.
Seam 5 of the small lace blocks together. Seam 6 of the small lace blocks together. Seam these two pieces to the bottom edge you just created with the smaller, 5 block piece on the side closest to the back panel and the longer, 6 block piece on the side closest to the front opening. Block as desired.
Lining up the front and back Small Lace Blocks, seam the back panel to the front sides of vest. Leave desired space for arm hole. I chose to leave 13” (33cm) open for the arm hole on my sample.
Add a SC border around all outside edges of the project. Fasten off. Secure and weave in all ends.
Adult 3X-Large Pattern
Small Lace Block Pattern (Make 25)
See Video 1 for intro. & help with starting instructions
Create a Magic Circle with 6 SC sts in the center using Color 1 Yarn
Join in the round by slip stitching first and last stitches together
Round 1: CH1,2 SC in each stitch around, slip stitch into first stitch (12 total sts)
See Video 2 for help with Round 2
Round 2: CH2, *3 HDC in next stitch, CH2, skip the next stitch* Repeat around, slip stitch into first stitch (30 total sts including center chains)
See Video 3 for help with Round 3
Round 3: CH2, *HDC3tog, CH5, slip stitch in next CH space, CH5* Repeat around, slip stitch into first stitch (72 total sts including center chains)
Drop Color 1 yarn and pick up Color 2 yarn
See Video 4 for help with Round 4
Round 4: CH4, *5 TRC in next CH space, (DC, HDC) in next CH space, (HDC, DC) in next CH space* Repeat 3 more times, slip stitch into first stitch (36 total sts)
Fasten off. Secure and weave in all ends.
Your project should measure 3” (7.5cm) x 3” (7.5cm) at this point.
Large Lace Block Pattern
Create a Magic Circle with 8 DC sts in the center using Color 1 Yarn
Join in the round by slip stitching first and last stitches together
Round 1: CH2, 2 DC in each stitch around, slip stitch into first stitch (16 total sts)
See Video 5 for help with Round 2
Round 2: CH2, *2 DC in next stitch, CH2, skip the next stitch* Repeat around, slip stitch into first stitch (32 total sts including center chains)
See Video 6 for help with Round 3
Round 3: CH2, *2 DC in each of next 2 sts, CH2, skip next CH space* Repeat around, slip stitch into first stitch (48 total sts including center chains)
Round 4: CH2, *DC in next stitch, 2 DC in each of next 2 sts, DC in next stitch, CH5, skip next CH space* Repeat around, slip stitch into first stitch (88 total sts including center chains)
See Video 7 for help with Round 5
Round 5: CH2, *DC in next stitch, DC2tog, DC2tog, DC in next stitch, CH5, slip stitch into next CH space, CH5* Repeat around, slip stitch into first stitch (120 total sts including center chains)
Round 6: CH2, *DC2tog, DC2tog, CH5, slip stitch into next CH space, CH5, slip stitch into next CH space, CH5* Repeat around, slip stitch into first stitch (152 total sts including center chains)
See Video 8 for help with Round 7
Round 7: CH1, *SC2tog, CH5, slip stitch into next CH space, CH5, slip stitch into next CH space, CH5, slip stitch into next CH space, CH5* Repeat around, slip stitch into first stitch (192 total sts including center chains)
See Video 9 for help with Round 8
Round 6: CH5, skip the first CH space, slip stitch into next CH space, *CH5, slip stitch into next CH space* Repeat around, slip stitch into first stitch (32 total CH spaces)
See Video 10 for help with Round 9
Drop Color 1 yarn and pick up Color 2 yarn
Round 9: CH4, *7 DTRC in next CH space, 3 TRC in next CH space, 3 DC in next CH space, 3 HDC in next CH space, 3 SC in next CH space, 3 HDC in next CH space, 3 DC in next CH space, 3 TRC in next CH space* Repeat around, slip stitch into first stitch (112 total sts)
Round 10: CH2, DC in each of next 3 sts, *5 DC in next stitch, DC in each of next 27 sts* Repeat 2 more times, 5 DC in next stitch, DC in each of next 24 sts, slip stitch into first stitch (128 total sts)
Round 11: CH2, DC in each of next 5 sts, *5 DC in next stitch, DC in each of next 31 sts* Repeat 2 more times, 5 DC in next stitch, DC in each of next 26 sts, slip stitch into first stitch (144 total sts)
Round 12: CH2, DC in each of next 7 sts, *4 DC in next stitch, DC in each of next 35 sts* Repeat 2 more times, 4 DC in next stitch, DC in each of next 28 sts, slip stitch into first stitch (156 total sts)
Your project should measure 11.25” (28.5cm) x 11.25” (28.5cm) at this point.
See Video 11 for help with next section
Slip stitch into each of the next 9 sts (which should bring you to the corner stitch).
We’ll now be working in rows. Turn work.
Row 1: CH2, DC into each stitch across to corner stitch, turn work
(39 total sts not including turning chain)
Row 2: CH2, DC in each stitch across, turn work (39 total sts)
Repeat Row 2 until your project measures 20” (50.75cm) in length from the upper edge of square. Do not turn work on last repeat. Fasten off.
See Video 12 for help with next section
Seam 3 of the small lace blocks together, adding a few additional SC rows between each block in order to make this piece the appropriate width, and then seam that piece to the bottom edge you just completed. Block as desired.
See Diagram 1.
First Front Side Pattern
See Video 13 for help with next section
Return to the upper edge of the Large Lace Block piece you just created (upper edge is the opposite side of the edge you just extended). Attach a new strand of Color 2 yarn to the top right corner stitch with the right side of the project facing you.
Row 1: CH2, DC in each of next 16 sts, turn work (16 total sts)
Row 2: CH2, DC2tog, DC in each of next 14 sts, turn work (15 total sts)
Row 3: CH2, DC in each of next 13 sts, DC2tog, turn work (14 total sts)
Row 4: CH2, DC2tog, DC in each of next 12 sts, turn work (13 total sts)
Row 5: CH2, DC in each of next 11 sts, DC2tog, turn work (12 total sts)
Row 6: CH2, DC2tog, DC in each of next 10 sts, turn work (11 total sts)
Row 7: CH2, DC in each of next 5 sts, 3 DC in center stitch, DC in each of next 5 sts, turn work (13 total sts)
See Video 14 for help with next section
Row 8: CH2, DC in each stitch across to center stitch, 3 DC in center stitch, DC in each remaining stitch across, turn work (15 total sts – increased by 2 sts)
Repeat Row 8 until you’ve increased to 131 total sts. Do not turn work on last repeat. Fasten off.
Seam 5 of the small lace blocks together. Seam 6 of the small lace blocks together. Seam these two pieces to the bottom edge you just created with the smaller, 5 block piece on the side closest to the back panel and the longer, 6 block piece on the side closest to the front opening.
See Diagram 2
Second Front Side Pattern
Return to the upper edge of the Large Lace Block piece you previously created (upper edge is the opposite side of the edge you just extended). Count 16 sts in from the top left corner stitch. Attach a new strand of Color 2 yarn to the stitch you just counted to with the right side of the project facing you.
Row 1: CH2, DC in each of next 16 sts, turn work (16 total sts)
Row 2: CH2, DC in each of next 14 sts, DC2tog, turn work (15 total sts)
Row 3: CH2, DC2tog, DC in each of next 13 sts, turn work (14 total sts)
Row 4: CH2, DC in each of next 12 sts, DC2tog, turn work (13 total sts)
Row 5: CH2, DC2tog, DC in each of next 11 sts, turn work (12 total sts)
Row 6: CH2, DC in each of next 10 sts, DC2tog, turn work (11 total sts)
Row 7: CH2, DC in each of next 5 sts, 3 DC in center stitch, DC in each of next 5 sts, turn work (13 total sts)
Row 8: CH2, DC in each stitch across to center stitch, 3 DC in center stitch, DC in each remaining stitch across, turn work (15 total sts – increased by 2 sts)
Repeat Row 8 until you’ve increased to 131 total sts. Do not turn work on last repeat. Fasten off.
Seam 5 of the small lace blocks together. Seam 6 of the small lace blocks together. Seam these two pieces to the bottom edge you just created with the smaller, 5 block piece on the side closest to the back panel and the longer, 6 block piece on the side closest to the front opening. Block as desired.
Lining up the front and back Small Lace Blocks, seam the back panel to the front sides of vest. Leave desired space for arm hole. I chose to leave 13” (33cm) open for the arm hole on my sample.
Add a SC border around all outside edges of the project. Fasten off. Secure and weave in all ends.
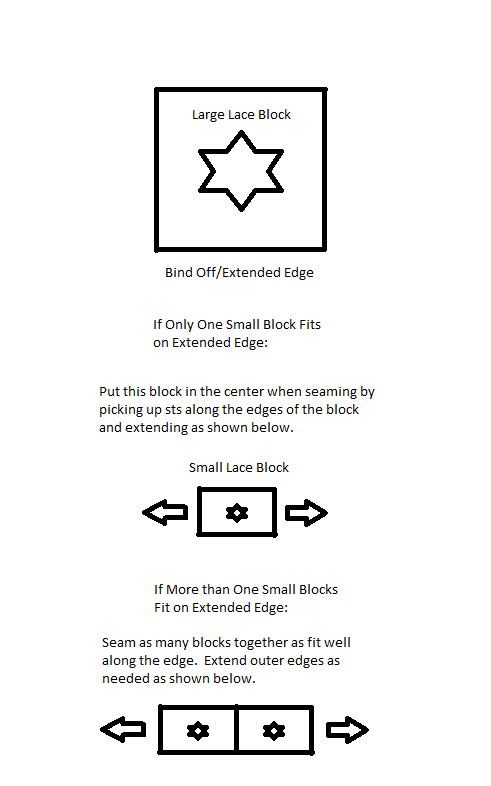
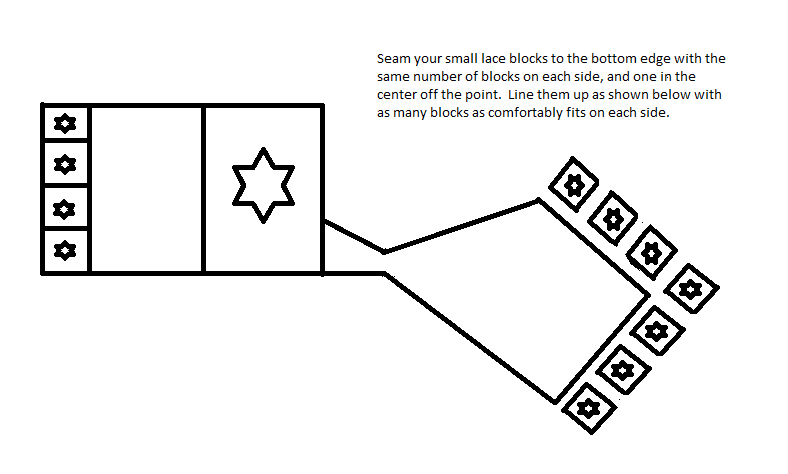
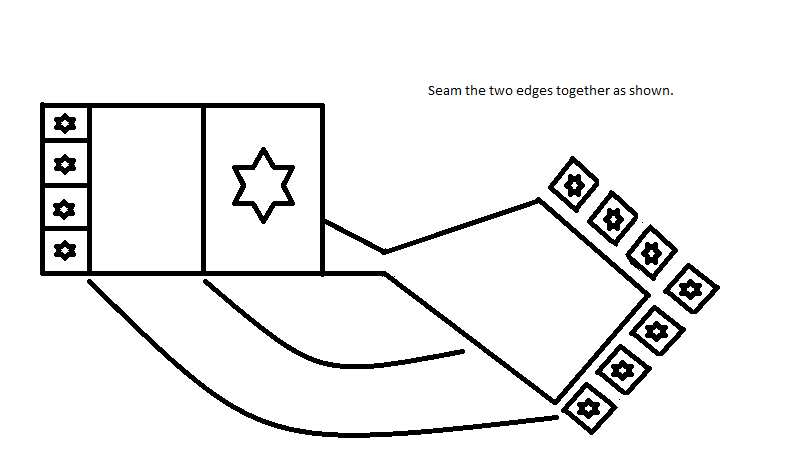
This design, a written work and images are a copyright of
©MelodysMakings and may not be copied or reproduced in any way. You have permission to sell finished products made from this pattern, but please leave a link to my website, www.melodys-makings.com, in your product listing specifying that I am the designer of this pattern. Thank you for supporting me as a work at home mother!
I wouldn’t necessarily call it “new being” but for me I guess it would be becoming a step mom….. I don’t personally have any kids of my own yet but my boyfriend does and honestly that was the biggest most rewarding change on the heart ? I will be completely honest I was terrified at first I would not “officially” date my boyfriend until I met his son and I waited a loooooong time before I wanted to meet him and it had nothing to do with the fact that he had a child I was honestly scared that if things don’t work out with my boyfriend and I what would his son think? I didn’t want to enter his life and then leave and him be left with confusing thoughts when he was already dealing with his parents being divorced but I followed my heart and trusted it with everything and 4 years later I couldn’t imagine life without him! Love is a funny but wonderful thing in this crazy deal we call life
Love this! Your step son is lucky to have you in his life. Thanks for sharing!
Thank you very much. Cannot wait to make one.
Hi I am stuck on round 5 of the large lace block pattern and no matter how many times I take the round out and do it again I only come out with a count of 112 so If possible you could let me know what I’m doing wrong I would appreciate it. Thanking you in advance,
Hi Margaret! Were you ever able to get it? If not, I’d be happy to help you work through it – could you please contact me via email? [email protected]. Thank you!
Pingback: 4 Free Patterns For Summer Lovers - Happily Hooked
Pingback: 4 Free Designs Perfect for the End of Summer - Happily Hooked