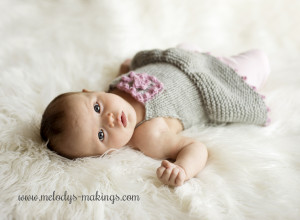
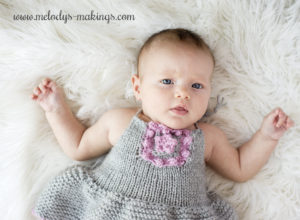
Autumn Lovin’ Baby Dress
This cute baby dress knitting pattern is sure to be a hit for the little ones in your life.
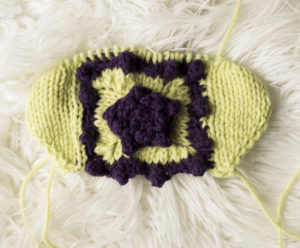
Designed with a gorgeous flower in the front and center of the dress, this is an entertaining knit! Learn to make flowers and pick up stitches.
With all sizes Newborn baby through 5 years, your creations can grow along with the little girl you’re crafting for.
If you’re looking for a crochet version of this same pattern, you’ll find my Autumn Lovin’ Dress Crochet Toddler Dress Pattern here.
Baby Dress Knitting Pattern
Materials:
- Yarn: Approximately 100 (75 of Base Color 1 & 25 of Accent Color 2) yards of worsted (4) yarn for smaller sizes and approx. 375 yards (325 of Base Color 1 & 50 of Accent Color 2) for larger sizes (I used Red Heart Soft)
- Knitting Needles: Size 5.5 mm (I/9) OR whatever size is needed to obtain gauge
- OPTIONAL: Same size circular needles to create a seamless piece. The pattern is written so it can be done either flat or in the round. If you choose to use circular needles, the length should be no longer than the Rib Cage circumference of the size you are making listed below.
- Yarn or Tapestry Needle
- Photos can be found at the end of this post as well as in the video shown below.
Abbreviations:
- K: Knit
- P: Purl
- CO: Cast On
- BO: Bind Off
- M1 (Make 1): On a knit row: Insert left needle, front to back, under the strand between st on left needle and st on right needle making a new loop on left needle. Knit this loop through the back.
- M1: On a purl row: Insert left needle, back to front, under the strand between st on left needle and st on right needle making a new loop on left needle. Purl this loop through the front.
Gauge:
8 sts and 13 rows = 2 inches (5 centimeters) in Stockinette Stitch
***It is important to check your gauge!***
Resources:
Step by Step photos can be found in the video at the top of this post. You’ll also find them in the ad-free PDF copy of this pattern available in my Etsy shop here.
Average Head Circumference:
- Newborn: 13-14”
- 0-3 Months: 14-15”
- 3-6 Months: 14-17”
- 6-12 Months: 16-19”
- 1-3 Years: 18-20”
- 3-10 Years: 19-20.5”
Average Rib Cage (Dress) Circumference:
- Newborn: 14” (35.5cm)
- 0-3 Months: 15” (38cm)
- 3-6 Months: 16” (40.5cm)
- 6-12 Months: 17” (43.25cm)
- 1-2 Years: 18” (45.75cm)
- 3 Years: 19” (48.25cm)
- 4 Years: 20” (50.75cm)
- 5 Years: 21” (53.25cm)
Autumn Lovin’ Dress Pattern
Love this pattern and my work?
Help support this blog by purchasing an ad-free PDF copy of this pattern!
Get the ad-free copy on Ravelry here.
Get the ad-free copy on Etsy here.
Newborn Dress Pattern
Cast on 48 sts using Accent Color 2 yarn and Straight Needles
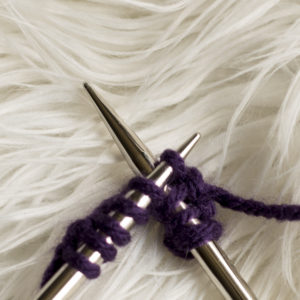
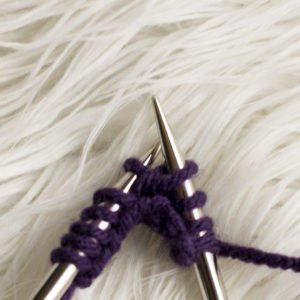
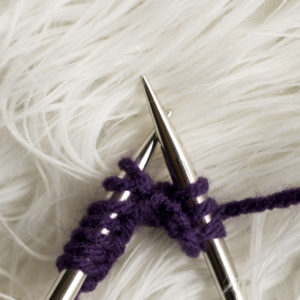
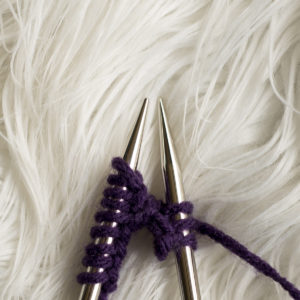
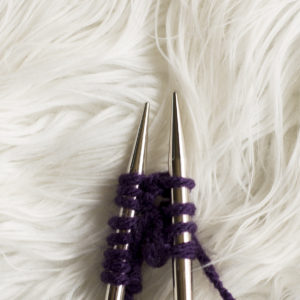
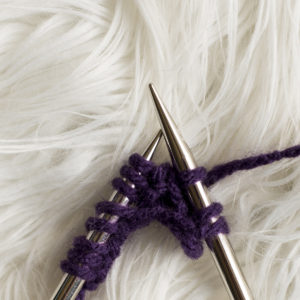
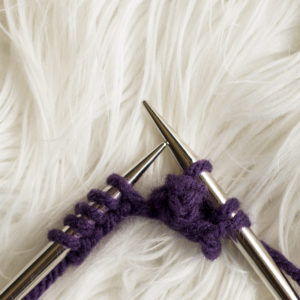
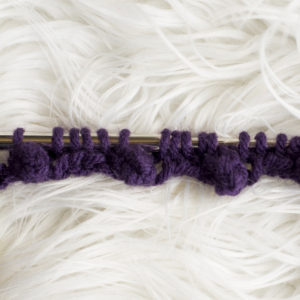
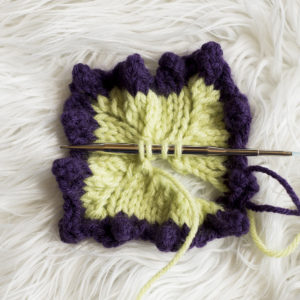
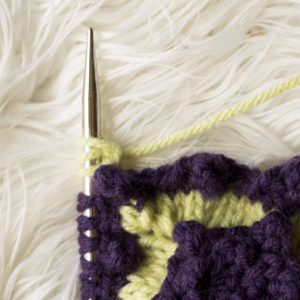
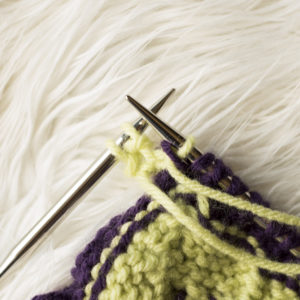
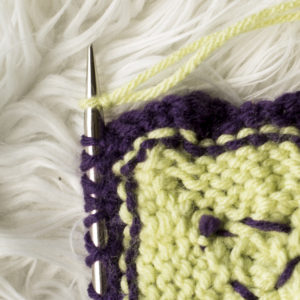
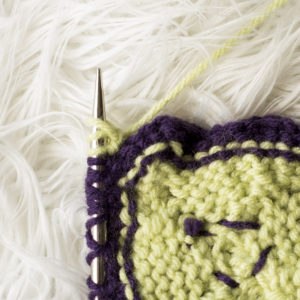
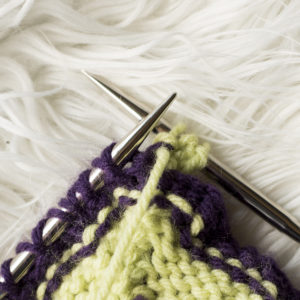
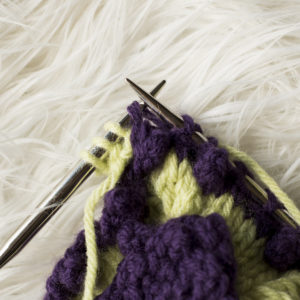
Row 1: *K3, CO3 (using a cable cast on onto left hand needle. These will be the next sts you work across), Using last stitch on right needle, BO4* Repeat across (36 total sts – 12 shells created)
{Reference Photos 1-8 for help with Row 1}
Drop and cut Accent Color 2 leave an approx. 12 inch (30.5cm) tail and Pick up Base Color 1
Row 2: *P6, P3tog* Repeat across (28 total sts)
Row 3: *K3tog, K4* Repeat across (20 total sts)
Row 4: *P2, P3tog* Repeat across (12 total sts)
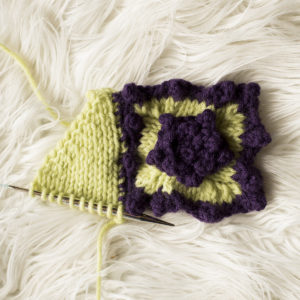
Row 5: *K3tog* Repeat across (4 total sts)
{Reference Photo 9 for example of what project should look like at this point}
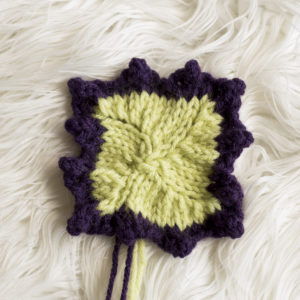
Do not bind off. Using yarn or tapestry needle, take stitches off of knitting needle as if to purl. Pull tail through all stitches. This should cinch the center of the square shape that you just started. Cut with a yarn tail long enough that you can use it to stitch the two edges of the piece you just made together. They should form a square after being connected.
Cut yarn and secure and weave in all ends.
{Reference Photo 10 for example of what project should look like at this point}
Cast on 6 sts using Accent Color 2 Yarn and Straight Needles
Row 1: K1, *CO3 (using a cable cast on onto left hand needle. These will be the next sts you work across), Using last stitch on right needle, BO4* Repeat across (5 total flower petals)
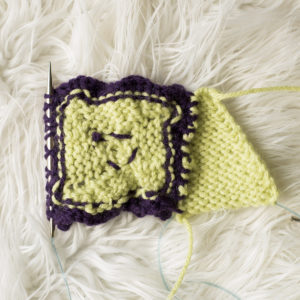
Do not bind off. Using yarn or tapestry needle, take sts off of knitting needle as if to purl. Pull tail through all sts to cinch the center of flower. Cut yarn with tail long enough to use for sewing the flower to center of square. Weave in all ends.
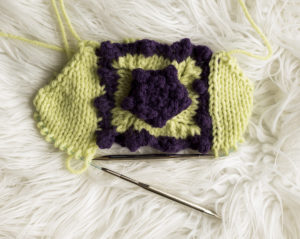
{Reference Photo 11 for example of what project should look like at this point}
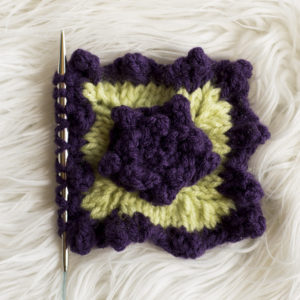
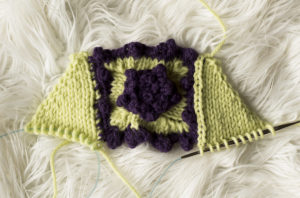
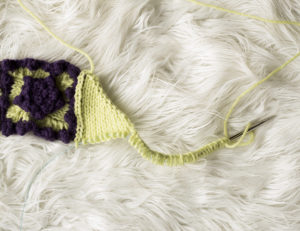
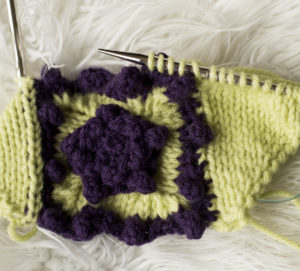
During the next section, you’ll be turning your flower square into a trapezoid shape (working on one side at a time) to form the front section of the halter top. To do this, you’ll be picking up sts along the edge of flower square, and then slowly adding them into each row to connect the two sections.
With front of flower facing you, pick up 12 sts (working from bottom to top) from the side edge of flower square onto your left straight needle.
{Reference Photo 12 for example of what project should look like at this point}
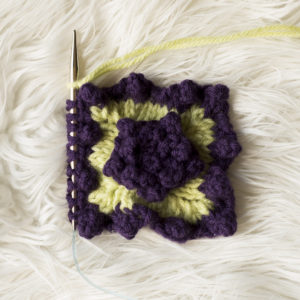
Cast on 3 new sts using Base Color 1 yarn directly above these stitches on left needle (these will be the first 3 sts you work).
{Reference Photos 13&14 for example of what project should look like at this point}
Then complete Row 1.
Row 1: K2, K2tog (Last Base Color 1 stitch and first Accent Color 2 stitch), Turn Work (3 total Base Color 1 sts)
{Reference Photos 15-17 for example of what project should look like at this point}
Row 2: Place one Accent Color 2 stitch onto left needle, P2tog, P1, M1, P1 (4 total Base Color 1 sts)
Row 3: K3, K2tog (Last Base Color 1 stitch and first Accent Color 2 stitch), Turn Work (4 total Base Color 1 sts)
Row 4: Place one Accent Color 2 stitch onto left needle, P2tog, P2, M1, P1 (5 total Base Color 1 sts)
Row 5: K4, K2tog (Last Base Color 1 stitch and first Accent Color 2 stitch), Turn Work (5 total Base Color 1 sts)
Row 6: Place one Accent Color 2 stitch onto left needle, P2tog, P3, M1, P1 (6 total Base Color 1 sts)
Row 7: K5, K2tog (Last Base Color 1 stitch and first Accent Color 2 stitch), Turn Work (6 total Base Color 1 sts)
Row 8: Place one Accent Color 2 stitch onto left needle, P2tog, P4, M1, P1 (7 total Base Color 1 sts)
Row 9: K6, K2tog (Last Base Color 1 stitch and first Accent Color 2 stitch), Turn Work (7 total Base Color 1 sts)
Row 10: Place one Accent Color 2 stitch onto left needle, P2tog, P5, M1, P1 (8 total Base Color 1 sts)
Row 11: K1, M1, K6, K2tog (Last Base Color 1 stitch and first Accent Color 2 stitch), Turn Work (9 total Base Color 1 sts)
Row 12: Place one Accent Color 2 stitch onto left needle, P2tog, P7, M1, P1 (10 total Base Color 1 sts)
Cut yarn and place this section on stitch holder.
{Reference Photo 18 for example of what project should look like at this point}
With back of flower facing you, pick up 12 sts (working from bottom to top) from the side edge of flower square onto your left straight needle.
{Reference Photo 19 for example of what project should look like at this point}
Cast on 3 new sts using Base Color 1 yarn directly above these stitches on left needle (these will be the first 3 sts you work).
{Reference Photos 20&21 for example of what project should look like at this point}
Then complete Row 1.
Row 1: P2, P2tog (Last Base Color 1 stitch and first Accent Color 2 stitch), Turn Work (3 total Base Color 1 sts)
{Reference Photos 22&23 for example of what project should look like at this point}
Row 2: Place one Accent Color 2 stitch onto left needle, K2tog, K1, M1, K1 (4 total Base Color 1 sts)
Row 3: P3, P2tog (Last Base Color 1 stitch and first Accent Color 2 stitch), Turn Work (4 total Base Color 1 sts)
Row 4: Place one Accent Color 2 stitch onto left needle, K2tog, K2, M1, K1 (5 total Base Color 1 sts)
Row 5: P4, P2tog (Last Base Color 1 stitch and first Accent Color 2 stitch), Turn Work (5 total Base Color 1 sts)
Row 6: Place one Accent Color 2 stitch onto left needle, K2tog, K3, M1, K1 (6 total Base Color 1 sts)
Row 7: P5, P2tog (Last Base Color 1 stitch and first Accent Color 2 stitch), Turn Work (6 total Base Color 1 sts)
Row 8: Place one Accent Color 2 stitch onto left needle, K2tog, K4, M1, K1 (7 total Base Color 1 sts)
Row 9: P6, P2tog (Last Base Color 1 stitch and first Accent Color 2 stitch), Turn Work (7 total Base Color 1 sts)
Row 10: Place one Accent Color 2 stitch onto left needle, K2tog, K5, M1, K1 (8 total Base Color 1 sts)
Row 11: P1, M1, P6, P2tog (Last Base Color 1 stitch and first Accent Color 2 stitch), Turn Work (9 total Base Color 1 sts)
Row 12: Place one Accent Color 2 stitch onto left needle, K2tog, K7, M1, K1 (10 total Base Color 1 sts)
{Reference Photo 24 for example of what project should look like at this point}
Your working yarn should now be on the outer edge of your trapezoid. If, for some reason, your yarn isn’t on that edge, Knit one more row so you’ll be completing the next step along the outside edge.
Circular Needle Instructions
*If using circular needles, follow these instructions, if using straight needles, skip ahead to the section labeled Straight Needle Instructions.*
Move stitches to circular needles.
Cast on 20 additional stitches.
{Reference Photo 25 for example of what project should look like at this point}
Then move stitches you had previously placed on stitch holder onto circular needle as well (these should be on left needle ready to knit). All knit sides should be facing. Join in the round. Place Stitch Marker.
*Stop at this point to check your size measurements. Your project should measure approx. 13 inches (33cm) in circumference at this point. If your project does not measure correctly, cast on or remove sts as necessary to get it to the right measurement. Make sure the number you cast on is a multiple of 4.*
{Reference Photo 26 for example of what project should look like at this point}
Round 1: Knit each of next 10 sts, Pick up and knit 12 sts along the bottom edge of flower square, Knit all remaining sts (52 total sts if completed as written)
{Reference Photos 27&28 for example of what project should look like at this point}
Round 2: Knit (52 total sts)
Repeat Round 2 until your project measures approx. 5 inches (12.75cm) from the top edge of flower square.
Round 3: Purl
Round 4: KFB each stitch around (104 total sts if completed as written)
Round 5: Purl (104 total sts)
Round 6: Knit
Repeat Rounds 5&6 until your project measures approx. 10 inches (25.5cm) from the top edge of flower square.
Drop Base Color 1 and pick up Accent Color 2 yarn.
Bind off using the Picot Bind off method.
Resource for Picot Bind Off: https://melodys-makings.com/how-to-knit-picot-bind-off/
Straight Needle Instructions
Cast on 20 additional stitches.
Row 1: Purl each of next 30 sts, Pick up and purl 12 sts along the bottom edge of flower square, Purl 10 remaining sts off of stitch holder (52 total sts)
Row 2: Knit
Row 3: Purl
Repeat Rows 2&3 until your project measures approx. 5 inches (12.75cm) from the top edge of flower square.
*Stop when your project gets long enough to check your size measurements. Your project should measure approx. 13 inches (33cm) in width at this point.*
Row 4: KFB each stitch across (104 total sts if completed as written)
Row 5: Knit (104 total sts)
Repeat Row 5 until your project measures approx. 10 inches (25.5cm) from the top edge of flower square.
Drop Base Color 1 and pick up Accent Color 2 yarn.
Bind off using the Picot Bind off method.
Resource for Picot Bind Off: https://melodys-makings.com/how-to-knit-picot-bind-off/
Cut two strands of yarn approx. 25 inches (63.5cm) long and pull them in a loop through the top corner of your trapezoid section. Pull the ends of the yarn through this loop (this attaches the yarn without any knots, and makes your project look smoother). Separate the yarn into three sections and braid them to desired approx. 10 inches (25.5cm) in length. Secure and cut yarn evenly on the ends. Repeat on the other side of the trapezoid as well. These braids act as your halter top ties.
Repeat flower instructions and seam to a long braid to use as tie-back headband.
0-3 Months Pattern
Cast on 48 sts using Accent Color 2 yarn and Straight Needles
Row 1: *K3, CO3 (using a cable cast on onto left hand needle. These will be the next sts you work across), Using last stitch on right needle, BO4* Repeat across (36 total sts – 12 shells created)
{Reference Photos 1-8 for help with Row 1}
Drop and cut Accent Color 2 leave an approx. 12 inch (30.5cm) tail and Pick up Base Color 1
Row 2: *P6, P3tog* Repeat across (28 total sts)
Row 3: *K3tog, K4* Repeat across (20 total sts)
Row 4: *P2, P3tog* Repeat across (12 total sts)
Row 5: *K3tog* Repeat across (4 total sts)
{Reference Photo 9 for example of what project should look like at this point}
Do not bind off. Using yarn or tapestry needle, take stitches off of knitting needle as if to purl. Pull tail through all stitches. This should cinch the center of the square shape that you just started. Cut with a yarn tail long enough that you can use it to stitch the two edges of the piece you just made together. They should form a square after being connected.
Cut yarn and secure and weave in all ends.
{Reference Photo 10 for example of what project should look like at this point}
Cast on 6 sts using Accent Color 2 Yarn and Straight Needles
Row 1: K1, *CO3 (using a cable cast on onto left hand needle. These will be the next sts you work across), Using last stitch on right needle, BO4* Repeat across (5 total flower petals)
Do not bind off. Using yarn or tapestry needle, take sts off of knitting needle as if to purl. Pull tail through all sts to cinch the center of flower. Cut yarn with tail long enough to use for sewing the flower to center of square. Weave in all ends.
{Reference Photo 11 for example of what project should look like at this point}
During the next section, you’ll be turning your flower square into a trapezoid shape (working on one side at a time) to form the front section of the halter top. To do this, you’ll be picking up sts along the edge of flower square, and then slowly adding them into each row to connect the two sections.
With front of flower facing you, pick up 12 sts (working from bottom to top) from the side edge of flower square onto your left straight needle.
{Reference Photo 12 for example of what project should look like at this point}
Cast on 3 new sts using Base Color 1 yarn directly above these stitches on left needle (these will be the first 3 sts you work).
{Reference Photos 13&14 for example of what project should look like at this point}
Then complete Row 1.
Row 1: K2, K2tog (Last Base Color 1 stitch and first Accent Color 2 stitch), Turn Work (3 total Base Color 1 sts)
{Reference Photos 15-17 for example of what project should look like at this point}
Row 2: Place one Accent Color 2 stitch onto left needle, P2tog, P1, M1, P1 (4 total Base Color 1 sts)
Row 3: K3, K2tog (Last Base Color 1 stitch and first Accent Color 2 stitch), Turn Work (4 total Base Color 1 sts)
Row 4: Place one Accent Color 2 stitch onto left needle, P2tog, P2, M1, P1 (5 total Base Color 1 sts)
Row 5: K4, K2tog (Last Base Color 1 stitch and first Accent Color 2 stitch), Turn Work (5 total Base Color 1 sts)
Row 6: Place one Accent Color 2 stitch onto left needle, P2tog, P3, M1, P1 (6 total Base Color 1 sts)
Row 7: K5, K2tog (Last Base Color 1 stitch and first Accent Color 2 stitch), Turn Work (6 total Base Color 1 sts)
Row 8: Place one Accent Color 2 stitch onto left needle, P2tog, P4, M1, P1 (7 total Base Color 1 sts)
Row 9: K6, K2tog (Last Base Color 1 stitch and first Accent Color 2 stitch), Turn Work (7 total Base Color 1 sts)
Row 10: Place one Accent Color 2 stitch onto left needle, P2tog, P5, M1, P1 (8 total Base Color 1 sts)
Row 11: K1, M1, K6, K2tog (Last Base Color 1 stitch and first Accent Color 2 stitch), Turn Work (9 total Base Color 1 sts)
Row 12: Place one Accent Color 2 stitch onto left needle, P2tog, P7, M1, P1 (10 total Base Color 1 sts)
Cut yarn and place this section on stitch holder.
{Reference Photo 18 for example of what project should look like at this point}
With back of flower facing you, pick up 12 sts (working from bottom to top) from the side edge of flower square onto your left straight needle.
{Reference Photo 19 for example of what project should look like at this point}
Cast on 3 new sts using Base Color 1 yarn directly above these stitches on left needle (these will be the first 3 sts you work).
{Reference Photos 20&21 for example of what project should look like at this point}
Then complete Row 1.
Row 1: P2, P2tog (Last Base Color 1 stitch and first Accent Color 2 stitch), Turn Work (3 total Base Color 1 sts)
{Reference Photos 22&23 for example of what project should look like at this point}
Row 2: Place one Accent Color 2 stitch onto left needle, K2tog, K1, M1, K1 (4 total Base Color 1 sts)
Row 3: P3, P2tog (Last Base Color 1 stitch and first Accent Color 2 stitch), Turn Work (4 total Base Color 1 sts)
Row 4: Place one Accent Color 2 stitch onto left needle, K2tog, K2, M1, K1 (5 total Base Color 1 sts)
Row 5: P4, P2tog (Last Base Color 1 stitch and first Accent Color 2 stitch), Turn Work (5 total Base Color 1 sts)
Row 6: Place one Accent Color 2 stitch onto left needle, K2tog, K3, M1, K1 (6 total Base Color 1 sts)
Row 7: P5, P2tog (Last Base Color 1 stitch and first Accent Color 2 stitch), Turn Work (6 total Base Color 1 sts)
Row 8: Place one Accent Color 2 stitch onto left needle, K2tog, K4, M1, K1 (7 total Base Color 1 sts)
Row 9: P6, P2tog (Last Base Color 1 stitch and first Accent Color 2 stitch), Turn Work (7 total Base Color 1 sts)
Row 10: Place one Accent Color 2 stitch onto left needle, K2tog, K5, M1, K1 (8 total Base Color 1 sts)
Row 11: P1, M1, P6, P2tog (Last Base Color 1 stitch and first Accent Color 2 stitch), Turn Work (9 total Base Color 1 sts)
Row 12: Place one Accent Color 2 stitch onto left needle, K2tog, K7, M1, K1 (10 total Base Color 1 sts)
{Reference Photo 24 for example of what project should look like at this point}
Your working yarn should now be on the outer edge of your trapezoid. If, for some reason, your yarn isn’t on that edge, Knit one more row so you’ll be completing the next step along the outside edge.
Circular Needle Instructions
*If using circular needles, follow these instructions, if using straight needles, skip ahead to the section labeled Straight Needle Instructions.*
Move stitches to circular needles.
Cast on 24 additional stitches
{Reference Photo 25 for example of what project should look like at this point}
Then move stitches you had previously placed on stitch holder onto circular needle as well (these should be on left needle ready to knit). All knit sides should be facing. Join in the round. Place Stitch Marker.
*Stop at this point to check your size measurements. Your project should measure approx. 14 inches (35.5 cm) in circumference at this point. If your project does not measure correctly, cast on or remove sts as necessary to get it to the right measurement. Make sure the number you cast on is a multiple of 4.*
{Reference Photo 26 for example of what project should look like at this point}
Round 1: Knit each of next 10 sts, Pick up and knit 12 sts along the bottom edge of flower square, Knit all remaining sts (56 total sts if completed as written)
{Reference Photos 27&28 for example of what project should look like at this point}
Round 2: Knit (56 total sts)
Repeat Round 2 until your project measures approx. 5.5 inches (14cm) from the top edge of flower square.
Round 3: Purl
Round 4: KFB each stitch around (112 total sts if completed as written)
Round 5: Purl (112 total sts)
Round 6: Knit
Repeat Rounds 5&6 until your project measures approx. 11 inches (28cm) from the top edge of flower square.
Drop Base Color 1 and pick up Accent Color 2 yarn.
Bind off using the Picot Bind off method.
Resource for Picot Bind Off: https://melodys-makings.com/how-to-knit-picot-bind-off/
Straight Needle Instructions
Cast on 24 additional stitches.
Row 1: Purl each of next 34 sts, Pick up and purl 12 sts along the bottom edge of flower square, Purl 10 remaining sts off of stitch holder (56 total sts)
Row 2: Knit
Row 3: Purl
Repeat Rows 2&3 until your project measures approx. 5.5 inches (14cm) from the top edge of flower square.
*Stop when your project gets long enough to check your size measurements. Your project should measure approx. 14 inches (35.5 cm) in width at this point.*
Row 4: KFB each stitch across (112 total sts if completed as written)
Row 5: Knit (112 total sts)
Repeat Row 5 until your project measures approx. 11 inches (28cm) from the top edge of flower square.
Drop Base Color 1 and pick up Accent Color 2 yarn.
Bind off using the Picot Bind off method.
Resource for Picot Bind Off: https://melodys-makings.com/how-to-knit-picot-bind-off/
Cut two strands of yarn approx. 25 inches (63.5cm) long and pull them in a loop through the top corner of your trapezoid section. Pull the ends of the yarn through this loop (this attaches the yarn without any knots, and makes your project look smoother). Separate the yarn into three sections and braid them to desired approx. 10 inches (25.5cm) in length. Secure and cut yarn evenly on the ends. Repeat on the other side of the trapezoid as well. These braids act as your halter top ties.
Repeat flower instructions and seam to a long braid to use as tie-back headband.
3-6 Months Pattern
Cast on 60 sts using Accent Color 2 yarn and Straight Needles
Row 1: *K4, CO3 (using a cable cast on onto left hand needle. These will be the next sts you work across), Using last stitch on right needle, BO4* Repeat across (48 total sts – 12 shells created)
{Reference Photos 1-8 for help with Row 1}
Drop and cut Accent Color 2 leave an approx. 12 inch (30.5cm) tail and Pick up Base Color 1
Row 2: *P9, P3tog* Repeat across (40 total sts)
Row 3: *K3tog, K7* Repeat across (32 total sts)
Row 4: *P5, P3tog* Repeat across (24 total sts)
Row 5: *K3tog, K3* Repeat across (16 total sts)
Row 6: *P1, P3tog* Repeat acorss (8 total sts)
{Reference Photo 9 for example of what project should look like at this point}
Do not bind off. Using yarn or tapestry needle, take stitches off of knitting needle as if to purl. Pull tail through all stitches. This should cinch the center of the square shape that you just started. Cut with a yarn tail long enough that you can use it to stitch the two edges of the piece you just made together. They should form a square after being connected.
Cut yarn and secure and weave in all ends.
{Reference Photo 10 for example of what project should look like at this point}
Cast on 20 sts using Accent Color 2 Yarn and Straight Needles
Row 1: *K3, CO3 (using a cable cast on onto left hand needle. These will be the next sts you work across), Using last stitch on right needle, BO4* Repeat across (5 total flower petals, 15 total sts)
Row 2: *P2tog, P1* Repeat across(10 total sts)
Row 3: *K2tog* Repeat across (5 total sts)
Do not bind off. Using yarn or tapestry needle, take sts off of knitting needle as if to purl. Pull tail through all sts to cinch the center of flower. Seam together flower edges. Cut yarn with tail long enough to use for sewing the flower to center of square. Weave in all ends.
Cast on 6 sts using Accent Color 2 Yarn and Straight Needles
Row 1: K1, *CO3 (using a cable cast on onto left hand needle. These will be the next sts you work across), Using last stitch on right needle, BO4* Repeat across (5 total flower petals)
Do not bind off. Using yarn or tapestry needle, take sts off of knitting needle as if to purl. Pull tail through all sts to cinch the center of flower. Seam together flower edges. Cut yarn with tail long enough to use for sewing the flower to center of square directly on top of the larger flower created above. Weave in all ends.
{Reference Photo 11 for example of what project should look like at this point}
During the next section, you’ll be turning your flower square into a trapezoid shape (working on one side at a time) to form the front section of the halter top. To do this, you’ll be picking up sts along the edge of flower square, and then slowly adding them into each row to connect the two sections.
With front of flower facing you, pick up 15 sts (working from bottom to top) from the side edge of flower square onto your left straight needle.
{Reference Photo 12 for example of what project should look like at this point}
Cast on 3 new sts using Base Color 1 yarn directly above these stitches on left needle (these will be the first 3 sts you work).
{Reference Photos 13&14 for example of what project should look like at this point}
Then complete Row 1.
Row 1: K2, K2tog (Last Base Color 1 stitch and first Accent Color 2 stitch), Turn Work (3 total Base Color 1 sts)
{Reference Photos 15-17 for example of what project should look like at this point}
Row 2: Place one Accent Color 2 stitch onto left needle, P2tog, P1, M1, P1 (4 total Base Color 1 sts)
Row 3: K3, K2tog (Last Base Color 1 stitch and first Accent Color 2 stitch), Turn Work (4 total Base Color 1 sts)
Row 4: Place one Accent Color 2 stitch onto left needle, P2tog, P2, M1, P1 (5 total Base Color 1 sts)
Row 5: K4, K2tog (Last Base Color 1 stitch and first Accent Color 2 stitch), Turn Work (5 total Base Color 1 sts)
Row 6: Place one Accent Color 2 stitch onto left needle, P2tog, P3, M1, P1 (6 total Base Color 1 sts)
Row 7: K5, K2tog (Last Base Color 1 stitch and first Accent Color 2 stitch), Turn Work (6 total Base Color 1 sts)
Row 8: Place one Accent Color 2 stitch onto left needle, P2tog, P4, M1, P1 (7 total Base Color 1 sts)
Row 9: K6, K2tog (Last Base Color 1 stitch and first Accent Color 2 stitch), Turn Work (7 total Base Color 1 sts)
Row 10: Place one Accent Color 2 stitch onto left needle, P2tog, P5, M1, P1 (8 total Base Color 1 sts)
Row 11: K7, K2tog (Last Base Color 1 stitch and first Accent Color 2 stitch), Turn Work (8 total Base Color 1 sts)
Row 12: Place one Accent Color 2 stitch onto left needle, P2tog, P6, M1, P1 (9 total Base Color 1 sts)
Row 13: K8, K2tog (Last Base Color 1 stitch and first Accent Color 2 stitch), Turn Work (9 total Base Color 1 sts)
Row 14: Place one Accent Color 2 stitch onto left needle, P2tog, P7, M1, P1 (10 total Base Color 1 sts)
Row 15: K9, K2tog (Last Base Color 1 stitch and first Accent Color 2 stitch), Turn Work (10 total Base Color 1 sts)
Cut yarn and place this section on stitch holder.
{Reference Photo 18 for example of what project should look like at this point}
With back of flower facing you, pick up 15 sts (working from bottom to top) from the side edge of flower square onto your left straight needle.
{Reference Photo 19 for example of what project should look like at this point}
Cast on 3 new sts using Base Color 1 yarn directly above these stitches on left needle (these will be the first 3 sts you work).
{Reference Photos 20&21 for example of what project should look like at this point}
Then complete Row 1.
Row 1: P2, P2tog (Last Base Color 1 stitch and first Accent Color 2 stitch), Turn Work (3 total Base Color 1 sts)
{Reference Photos 22&23 for example of what project should look like at this point}
Row 2: Place one Accent Color 2 stitch onto left needle, K2tog, K1, M1, K1 (4 total Base Color 1 sts)
Row 3: P3, P2tog (Last Base Color 1 stitch and first Accent Color 2 stitch), Turn Work (4 total Base Color 1 sts)
Row 4: Place one Accent Color 2 stitch onto left needle, K2tog, K2, M1, K1 (5 total Base Color 1 sts)
Row 5: P4, P2tog (Last Base Color 1 stitch and first Accent Color 2 stitch), Turn Work (5 total Base Color 1 sts)
Row 6: Place one Accent Color 2 stitch onto left needle, K2tog, K3, M1, K1 (6 total Base Color 1 sts)
Row 7: P5, P2tog (Last Base Color 1 stitch and first Accent Color 2 stitch), Turn Work (6 total Base Color 1 sts)
Row 8: Place one Accent Color 2 stitch onto left needle, K2tog, K4, M1, K1 (7 total Base Color 1 sts)
Row 9: P6, P2tog (Last Base Color 1 stitch and first Accent Color 2 stitch), Turn Work (7 total Base Color 1 sts)
Row 10: Place one Accent Color 2 stitch onto left needle, K2tog, K5, M1, K1 (8 total Base Color 1 sts)
Row 11: P7, P2tog (Last Base Color 1 stitch and first Accent Color 2 stitch), Turn Work (8 total Base Color 1 sts)
Row 12: Place one Accent Color 2 stitch onto left needle, K2tog, K6, M1, K1 (9 total Base Color 1 sts)
Row 13: P8, P2tog (Last Base Color 1 stitch and first Accent Color 2 stitch), Turn Work (9 total Base Color 1 sts)
Row 14: Place one Accent Color 2 stitch onto left needle, K2tog, K7, M1, K1 (10 total Base Color 1 sts)
Row 15: P9, P2tog (Last Base Color 1 stitch and first Accent Color 2 stitch), Turn Work (10 total Base Color 1 sts)
{Reference Photo 24 for example of what project should look like at this point}
Your working yarn should now be on the outer edge of your trapezoid. If, for some reason, your yarn isn’t on that edge, Knit one more row so you’ll be completing the next step along the outside edge.
Circular Needle Instructions
*If using circular needles, follow these instructions, if using straight needles, skip ahead to the section labeled Straight Needle Instructions.*
Move stitches to circular needles.
Cast on 25 additional stitches
{Reference Photo 25 for example of what project should look like at this point}
Then move stitches you had previously placed on stitch holder onto circular needle as well (these should be on left needle ready to knit). All knit sides should be facing. Join in the round. Place Stitch Marker.
*Stop at this point to check your size measurements. Your project should measure approx. 15 inches (38 cm) in circumference at this point. If your project does not measure correctly, cast on or remove sts as necessary to get it to the right measurement. Make sure the number you cast on is a multiple of 4 + 1.*
{Reference Photo 26 for example of what project should look like at this point}
Round 1: Knit each of next 10 sts, Pick up and knit 15 sts along the bottom edge of flower square, Knit all remaining sts (60 total sts if completed as written)
{Reference Photos 27&28 for example of what project should look like at this point}
Round 2: Knit (60 total sts)
Repeat Round 2 until your project measures approx. 6 inches (15.25cm) from the top edge of flower square.
Round 3: Purl
Round 4: KFB each stitch around (120 total sts if completed as written)
Round 5: Purl (120 total sts)
Round 6: Knit
Repeat Rounds 5&6 until your project measures approx. 12 inches (30.5cm) from the top edge of flower square.
Drop Base Color 1 and pick up Accent Color 2 yarn.
Bind off using the Picot Bind off method.
Resource for Picot Bind Off: https://melodys-makings.com/how-to-knit-picot-bind-off/
Straight Needle Instructions
Cast on 25 additional stitches.
Row 1: Purl each of next 35 sts, Pick up and purl 15 sts along the bottom edge of flower square, Purl 10 remaining sts off of stitch holder (60 total sts)
Row 2: Knit
Row 3: Purl
Repeat Rows 2&3 until your project measures approx. 6 inches (15.25cm) from the top edge of flower square.
*Stop when your project gets long enough to check your size measurements. Your project should measure approx. 15 inches (38 cm) in width at this point.*
Row 4: KFB each stitch across (120 total sts if completed as written)
Row 5: Knit (120 total sts)
Repeat Row 5 until your project measures approx. 12 inches (30.5cm) from the top edge of flower square.
Drop Base Color 1 and pick up Accent Color 2 yarn.
Bind off using the Picot Bind off method.
Resource for Picot Bind Off: https://melodys-makings.com/how-to-knit-picot-bind-off/
Cut two strands of yarn approx. 25 inches (63.5cm) long and pull them in a loop through the top corner of your trapezoid section. Pull the ends of the yarn through this loop (this attaches the yarn without any knots, and makes your project look smoother). Separate the yarn into three sections and braid them to desired approx. 10 inches (25.5cm) in length. Secure and cut yarn evenly on the ends. Repeat on the other side of the trapezoid as well. These braids act as your halter top ties.
Repeat flower instructions and seam to a long braid to use as tie-back headband.
6-12 Months Pattern
Cast on 60 sts using Accent Color 2 yarn and Straight Needles
Row 1: *K4, CO3 (using a cable cast on onto left hand needle. These will be the next sts you work across), Using last stitch on right needle, BO4* Repeat across (48 total sts – 12 shells created)
{Reference Photos 1-8 for help with Row 1}
Drop and cut Accent Color 2 leave an approx. 12 inch (30.5cm) tail and Pick up Base Color 1
Row 2: *P9, P3tog* Repeat across (40 total sts)
Row 3: *K3tog, K7* Repeat across (32 total sts)
Row 4: *P5, P3tog* Repeat across (24 total sts)
Row 5: *K3tog, K3* Repeat across (16 total sts)
Row 6: *P1, P3tog* Repeat acorss (8 total sts)
{Reference Photo 9 for example of what project should look like at this point}
Do not bind off. Using yarn or tapestry needle, take stitches off of knitting needle as if to purl. Pull tail through all stitches. This should cinch the center of the square shape that you just started. Cut with a yarn tail long enough that you can use it to stitch the two edges of the piece you just made together. They should form a square after being connected.
Cut yarn and secure and weave in all ends.
{Reference Photo 10 for example of what project should look like at this point}
Cast on 20 sts using Accent Color 2 Yarn and Straight Needles
Row 1: *K3, CO3 (using a cable cast on onto left hand needle. These will be the next sts you work across), Using last stitch on right needle, BO4* Repeat across (5 total flower petals, 15 total sts)
Row 2: *P2tog, P1* Repeat across(10 total sts)
Row 3: *K2tog* Repeat across (5 total sts)
Do not bind off. Using yarn or tapestry needle, take sts off of knitting needle as if to purl. Pull tail through all sts to cinch the center of flower. Seam together flower edges. Cut yarn with tail long enough to use for sewing the flower to center of square. Weave in all ends.
Cast on 6 sts using Accent Color 2 Yarn and Straight Needles
Row 1: K1, *CO3 (using a cable cast on onto left hand needle. These will be the next sts you work across), Using last stitch on right needle, BO4* Repeat across (5 total flower petals)
Do not bind off. Using yarn or tapestry needle, take sts off of knitting needle as if to purl. Pull tail through all sts to cinch the center of flower. Seam together flower edges. Cut yarn with tail long enough to use for sewing the flower to center of square directly on top of the larger flower created above. Weave in all ends.
{Reference Photo 11 for example of what project should look like at this point}
During the next section, you’ll be turning your flower square into a trapezoid shape (working on one side at a time). To do this, you’ll be picking up sts along the edge of flower square, and then slowly adding them into each row to connect the two sections.
With front of flower facing you, pick up 15 sts (working from bottom to top) from the side edge of flower square onto your left straight needle.
{Reference Photo 12 for example of what project should look like at this point}
Cast on 3 new sts using Base Color 1 yarn directly above these stitches on left needle (these will be the first 3 sts you work).
{Reference Photos 13&14 for example of what project should look like at this point}
Then complete Row 1.
Row 1: K2, K2tog (Last Base Color 1 stitch and first Accent Color 2 stitch), Turn Work
(3 total Base Color 1 sts)
{Reference Photos 15-17 for example of what project should look like at this point}
Row 2: Place one Accent Color 2 stitch onto left needle, P2tog, P1, M1, P1 (4 total Base Color 1 sts)
Row 3: K3, K2tog (Last Base Color 1 stitch and first Accent Color 2 stitch), Turn Work (4 total Base Color 1 sts)
Row 4: Place one Accent Color 2 stitch onto left needle, P2tog, P2, M1, P1 (5 total Base Color 1 sts)
Row 5: K4, K2tog (Last Base Color 1 stitch and first Accent Color 2 stitch), Turn Work (5 total Base Color 1 sts)
Row 6: Place one Accent Color 2 stitch onto left needle, P2tog, P3, M1, P1 (6 total Base Color 1 sts)
Row 7: K5, K2tog (Last Base Color 1 stitch and first Accent Color 2 stitch), Turn Work (6 total Base Color 1 sts)
Row 8: Place one Accent Color 2 stitch onto left needle, P2tog, P4, M1, P1 (7 total Base Color 1 sts)
Row 9: K6, K2tog (Last Base Color 1 stitch and first Accent Color 2 stitch), Turn Work (7 total Base Color 1 sts)
Row 10: Place one Accent Color 2 stitch onto left needle, P2tog, P5, M1, P1 (8 total Base Color 1 sts)
Row 11: K7, K2tog (Last Base Color 1 stitch and first Accent Color 2 stitch), Turn Work (8 total Base Color 1 sts)
Row 12: Place one Accent Color 2 stitch onto left needle, P2tog, P6, M1, P1 (9 total Base Color 1 sts)
Row 13: K8, K2tog (Last Base Color 1 stitch and first Accent Color 2 stitch), Turn Work (9 total Base Color 1 sts)
Row 14: Place one Accent Color 2 stitch onto left needle, P2tog, P7, M1, P1 (10 total Base Color 1 sts)
Row 15: K9, K2tog (Last Base Color 1 stitch and first Accent Color 2 stitch), Turn Work (10 total Base Color 1 sts)
Cut yarn and place this section on stitch holder.
{Reference Photo 18 for example of what project should look like at this point}
With back of flower facing you, pick up 15 sts (working from bottom to top) from the side edge of flower square onto your left straight needle.
{Reference Photo 19 for example of what project should look like at this point}
Cast on 3 new sts using Base Color 1 yarn directly above these stitches on left needle (these will be the first 3 sts you work).
{Reference Photos 20&21 for example of what project should look like at this point}
Then complete Row 1.
Row 1: P2, P2tog (Last Base Color 1 stitch and first Accent Color 2 stitch), Turn Work (3 total Base Color 1 sts)
{Reference Photos 22&23 for example of what project should look like at this point}
Row 2: Place one Accent Color 2 stitch onto left needle, K2tog, K1, M1, K1 (4 total Base Color 1 sts)
Row 3: P3, P2tog (Last Base Color 1 stitch and first Accent Color 2 stitch), Turn Work (4 total Base Color 1 sts)
Row 4: Place one Accent Color 2 stitch onto left needle, K2tog, K2, M1, K1 (5 total Base Color 1 sts)
Row 5: P4, P2tog (Last Base Color 1 stitch and first Accent Color 2 stitch), Turn Work (5 total Base Color 1 sts)
Row 6: Place one Accent Color 2 stitch onto left needle, K2tog, K3, M1, K1 (6 total Base Color 1 sts)
Row 7: P5, P2tog (Last Base Color 1 stitch and first Accent Color 2 stitch), Turn Work (6 total Base Color 1 sts)
Row 8: Place one Accent Color 2 stitch onto left needle, K2tog, K4, M1, K1 (7 total Base Color 1 sts)
Row 9: P6, P2tog (Last Base Color 1 stitch and first Accent Color 2 stitch), Turn Work (7 total Base Color 1 sts)
Row 10: Place one Accent Color 2 stitch onto left needle, K2tog, K5, M1, K1 (8 total Base Color 1 sts)
Row 11: P7, P2tog (Last Base Color 1 stitch and first Accent Color 2 stitch), Turn Work (8 total Base Color 1 sts)
Row 12: Place one Accent Color 2 stitch onto left needle, K2tog, K6, M1, K1 (9 total Base Color 1 sts)
Row 13: P8, P2tog (Last Base Color 1 stitch and first Accent Color 2 stitch), Turn Work (9 total Base Color 1 sts)
Row 14: Place one Accent Color 2 stitch onto left needle, K2tog, K7, M1, K1 (10 total Base Color 1 sts)
Row 15: P9, P2tog (Last Base Color 1 stitch and first Accent Color 2 stitch), Turn Work (10 total Base Color 1 sts)
{Reference Photo 24 for example of what project should look like at this point}
Your working yarn should now be on the outer edge of your trapezoid. If, for some reason, your yarn isn’t on that edge, Knit one more row so you’ll be completing the next step along the outside edge.
Circular Needle Instructions
*If using circular needles, follow these instructions, if using straight needles, skip ahead to the section labeled Straight Needle Instructions.*
Move stitches to circular needles.
Cast on 29 additional stitches
{Reference Photo 25 for example of what project should look like at this point}
Then move stitches you had previously placed on stitch holder onto circular needle as well (these should be on left needle ready to knit). All knit sides should be facing. Join in the round. Place Stitch Marker.
*Stop at this point to check your size measurements. Your project should measure approx. 16 inches (40.5 cm) in circumference at this point. If your project does not measure correctly, cast on or remove sts as necessary to get it to the right measurement. Make sure the number you cast on is a multiple of 4 + 1.*
{Reference Photo 26 for example of what project should look like at this point}
Round 1: Knit each of next 10 sts, Pick up and knit 15 sts along the bottom edge of flower square, Knit all remaining sts (64 total sts if completed as written)
{Reference Photos 27&28 for example of what project should look like at this point}
Round 2: Knit (64 total sts)
Repeat Round 2 until your project measures approx. 7 inches (17.75cm) from the top edge of flower square.
Round 3: Purl
Round 4: KFB each stitch around (128 total sts if completed as written)
Round 5: Purl (128 total sts)
Round 6: Knit
Repeat Rounds 5&6 until your project measures approx. 14 inches (35.5cm) from the top edge of flower square.
Drop Base Color 1 and pick up Accent Color 2 yarn.
Bind off using the Picot Bind off method.
Resource for Picot Bind Off: https://melodys-makings.com/how-to-knit-picot-bind-off/
Straight Needle Instructions
Cast on 29 additional stitches.
Row 1: Purl each of next 39 sts, Pick up and purl 15 sts along the bottom edge of flower square, Purl 10 remaining sts off of stitch holder (64 total sts)
Row 2: Knit
Row 3: Purl
Repeat Rows 2&3 until your project measures approx. 7 inches (17.75cm) from the top edge of flower square.
*Stop when your project gets long enough to check your size measurements. Your project should measure approx. 16 inches (40.5 cm) in width at this point.*
Row 4: KFB each stitch across (128 total sts if completed as written)
Row 5: Knit (128 total sts)
Repeat Row 5 until your project measures approx. 14 inches (35.5cm) from the top edge of flower square.
Drop Base Color 1 and pick up Accent Color 2 yarn.
Bind off using the Picot Bind off method.
Resource for Picot Bind Off: https://melodys-makings.com/how-to-knit-picot-bind-off/
Cut two strands of yarn approx. 25 inches (63.5cm) long and pull them in a loop through the top corner of your trapezoid section. Pull the ends of the yarn through this loop (this attaches the yarn without any knots, and makes your project look smoother). Separate the yarn into three sections and braid them to desired approx. 10 inches (25.5cm) in length. Secure and cut yarn evenly on the ends. Repeat on the other side of the trapezoid as well. These braids act as your halter top ties.
Repeat flower instructions and seam to a long braid to use as tie-back headband.
1-2 Years Pattern
Cast on 72 sts using Accent Color 2 yarn and Straight Needles
Row 1: *K5, CO3 (using a cable cast on onto left hand needle. These will be the next sts you work across), Using last stitch on right needle, BO4* Repeat across (60 total sts – 12 shells created)
{Reference Photos 1-8 for help with Row 1}
Drop and cut Accent Color 2 leave an approx. 12 inch (30.5cm) tail and Pick up Base Color 1
Row 2: *P12, P3tog* Repeat across (52 total sts)
Row 3: *K3tog, K10* Repeat across (44 total sts)
Row 4: *P8, P3tog* Repeat across (36 total sts)
Row 5: *K3tog, K6* Repeat across (28 total sts)
Row 6: *P4, P3tog* Repeat across (20 total sts)
Row 7: *K3tog, K2* Repeat across (12 total sts)
Row 8: *P3tog* Repeat across (4 total sts)
{Reference Photo 9 for example of what project should look like at this point}
Do not bind off. Using yarn or tapestry needle, take stitches off of knitting needle as if to purl. Pull tail through all stitches. This should cinch the center of the square shape that you just started. Cut with a yarn tail long enough that you can use it to stitch the two edges of the piece you just made together. They should form a square after being connected.
Cut yarn and secure and weave in all ends.
{Reference Photo 10 for example of what project should look like at this point}
Cast on 20 sts using Accent Color 2 Yarn and Straight Needles
Row 1: *K3, CO3 (using a cable cast on onto left hand needle. These will be the next sts you work across), Using last stitch on right needle, BO4* Repeat across (5 total flower petals, 15 total sts)
Row 2: *P2tog, P1* Repeat across (10 total sts)
Row 3: *K2tog* Repeat across (5 total sts)
Do not bind off. Using yarn or tapestry needle, take sts off of knitting needle as if to purl. Pull tail through all sts to cinch the center of flower. Seam together flower edges. Cut yarn with tail long enough to use for sewing the flower to center of square. Weave in all ends.
Cast on 6 sts using Accent Color 2 Yarn and Straight Needles
Row 1: K1, *CO3 (using a cable cast on onto left hand needle. These will be the next sts you work across), Using last stitch on right needle, BO4* Repeat across (5 total flower petals)
Do not bind off. Using yarn or tapestry needle, take sts off of knitting needle as if to purl. Pull tail through all sts to cinch the center of flower. Seam together flower edges. Cut yarn with tail long enough to use for sewing the flower to center of square directly on top of the larger flower created above. Weave in all ends.
{Reference Photo 11 for example of what project should look like at this point}
During the next section, you’ll be turning your flower square into a trapezoid shape (working on one side at a time) to form the front section of the halter top. To do this, you’ll be picking up sts along the edge of flower square, and then slowly adding them into each row to connect the two sections.
With front of flower facing you, pick up 18 sts (working from bottom to top) from the side edge of flower square onto your left straight needle.
{Reference Photo 12 for example of what project should look like at this point}
Cast on 3 new sts using Base Color 1 yarn directly above these stitches on left needle (these will be the first 3 sts you work).
{Reference Photos 13&14 for example of what project should look like at this point}
Then complete Row 1.
Row 1: K2, K2tog (Last Base Color 1 stitch and first Accent Color 2 stitch), Turn Work (3 total Base Color 1 sts)
{Reference Photos 15-17 for example of what project should look like at this point}
Row 2: Place one Accent Color 2 stitch onto left needle, P2tog, P1, M1, P1 (4 total Base Color 1 sts)
Row 3: K3, K2tog (Last Base Color 1 stitch and first Accent Color 2 stitch), Turn Work (4 total Base Color 1 sts)
Row 4: Place one Accent Color 2 stitch onto left needle, P2tog, P2, M1, P1 (5 total Base Color 1 sts)
Row 5: K4, K2tog (Last Base Color 1 stitch and first Accent Color 2 stitch), Turn Work (5 total Base Color 1 sts)
Row 6: Place one Accent Color 2 stitch onto left needle, P2tog, P3, M1, P1 (6 total Base Color 1 sts)
Row 7: K5, K2tog (Last Base Color 1 stitch and first Accent Color 2 stitch), Turn Work (6 total Base Color 1 sts)
Row 8: Place one Accent Color 2 stitch onto left needle, P2tog, P4, M1, P1 (7 total Base Color 1 sts)
Row 9: K6, K2tog (Last Base Color 1 stitch and first Accent Color 2 stitch), Turn Work (7 total Base Color 1 sts)
Row 10: Place one Accent Color 2 stitch onto left needle, P2tog, P5, M1, P1 (8 total Base Color 1 sts)
Row 11: K7, K2tog (Last Base Color 1 stitch and first Accent Color 2 stitch), Turn Work (8 total Base Color 1 sts)
Row 12: Place one Accent Color 2 stitch onto left needle, P2tog, P6, M1, P1 (9 total Base Color 1 sts)
Row 13: K8, K2tog (Last Base Color 1 stitch and first Accent Color 2 stitch), Turn Work (9 total Base Color 1 sts)
Row 14: Place one Accent Color 2 stitch onto left needle, P2tog, P7, M1, P1 (10 total Base Color 1 sts)
Row 15: K9, K2tog (Last Base Color 1 stitch and first Accent Color 2 stitch), Turn Work (10 total Base Color 1 sts)
Row 16: Place one Accent Color 2 stitch onto left needle, P2tog, Purl to end of row (10 total Base Color 1 sts)
Row 17: K9, K2tog (Last Base Color 1 stitch and first Accent Color 2 stitch), Turn Work (10 total Base Color 1 sts)
Row 18: Place one Accent Color 2 stitch onto left needle, P2tog, Purl to end of row (10 total Base Color 1 sts)
Cut yarn and place this section on stitch holder.
{Reference Photo 18 for example of what project should look like at this point}
With back of flower facing you, pick up 18 sts (working from bottom to top) from the side edge of flower square onto your left straight needle.
{Reference Photo 19 for example of what project should look like at this point}
Cast on 3 new sts using Base Color 1 yarn directly above these stitches on left needle (these will be the first 3 sts you work).
{Reference Photos 20&21 for example of what project should look like at this point}
Then complete Row 1.
Row 1: P2, P2tog (Last Base Color 1 stitch and first Accent Color 2 stitch), Turn Work (3 total Base Color 1 sts)
{Reference Photos 22&23 for example of what project should look like at this point}
Row 2: Place one Accent Color 2 stitch onto left needle, K2tog, K1, M1, K1 (4 total Base Color 1 sts)
Row 3: P3, P2tog (Last Base Color 1 stitch and first Accent Color 2 stitch), Turn Work (4 total Base Color 1 sts)
Row 4: Place one Accent Color 2 stitch onto left needle, K2tog, K2, M1, K1 (5 total Base Color 1 sts)
Row 5: P4, P2tog (Last Base Color 1 stitch and first Accent Color 2 stitch), Turn Work (5 total Base Color 1 sts)
Row 6: Place one Accent Color 2 stitch onto left needle, K2tog, K3, M1, K1 (6 total Base Color 1 sts)
Row 7: P5, P2tog (Last Base Color 1 stitch and first Accent Color 2 stitch), Turn Work (6 total Base Color 1 sts)
Row 8: Place one Accent Color 2 stitch onto left needle, K2tog, K4, M1, K1 (7 total Base Color 1 sts)
Row 9: P6, P2tog (Last Base Color 1 stitch and first Accent Color 2 stitch), Turn Work (7 total Base Color 1 sts)
Row 10: Place one Accent Color 2 stitch onto left needle, K2tog, K5, M1, K1 (8 total Base Color 1 sts)
Row 11: P7, P2tog (Last Base Color 1 stitch and first Accent Color 2 stitch), Turn Work (8 total Base Color 1 sts)
Row 12: Place one Accent Color 2 stitch onto left needle, K2tog, K6, M1, K1 (9 total Base Color 1 sts)
Row 13: P8, P2tog (Last Base Color 1 stitch and first Accent Color 2 stitch), Turn Work (9 total Base Color 1 sts)
Row 14: Place one Accent Color 2 stitch onto left needle, K2tog, K7, M1, K1 (10 total Base Color 1 sts)
Row 15: P9, P2tog (Last Base Color 1 stitch and first Accent Color 2 stitch), Turn Work (10 total Base Color 1 sts)
Row 16: Place one Accent Color 2 stitch onto left needle, K2tog, Knit to end of row (10 total Base Color 1 sts)
Row 17: P9, P2tog (Last Base Color 1 stitch and first Accent Color 2 stitch), Turn Work (10 total Base Color 1 sts)
Row 18: Place one Accent Color 2 stitch onto left needle, K2tog, Knit to end of row (10 total Base Color 1 sts)
{Reference Photo 24 for example of what project should look like at this point}
Your working yarn should now be on the outer edge of your trapezoid. If, for some reason, your yarn isn’t on that edge, Knit one more row so you’ll be completing the next step along the outside edge.
Circular Needle Instructions
*If using circular needles, follow these instructions, if using straight needles, skip ahead to the section labeled Straight Needle Instructions.*
Move stitches to circular needles.
Cast on 30 additional stitches
{Reference Photo 25 for example of what project should look like at this point}
Then move stitches you had previously placed on stitch holder onto circular needle as well (these should be on left needle ready to knit). All knit sides should be facing. Join in the round. Place Stitch Marker.
*Stop at this point to check your size measurements. Your project should measure approx. 17 inches (43.25 cm) in circumference at this point. If your project does not measure correctly, cast on or remove sts as necessary to get it to the right measurement. Make sure the number you cast on is a multiple of 4 + 2.*
{Reference Photo 26 for example of what project should look like at this point}
Round 1: Knit each of next 10 sts, Pick up and knit 18 sts along the bottom edge of flower square, Knit all remaining sts (68 total sts if completed as written)
{Reference Photos 27&28 for example of what project should look like at this point}
Round 2: Knit (68 total sts)
Repeat Round 2 until your project measures approx. 8 inches (20.25cm) from the top edge of flower square.
Round 3: Purl
Round 4: KFB each stitch around (136 total sts if completed as written)
Round 5: Purl (136 total sts)
Round 6: Knit
Repeat Rounds 5&6 until your project measures approx. 16 inches (40.5cm) from the top edge of flower square.
Drop Base Color 1 and pick up Accent Color 2 yarn.
Bind off using the Picot Bind off method.
Resource for Picot Bind Off: https://melodys-makings.com/how-to-knit-picot-bind-off/
Straight Needle Instructions
Cast on 30 additional stitches.
Row 1: Purl each of next 40 sts, Pick up and purl 18 sts along the bottom edge of flower square, Purl 10 remaining sts off of stitch holder (68 total sts)
Row 2: Knit
Row 3: Purl
Repeat Rows 2&3 until your project measures approx. 8 inches (20.25cm) from the top edge of flower square.
*Stop when your project gets long enough to check your size measurements. Your project should measure approx. 17 inches (43.25 cm) in width at this point.*
Row 4: KFB each stitch across (136 total sts if completed as written)
Row 5: Knit (136 total sts)
Repeat Row 5 until your project measures approx. 16 inches (40.5cm) from the top edge of flower square.
Drop Base Color 1 and pick up Accent Color 2 yarn.
Bind off using the Picot Bind off method.
Resource for Picot Bind Off: https://melodys-makings.com/how-to-knit-picot-bind-off/
Cut two strands of yarn approx. 30 inches (76.25cm) long and pull them in a loop through the top corner of your trapezoid section. Pull the ends of the yarn through this loop (this attaches the yarn without any knots, and makes your project look smoother). Separate the yarn into three sections and braid them to desired approx. 12 inches (30.5cm) in length. Secure and cut yarn evenly on the ends. Repeat on the other side of the trapezoid as well. These braids act as your halter top ties.
Repeat flower instructions and seam to a long braid to use as tie-back headband.
3 Years Pattern
Cast on 72 sts using Accent Color 2 yarn and Straight Needles
Row 1: *K5, CO3 (using a cable cast on onto left hand needle. These will be the next sts you work across), Using last stitch on right needle, BO4* Repeat across (60 total sts – 12 shells created)
{Reference Photos 1-8 for help with Row 1}
Drop and cut Accent Color 2 leave an approx. 12 inch (30.5cm) tail and Pick up Base Color 1
Row 2: *P12, P3tog* Repeat across (52 total sts)
Row 3: *K3tog, K10* Repeat across (44 total sts)
Row 4: *P8, P3tog* Repeat across (36 total sts)
Row 5: *K3tog, K6* Repeat across (28 total sts)
Row 6: *P4, P3tog* Repeat across (20 total sts)
Row 7: *K3tog, K2* Repeat across (12 total sts)
Row 8: *P3tog* Repeat across (4 total sts)
{Reference Photo 9 for example of what project should look like at this point}
Do not bind off. Using yarn or tapestry needle, take stitches off of knitting needle as if to purl. Pull tail through all stitches. This should cinch the center of the square shape that you just started. Cut with a yarn tail long enough that you can use it to stitch the two edges of the piece you just made together. They should form a square after being connected.
Cut yarn and secure and weave in all ends.
{Reference Photo 10 for example of what project should look like at this point}
Cast on 20 sts using Accent Color 2 Yarn and Straight Needles
Row 1: *K3, CO3 (using a cable cast on onto left hand needle. These will be the next sts you work across), Using last stitch on right needle, BO4* Repeat across (5 total flower petals, 15 total sts)
Row 2: *P2tog, P1* Repeat across (10 total sts)
Row 3: *K2tog* Repeat across (5 total sts)
Do not bind off. Using yarn or tapestry needle, take sts off of knitting needle as if to purl. Pull tail through all sts to cinch the center of flower. Seam together flower edges. Cut yarn with tail long enough to use for sewing the flower to center of square. Weave in all ends.
Cast on 6 sts using Accent Color 2 Yarn and Straight Needles
Row 1: K1, *CO3 (using a cable cast on onto left hand needle. These will be the next sts you work across), Using last stitch on right needle, BO4* Repeat across (5 total flower petals)
Do not bind off. Using yarn or tapestry needle, take sts off of knitting needle as if to purl. Pull tail through all sts to cinch the center of flower. Seam together flower edges. Cut yarn with tail long enough to use for sewing the flower to center of square directly on top of the larger flower created above. Weave in all ends.
{Reference Photo 11 for example of what project should look like at this point}
During the next section, you’ll be turning your flower square into a trapezoid shape (working on one side at a time) to form the front section of the halter top. To do this, you’ll be picking up sts along the edge of flower square, and then slowly adding them into each row to connect the two sections.
With front of flower facing you, pick up 18 sts (working from bottom to top) from the side edge of flower square onto your left straight needle.
{Reference Photo 12 for example of what project should look like at this point}
Cast on 3 new sts using Base Color 1 yarn directly above these stitches on left needle (these will be the first 3 sts you work).
{Reference Photos 13&14 for example of what project should look like at this point}
Then complete Row 1.
Row 1: K2, K2tog (Last Base Color 1 stitch and first Accent Color 2 stitch), Turn Work (3 total Base Color 1 sts)
{Reference Photos 15-17 for example of what project should look like at this point}
Row 2: Place one Accent Color 2 stitch onto left needle, P2tog, P1, M1, P1 (4 total Base Color 1 sts)
Row 3: K3, K2tog (Last Base Color 1 stitch and first Accent Color 2 stitch), Turn Work (4 total Base Color 1 sts)
Row 4: Place one Accent Color 2 stitch onto left needle, P2tog, P2, M1, P1 (5 total Base Color 1 sts)
Row 5: K4, K2tog (Last Base Color 1 stitch and first Accent Color 2 stitch), Turn Work (5 total Base Color 1 sts)
Row 6: Place one Accent Color 2 stitch onto left needle, P2tog, P3, M1, P1 (6 total Base Color 1 sts)
Row 7: K5, K2tog (Last Base Color 1 stitch and first Accent Color 2 stitch), Turn Work (6 total Base Color 1 sts)
Row 8: Place one Accent Color 2 stitch onto left needle, P2tog, P4, M1, P1 (7 total Base Color 1 sts)
Row 9: K6, K2tog (Last Base Color 1 stitch and first Accent Color 2 stitch), Turn Work (7 total Base Color 1 sts)
Row 10: Place one Accent Color 2 stitch onto left needle, P2tog, P5, M1, P1 (8 total Base Color 1 sts)
Row 11: K7, K2tog (Last Base Color 1 stitch and first Accent Color 2 stitch), Turn Work (8 total Base Color 1 sts)
Row 12: Place one Accent Color 2 stitch onto left needle, P2tog, P6, M1, P1 (9 total Base Color 1 sts)
Row 13: K8, K2tog (Last Base Color 1 stitch and first Accent Color 2 stitch), Turn Work (9 total Base Color 1 sts)
Row 14: Place one Accent Color 2 stitch onto left needle, P2tog, P7, M1, P1 (10 total Base Color 1 sts)
Row 15: K9, K2tog (Last Base Color 1 stitch and first Accent Color 2 stitch), Turn Work (10 total Base Color 1 sts)
Row 16: Place one Accent Color 2 stitch onto left needle, P2tog, Purl to end of row (10 total Base Color 1 sts)
Row 17: K9, K2tog (Last Base Color 1 stitch and first Accent Color 2 stitch), Turn Work (10 total Base Color 1 sts)
Row 18: Place one Accent Color 2 stitch onto left needle, P2tog, Purl to end of row (10 total Base Color 1 sts)
Cut yarn and place this section on stitch holder.
{Reference Photo 18 for example of what project should look like at this point}
With back of flower facing you, pick up 18 sts (working from bottom to top) from the side edge of flower square onto your left straight needle.
{Reference Photo 19 for example of what project should look like at this point}
Cast on 3 new sts using Base Color 1 yarn directly above these stitches on left needle (these will be the first 3 sts you work).
{Reference Photos 20&21 for example of what project should look like at this point}
Then complete Row 1.
Row 1: P2, P2tog (Last Base Color 1 stitch and first Accent Color 2 stitch), Turn Work (3 total Base Color 1 sts)
{Reference Photos 22&23 for example of what project should look like at this point}
Row 2: Place one Accent Color 2 stitch onto left needle, K2tog, K1, M1, K1 (4 total Base Color 1 sts)
Row 3: P3, P2tog (Last Base Color 1 stitch and first Accent Color 2 stitch), Turn Work (4 total Base Color 1 sts)
Row 4: Place one Accent Color 2 stitch onto left needle, K2tog, K2, M1, K1 (5 total Base Color 1 sts)
Row 5: P4, P2tog (Last Base Color 1 stitch and first Accent Color 2 stitch), Turn Work (5 total Base Color 1 sts)
Row 6: Place one Accent Color 2 stitch onto left needle, K2tog, K3, M1, K1 (6 total Base Color 1 sts)
Row 7: P5, P2tog (Last Base Color 1 stitch and first Accent Color 2 stitch), Turn Work (6 total Base Color 1 sts)
Row 8: Place one Accent Color 2 stitch onto left needle, K2tog, K4, M1, K1 (7 total Base Color 1 sts)
Row 9: P6, P2tog (Last Base Color 1 stitch and first Accent Color 2 stitch), Turn Work (7 total Base Color 1 sts)
Row 10: Place one Accent Color 2 stitch onto left needle, K2tog, K5, M1, K1 (8 total Base Color 1 sts
Row 11: P7, P2tog (Last Base Color 1 stitch and first Accent Color 2 stitch), Turn Work (8 total Base Color 1 sts)
Row 12: Place one Accent Color 2 stitch onto left needle, K2tog, K6, M1, K1 (9 total Base Color 1 sts)
Row 13: P8, P2tog (Last Base Color 1 stitch and first Accent Color 2 stitch), Turn Work (9 total Base Color 1 sts)
Row 14: Place one Accent Color 2 stitch onto left needle, K2tog, K7, M1, K1 (10 total Base Color 1 sts)
Row 15: P9, P2tog (Last Base Color 1 stitch and first Accent Color 2 stitch), Turn Work (10 total Base Color 1 sts)
Row 16: Place one Accent Color 2 stitch onto left needle, K2tog, Knit to end of row (10 total Base Color 1 sts)
Row 17: P9, P2tog (Last Base Color 1 stitch and first Accent Color 2 stitch), Turn Work (10 total Base Color 1 sts)
Row 18: Place one Accent Color 2 stitch onto left needle, K2tog, Knit to end of row (10 total Base Color 1 sts)
{Reference Photo 24 for example of what project should look like at this point}
Your working yarn should now be on the outer edge of your trapezoid. If, for some reason, your yarn isn’t on that edge, Knit one more row so you’ll be completing the next step along the outside edge.
Circular Needle Instructions
*If using circular needles, follow these instructions, if using straight needles, skip ahead to the section labeled Straight Needle Instructions.*
Move stitches to circular needles.
Cast on 34 additional stitches
{Reference Photo 25 for example of what project should look like at this point}
Then move stitches you had previously placed on stitch holder onto circular needle as well (these should be on left needle ready to knit). All knit sides should be facing. Join in the round. Place Stitch Marker.
*Stop at this point to check your size measurements. Your project should measure approx. 18 inches (45.75 cm) in circumference at this point. If your project does not measure correctly, cast on or remove sts as necessary to get it to the right measurement. Make sure the number you cast on is a multiple of 4 + 2.*
{Reference Photo 26 for example of what project should look like at this point}
Round 1: Knit each of next 10 sts, Pick up and knit 18 sts along the bottom edge of flower square, Knit all remaining sts (72 total sts if completed as written)
{Reference Photos 27&28 for example of what project should look like at this point}
Round 2: Knit (72 total sts)
Repeat Round 2 until your project measures approx. 9 inches (22.75cm) from the top edge of flower square.
Round 3: Purl
Round 4: KFB each stitch around (144 total sts if completed as written)
Round 5: Purl (144 total sts)
Round 6: Knit
Repeat Rounds 5&6 until your project measures approx. 18 inches (45.75cm) from the top edge of flower square.
Drop Base Color 1 and pick up Accent Color 2 yarn.
Bind off using the Picot Bind off method.
Resource for Picot Bind Off: https://melodys-makings.com/how-to-knit-picot-bind-off/
Straight Needle Instructions
Cast on 34 additional stitches.
Row 1: Purl each of next 44 sts, Pick up and purl 18 sts along the bottom edge of flower square, Purl 10 remaining sts off of stitch holder (72 total sts)
Row 2: Knit
Row 3: Purl
Repeat Rows 2&3 until your project measures approx. 9 inches (22.75cm) from the top edge of flower square.
*Stop when your project gets long enough to check your size measurements. Your project should measure approx. 18 inches (45.75 cm) in width at this point.*
Row 4: KFB each stitch across (144 total sts if completed as written)
Row 5: Knit (144 total sts)
Repeat Row 5 until your project measures approx. 18 inches (45.75cm) from the top edge of flower square.
Drop Base Color 1 and pick up Accent Color 2 yarn.
Bind off using the Picot Bind off method.
Resource for Picot Bind Off: https://melodys-makings.com/how-to-knit-picot-bind-off/
Cut two strands of yarn approx. 30 inches (76.25cm) long and pull them in a loop through the top corner of your trapezoid section. Pull the ends of the yarn through this loop (this attaches the yarn without any knots, and makes your project look smoother). Separate the yarn into three sections and braid them to desired approx. 12 inches (30.5cm) in length. Secure and cut yarn evenly on the ends. Repeat on the other side of the trapezoid as well. These braids act as your halter top ties.
Repeat flower instructions and seam to a long braid to use as tie-back headband.
4 Years Pattern
Cast on 72 sts using Accent Color 2 yarn and Straight Needles
Row 1: *K5, CO3 (using a cable cast on onto left hand needle. These will be the next sts you work across), Using last stitch on right needle, BO4* Repeat across (60 total sts – 12 shells created)
{Reference Photos 1-8 for help with Row 1}
Drop and cut Accent Color 2 leave an approx. 12 inch (30.5cm) tail and Pick up Base Color 1
Row 2: *P12, P3tog* Repeat across (52 total sts)
Row 3: *K3tog, K10* Repeat across (44 total sts)
Row 4: *P8, P3tog* Repeat across (36 total sts)
Row 5: *K3tog, K6* Repeat across (28 total sts)
Row 6: *P4, P3tog* Repeat across (20 total sts)
Row 7: *K3tog, K2* Repeat across (12 total sts)
Row 8: *P3tog* Repeat across (4 total sts)
{Reference Photo 9 for example of what project should look like at this point}
Do not bind off. Using yarn or tapestry needle, take stitches off of knitting needle as if to purl. Pull tail through all stitches. This should cinch the center of the square shape that you just started. Cut with a yarn tail long enough that you can use it to stitch the two edges of the piece you just made together. They should form a square after being connected.
Cut yarn and secure and weave in all ends.
{Reference Photo 10 for example of what project should look like at this point}
Cast on 20 sts using Accent Color 2 Yarn and Straight Needles
Row 1: *K3, CO3 (using a cable cast on onto left hand needle. These will be the next sts you work across), Using last stitch on right needle, BO4* Repeat across (5 total flower petals, 15 total sts)
Row 2: *P2tog, P1* Repeat across (10 total sts)
Row 3: *K2tog* Repeat across (5 total sts)
Do not bind off. Using yarn or tapestry needle, take sts off of knitting needle as if to purl. Pull tail through all sts to cinch the center of flower. Seam together flower edges. Cut yarn with tail long enough to use for sewing the flower to center of square. Weave in all ends.
Cast on 6 sts using Accent Color 2 Yarn and Straight Needles
Row 1: K1, *CO3 (using a cable cast on onto left hand needle. These will be the next sts you work across), Using last stitch on right needle, BO4* Repeat across (5 total flower petals)
Do not bind off. Using yarn or tapestry needle, take sts off of knitting needle as if to purl. Pull tail through all sts to cinch the center of flower. Seam together flower edges. Cut yarn with tail long enough to use for sewing the flower to center of square directly on top of the larger flower created above. Weave in all ends.
{Reference Photo 11 for example of what project should look like at this point}
During the next section, you’ll be turning your flower square into a trapezoid shape (working on one side at a time) to form the front section of the halter top. To do this, you’ll be picking up sts along the edge of flower square, and then slowly adding them into each row to connect the two sections.
With front of flower facing you, pick up 18 sts (working from bottom to top) from the side edge of flower square onto your left straight needle.
{Reference Photo 12 for example of what project should look like at this point}
Cast on 3 new sts using Base Color 1 yarn directly above these stitches on left needle (these will be the first 3 sts you work).
{Reference Photos 13&14 for example of what project should look like at this point}
Then complete Row 1.
Row 1: K2, K2tog (Last Base Color 1 stitch and first Accent Color 2 stitch), Turn Work (3 total Base Color 1 sts)
{Reference Photos 15-17 for example of what project should look like at this point}
Row 2: Place one Accent Color 2 stitch onto left needle, P2tog, P1, M1, P1 (4 total Base Color 1 sts)
Row 3: K3, K2tog (Last Base Color 1 stitch and first Accent Color 2 stitch), Turn Work (4 total Base Color 1 sts)
Row 4: Place one Accent Color 2 stitch onto left needle, P2tog, P2, M1, P1 (5 total Base Color 1 sts)
Row 5: K4, K2tog (Last Base Color 1 stitch and first Accent Color 2 stitch), Turn Work (5 total Base Color 1 sts)
Row 6: Place one Accent Color 2 stitch onto left needle, P2tog, P3, M1, P1 (6 total Base Color 1 sts)
Row 7: K5, K2tog (Last Base Color 1 stitch and first Accent Color 2 stitch), Turn Work (6 total Base Color 1 sts)
Row 8: Place one Accent Color 2 stitch onto left needle, P2tog, P4, M1, P1 (7 total Base Color 1 sts)
Row 9: K6, K2tog (Last Base Color 1 stitch and first Accent Color 2 stitch), Turn Work (7 total Base Color 1 sts)
Row 10: Place one Accent Color 2 stitch onto left needle, P2tog, P5, M1, P1 (8 total Base Color 1 sts)
Row 11: K7, K2tog (Last Base Color 1 stitch and first Accent Color 2 stitch), Turn Work (8 total Base Color 1 sts)
Row 12: Place one Accent Color 2 stitch onto left needle, P2tog, P6, M1, P1 (9 total Base Color 1 sts)
Row 13: K8, K2tog (Last Base Color 1 stitch and first Accent Color 2 stitch), Turn Work (9 total Base Color 1 sts)
Row 14: Place one Accent Color 2 stitch onto left needle, P2tog, P7, M1, P1 (10 total Base Color 1 sts)
Row 15: K9, K2tog (Last Base Color 1 stitch and first Accent Color 2 stitch), Turn Work (10 total Base Color 1 sts)
Row 16: Place one Accent Color 2 stitch onto left needle, P2tog, Purl to end of row (10 total Base Color 1 sts)
Row 17: K9, K2tog (Last Base Color 1 stitch and first Accent Color 2 stitch), Turn Work (10 total Base Color 1 sts)
Row 18: Place one Accent Color 2 stitch onto left needle, P2tog, Purl to end of row (10 total Base Color 1 sts)
Cut yarn and place this section on stitch holder.
{Reference Photo 18 for example of what project should look like at this point}
With back of flower facing you, pick up 18 sts (working from bottom to top) from the side edge of flower square onto your left straight needle.
{Reference Photo 19 for example of what project should look like at this point}
Cast on 3 new sts using Base Color 1 yarn directly above these stitches on left needle (these will be the first 3 sts you work).
{Reference Photos 20&21 for example of what project should look like at this point}
Then complete Row 1.
Row 1: P2, P2tog (Last Base Color 1 stitch and first Accent Color 2 stitch), Turn Work (3 total Base Color 1 sts)
{Reference Photos 22&23 for example of what project should look like at this point}
Row 2: Place one Accent Color 2 stitch onto left needle, K2tog, K1, M1, K1 (4 total Base Color 1 sts)
Row 3: P3, P2tog (Last Base Color 1 stitch and first Accent Color 2 stitch), Turn Work (4 total Base Color 1 sts)
Row 4: Place one Accent Color 2 stitch onto left needle, K2tog, K2, M1, K1 (5 total Base Color 1 sts)
Row 5: P4, P2tog (Last Base Color 1 stitch and first Accent Color 2 stitch), Turn Work (5 total Base Color 1 sts)
Row 6: Place one Accent Color 2 stitch onto left needle, K2tog, K3, M1, K1 (6 total Base Color 1 sts)
Row 7: P5, P2tog (Last Base Color 1 stitch and first Accent Color 2 stitch), Turn Work (6 total Base Color 1 sts)
Row 8: Place one Accent Color 2 stitch onto left needle, K2tog, K4, M1, K1 (7 total Base Color 1 sts)
Row 9: P6, P2tog (Last Base Color 1 stitch and first Accent Color 2 stitch), Turn Work (7 total Base Color 1 sts)
Row 10: Place one Accent Color 2 stitch onto left needle, K2tog, K5, M1, K1 (8 total Base Color 1 sts)
Row 11: P7, P2tog (Last Base Color 1 stitch and first Accent Color 2 stitch), Turn Work (8 total Base Color 1 sts)
Row 12: Place one Accent Color 2 stitch onto left needle, K2tog, K6, M1, K1 (9 total Base Color 1 sts)
Row 13: P8, P2tog (Last Base Color 1 stitch and first Accent Color 2 stitch), Turn Work (9 total Base Color 1 sts)
Row 14: Place one Accent Color 2 stitch onto left needle, K2tog, K7, M1, K1 (10 total Base Color 1 sts)
Row 15: P9, P2tog (Last Base Color 1 stitch and first Accent Color 2 stitch), Turn Work (10 total Base Color 1 sts)
Row 16: Place one Accent Color 2 stitch onto left needle, K2tog, Knit to end of row (10 total Base Color 1 sts)
Row 17: P9, P2tog (Last Base Color 1 stitch and first Accent Color 2 stitch), Turn Work (10 total Base Color 1 sts)
Row 18: Place one Accent Color 2 stitch onto left needle, K2tog, Knit to end of row (10 total Base Color 1 sts)
{Reference Photo 24 for example of what project should look like at this point}
Your working yarn should now be on the outer edge of your trapezoid. If, for some reason, your yarn isn’t on that edge, Knit one more row so you’ll be completing the next step along the outside edge.
Circular Needle Instructions
*If using circular needles, follow these instructions, if using straight needles, skip ahead to the section labeled Straight Needle Instructions.*
Move stitches to circular needles.
Cast on 38 additional stitches
{Reference Photo 25 for example of what project should look like at this point}
Then move stitches you had previously placed on stitch holder onto circular needle as well (these should be on left needle ready to knit). All knit sides should be facing. Join in the round. Place Stitch Marker.
*Stop at this point to check your size measurements. Your project should measure approx. 19 inches (48.25 cm) in circumference at this point. If your project does not measure correctly, cast on or remove sts as necessary to get it to the right measurement. Make sure the number you cast on is a multiple of 4 + 2.*
{Reference Photo 26 for example of what project should look like at this point}
Round 1: Knit each of next 10 sts, Pick up and knit 18 sts along the bottom edge of flower square, Knit all remaining sts (76 total sts if completed as written)
{Reference Photos 27&28 for example of what project should look like at this point}
Round 2: Knit (76 total sts)
Repeat Round 2 until your project measures approx. 10 inches (25.5cm) from the top edge of flower square.
Round 3: Purl
Round 4: KFB each stitch around (152 total sts if completed as written)
Round 5: Purl (152 total sts)
Round 6: Knit
Repeat Rounds 5&6 until your project measures approx. 20 inches (50.75cm) from the top edge of flower square.
Drop Base Color 1 and pick up Accent Color 2 yarn.
Bind off using the Picot Bind off method.
Resource for Picot Bind Off: https://melodys-makings.com/how-to-knit-picot-bind-off/
Straight Needle Instructions
Cast on 38 additional stitches.
Row 1: Purl each of next 48 sts, Pick up and purl 18 sts along the bottom edge of flower square, Purl 10 remaining sts off of stitch holder (76 total sts)
Row 2: Knit
Row 3: Purl
Repeat Rows 2&3 until your project measures approx. 10 inches (25.5cm) from the top edge of flower square.
*Stop when your project gets long enough to check your size measurements. Your project should measure approx. 19 inches (48.25 cm) in width at this point.*
Row 4: KFB each stitch across (152 total sts if completed as written)
Row 5: Knit (152 total sts)
Repeat Row 5 until your project measures approx. 20 inches (50.75cm) from the top edge of flower square.
Drop Base Color 1 and pick up Accent Color 2 yarn.
Bind off using the Picot Bind off method.
Resource for Picot Bind Off: https://melodys-makings.com/how-to-knit-picot-bind-off/
Cut two strands of yarn approx. 30 inches (76.25cm) long and pull them in a loop through the top corner of your trapezoid section. Pull the ends of the yarn through this loop (this attaches the yarn without any knots, and makes your project look smoother). Separate the yarn into three sections and braid them to desired approx. 12 inches (30.5cm) in length. Secure and cut yarn evenly on the ends. Repeat on the other side of the trapezoid as well. These braids act as your halter top ties.
Repeat flower instructions and seam to a long braid to use as tie-back headband.
5 Years Pattern
Cast on 72 sts using Accent Color 2 yarn and Straight Needles
Row 1: *K5, CO3 (using a cable cast on onto left hand needle. These will be the next sts you work across), Using last stitch on right needle, BO4* Repeat across (60 total sts – 12 shells created)
{Reference Photos 1-8 for help with Row 1}
Drop and cut Accent Color 2 leave an approx. 12 inch (30.5cm) tail and Pick up Base Color 1
Row 2: *P12, P3tog* Repeat across (52 total sts)
Row 3: *K3tog, K10* Repeat across (44 total sts)
Row 4: *P8, P3tog* Repeat across (36 total sts)
Row 5: *K3tog, K6* Repeat across (28 total sts)
Row 6: *P4, P3tog* Repeat across (20 total sts)
Row 7: *K3tog, K2* Repeat across (12 total sts)
Row 8: *P3tog* Repeat across (4 total sts)
{Reference Photo 9 for example of what project should look like at this point}
Do not bind off. Using yarn or tapestry needle, take stitches off of knitting needle as if to purl. Pull tail through all stitches. This should cinch the center of the square shape that you just started. Cut with a yarn tail long enough that you can use it to stitch the two edges of the piece you just made together. They should form a square after being connected.
Cut yarn and secure and weave in all ends.
{Reference Photo 10 for example of what project should look like at this point}
Cast on 20 sts using Accent Color 2 Yarn and Straight Needles
Row 1: *K3, CO3 (using a cable cast on onto left hand needle. These will be the next sts you work across), Using last stitch on right needle, BO4* Repeat across (5 total flower petals, 15 total sts)
Row 2: *P2tog, P1* Repeat across (10 total sts)
Row 3: *K2tog* Repeat across (5 total sts)
Do not bind off. Using yarn or tapestry needle, take sts off of knitting needle as if to purl. Pull tail through all sts to cinch the center of flower. Seam together flower edges. Cut yarn with tail long enough to use for sewing the flower to center of square. Weave in all ends.
Cast on 6 sts using Accent Color 2 Yarn and Straight Needles
Row 1: K1, *CO3 (using a cable cast on onto left hand needle. These will be the next sts you work across), Using last stitch on right needle, BO4* Repeat across (5 total flower petals)
Do not bind off. Using yarn or tapestry needle, take sts off of knitting needle as if to purl. Pull tail through all sts to cinch the center of flower. Seam together flower edges. Cut yarn with tail long enough to use for sewing the flower to center of square directly on top of the larger flower created above. Weave in all ends.
{Reference Photo 11 for example of what project should look like at this point}
During the next section, you’ll be turning your flower square into a trapezoid shape (working on one side at a time) to form the front section of the halter top. To do this, you’ll be picking up sts along the edge of flower square, and then slowly adding them into each row to connect the two sections.
With front of flower facing you, pick up 18 sts (working from bottom to top) from the side edge of flower square onto your left straight needle.
{Reference Photo 12 for example of what project should look like at this point}
Cast on 3 new sts using Base Color 1 yarn directly above these stitches on left needle (these will be the first 3 sts you work).
{Reference Photos 13&14 for example of what project should look like at this point}
Then complete Row 1.
Row 1: K2, K2tog (Last Base Color 1 stitch and first Accent Color 2 stitch), Turn Work (3 total Base Color 1 sts)
{Reference Photos 15-17 for example of what project should look like at this point}
Row 2: Place one Accent Color 2 stitch onto left needle, P2tog, P1, M1, P1 (4 total Base Color 1 sts)
Row 3: K3, K2tog (Last Base Color 1 stitch and first Accent Color 2 stitch), Turn Work (4 total Base Color 1 sts)
Row 4: Place one Accent Color 2 stitch onto left needle, P2tog, P2, M1, P1 (5 total Base Color 1 sts)
Row 5: K4, K2tog (Last Base Color 1 stitch and first Accent Color 2 stitch), Turn Work (5 total Base Color 1 sts)
Row 6: Place one Accent Color 2 stitch onto left needle, P2tog, P3, M1, P1 (6 total Base Color 1 sts)
Row 7: K5, K2tog (Last Base Color 1 stitch and first Accent Color 2 stitch), Turn Work (6 total Base Color 1 sts)
Row 8: Place one Accent Color 2 stitch onto left needle, P2tog, P4, M1, P1 (7 total Base Color 1 sts)
Row 9: K6, K2tog (Last Base Color 1 stitch and first Accent Color 2 stitch), Turn Work (7 total Base Color 1 sts)
Row 10: Place one Accent Color 2 stitch onto left needle, P2tog, P5, M1, P1 (8 total Base Color 1 sts)
Row 11: K7, K2tog (Last Base Color 1 stitch and first Accent Color 2 stitch), Turn Work (8 total Base Color 1 sts)
Row 12: Place one Accent Color 2 stitch onto left needle, P2tog, P6, M1, P1 (9 total Base Color 1 sts)
Row 13: K8, K2tog (Last Base Color 1 stitch and first Accent Color 2 stitch), Turn Work (9 total Base Color 1 sts)
Row 14: Place one Accent Color 2 stitch onto left needle, P2tog, P7, M1, P1 (10 total Base Color 1 sts)
Row 15: K9, K2tog (Last Base Color 1 stitch and first Accent Color 2 stitch), Turn Work (10 total Base Color 1 sts)
Row 16: Place one Accent Color 2 stitch onto left needle, P2tog, Purl to end of row (10 total Base Color 1 sts)
Row 17: K9, K2tog (Last Base Color 1 stitch and first Accent Color 2 stitch), Turn Work (10 total Base Color 1 sts)
Row 18: Place one Accent Color 2 stitch onto left needle, P2tog, Purl to end of row (10 total Base Color 1 sts)
Cut yarn and place this section on stitch holder.
{Reference Photo 18 for example of what project should look like at this point}
With back of flower facing you, pick up 18 sts (working from bottom to top) from the side edge of flower square onto your left straight needle.
{Reference Photo 19 for example of what project should look like at this point}
Cast on 3 new sts using Base Color 1 yarn directly above these stitches on left needle (these will be the first 3 sts you work).
{Reference Photos 20&21 for example of what project should look like at this point}
Then complete Row 1.
Row 1: P2, P2tog (Last Base Color 1 stitch and first Accent Color 2 stitch), Turn Work (3 total Base Color 1 sts)
{Reference Photos 22&23 for example of what project should look like at this point}
Row 2: Place one Accent Color 2 stitch onto left needle, K2tog, K1, M1, K1 (4 total Base Color 1 sts)
Row 3: P3, P2tog (Last Base Color 1 stitch and first Accent Color 2 stitch), Turn Work (4 total Base Color 1 sts)
Row 4: Place one Accent Color 2 stitch onto left needle, K2tog, K2, M1, K1 (5 total Base Color 1 sts)
Row 5: P4, P2tog (Last Base Color 1 stitch and first Accent Color 2 stitch), Turn Work (5 total Base Color 1 sts)
Row 6: Place one Accent Color 2 stitch onto left needle, K2tog, K3, M1, K1 (6 total Base Color 1 sts)
Row 7: P5, P2tog (Last Base Color 1 stitch and first Accent Color 2 stitch), Turn Work (6 total Base Color 1 sts)
Row 8: Place one Accent Color 2 stitch onto left needle, K2tog, K4, M1, K1 (7 total Base Color 1 sts)
Row 9: P6, P2tog (Last Base Color 1 stitch and first Accent Color 2 stitch), Turn Work (7 total Base Color 1 sts)
Row 10: Place one Accent Color 2 stitch onto left needle, K2tog, K5, M1, K1 (8 total Base Color 1 sts)
Row 11: P7, P2tog (Last Base Color 1 stitch and first Accent Color 2 stitch), Turn Work (8 total Base Color 1 sts)
Row 12: Place one Accent Color 2 stitch onto left needle, K2tog, K6, M1, K1 (9 total Base Color 1 sts)
Row 13: P8, P2tog (Last Base Color 1 stitch and first Accent Color 2 stitch), Turn Work (9 total Base Color 1 sts)
Row 14: Place one Accent Color 2 stitch onto left needle, K2tog, K7, M1, K1 (10 total Base Color 1 sts)
Row 15: P9, P2tog (last Base Color 1 stitch and first Accent Color 2 stitch), Turn Work (10 total Base Color 1 sts)
Row 16: Place one Accent Color 2 stitch onto left needle, K2tog, Knit to end of row (10 total Base Color 1 sts)
Row 17: P9, P2tog (Last Base Color 1 stitch and first Accent Color 2 stitch), Turn Work (10 total Base Color 1 sts)
Row 18: Place one Accent Color 2 stitch onto left needle, K2tog, Knit to end of row (10 total Base Color 1 sts)
{Reference Photo 24 for example of what project should look like at this point}
Your working yarn should now be on the outer edge of your trapezoid. If, for some reason, your yarn isn’t on that edge, Knit one more row so you’ll be completing the next step along the outside edge.
Circular Needle Instructions
*If using circular needles, follow these instructions, if using straight needles, skip ahead to the section labeled Straight Needle Instructions.*
Move stitches to circular needles.
Cast on 38 additional stitches
{Reference Photo 25 for example of what project should look like at this point}
Then move stitches you had previously placed on stitch holder onto circular needle as well (these should be on left needle ready to knit). All knit sides should be facing. Join in the round. Place Stitch Marker.
*Stop at this point to check your size measurements. Your project should measure approx. 19 inches (48.25 cm) in circumference at this point. If your project does not measure correctly, cast on or remove sts as necessary to get it to the right measurement. Make sure the number you cast on is a multiple of 4 + 2.*
{Reference Photo 26 for example of what project should look like at this point}
Round 1: Knit each of next 10 sts, Pick up and knit 18 sts along the bottom edge of flower square, Knit all remaining sts (76 total sts if completed as written)
{Reference Photos 27&28 for example of what project should look like at this point}
Round 2: Knit (76 total sts)
Repeat Round 2 until your project measures approx. 10 inches (25.5cm) from the top edge of flower square.
Round 3: Purl
Round 4: KFB each stitch around (152 total sts if completed as written)
Round 5: Purl (152 total sts)
Round 6: Knit
Repeat Rounds 5&6 until your project measures approx. 20 inches (50.75cm) from the top edge of flower square.
Drop Base Color 1 and pick up Accent Color 2 yarn.
Bind off using the Picot Bind off method.
Resource for Picot Bind Off: https://melodys-makings.com/how-to-knit-picot-bind-off/
Straight Needle Instructions
Cast on 38 additional stitches.
Row 1: Purl each of next 48 sts, Pick up and purl 18 sts along the bottom edge of flower square, Purl 10 remaining sts off of stitch holder (76 total sts)
Row 2: Knit
Row 3: Purl
Repeat Rows 2&3 until your project measures approx. 10 inches (25.5cm) from the top edge of flower square.
*Stop when your project gets long enough to check your size measurements. Your project should measure approx. 19 inches (48.25 cm) in width at this point.*
Row 4: KFB each stitch across (152 total sts if completed as written)
Row 5: Knit (152 total sts)
Repeat Row 5 until your project measures approx. 20 inches (50.75cm) from the top edge of flower square.
Drop Base Color 1 and pick up Accent Color 2 yarn.
Bind off using the Picot Bind off method.
Resource for Picot Bind Off: https://melodys-makings.com/how-to-knit-picot-bind-off/
Cut two strands of yarn approx. 30 inches (76.25cm) long and pull them in a loop through the top corner of your trapezoid section. Pull the ends of the yarn through this loop (this attaches the yarn without any knots, and makes your project look smoother). Separate the yarn into three sections and braid them to desired approx. 12 inches (30.5cm) in length. Secure and cut yarn evenly on the ends. Repeat on the other side of the trapezoid as well. These braids act as your halter top ties.
Repeat flower instructions and seam to a long braid to use as tie-back headband.